Pick Your Crimp Tool
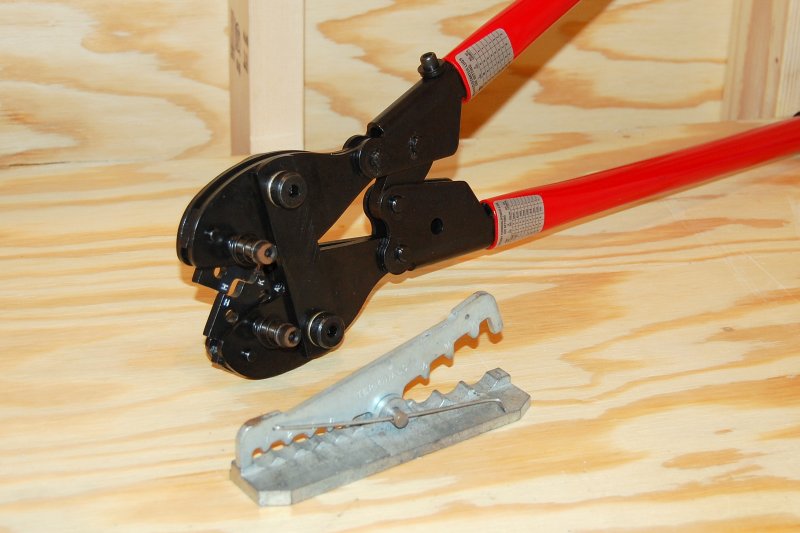
FTZ 94284 & Ancor Hammer Crimper
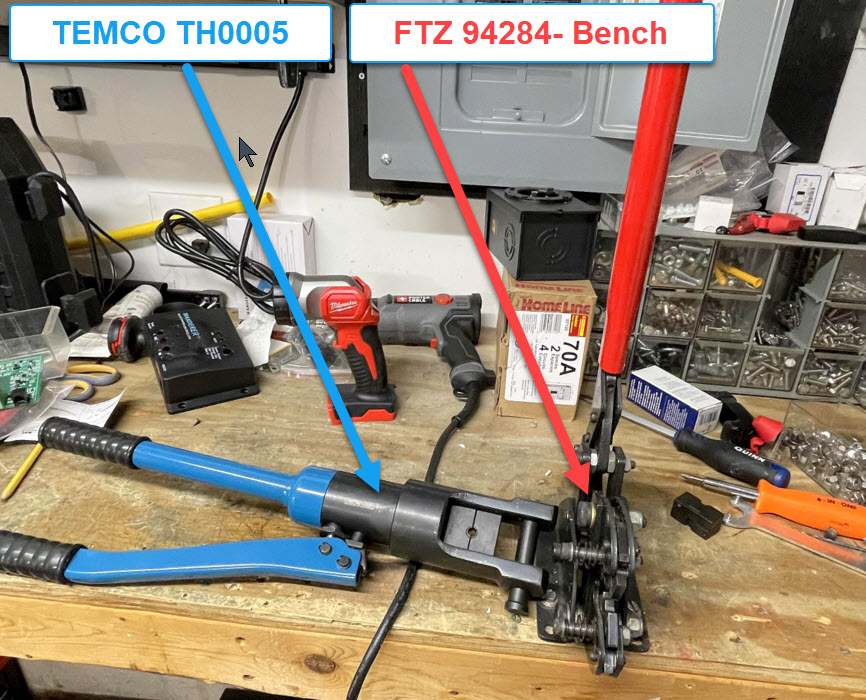
TEMCO TH0005 & FTZ Bench Mount

BUY FTZ 94284 CRIMP TOOL – BAY MARINE SUPPLY
BUY FTZ HEAVY DUTY MARINE LUGS – BAY MARINE SUPPLY
WHAT ABOUT HYDRAULIC CRIMP TOOLS?
As paid Pro’s, we have tested at no less 25 different hydraulic tools. We don’t use them in the field. Why?
1- Because they are slow and time is money when you are a paid professional.
2 – 98% of these hydraulic tools are using the wrong sized dies even though they lie and stamp “AWG” on the dies.
3- There are just too many dies to lose.
Is there a Hydraulic tool you recommend?
The only hydraulic tool we have tested that works well and has correctly sized dies are the TEMCO’s, but, the Temco tools do not make a “box -crimp”.
BUY TEMCO & FTZ Lug Crimpers- AMAZON
We own both the Ancor hammer crimper and the FTZ 94284, as well as many others. The FTZ 94284 makes a beautiful “Box-Crimp”as required by ABYC. A box crimp is a 360 degree crimp that is extremely solid. In testing we’ve conducted here at Compass Marine Inc. an FTZ made crimp tool exceeds US MIL Spec! A full 360 degree crimp makes a truly cold formed/gas-tight connection between the wire and the lug .
We are only showing the Ancor “hammer-crimp” tool as an example of an emergency use tool kind of like your spare tire. Good to have as a spare that you can carry on-board for emergencies but no where near the quality of the FTZ rotating die crimper. The FTZ is just that much better for not that much more money. The Ancor tool makes a dimple-crimp which can damage conductors, and still not make the best electrical connection. When you’re crimping cables that will start 800HP diesels there is simply no room for a cheap dimple- crimper in the tool box.
I consider the Ancor tool an emergency, get you home, tool. Nice to own if you have extra boat bucks floating around but not a tool I’d ever reach for for my own boat or professional primary wiring.
Marinco claimed/claims this tool makes a UL crimp. However, when I called and asked them to furnish documentation of this, or any other testing, there was a complete lull in any data coming out of them. I made three calls and got nothing out of Marinco.
If someone can get this UL documentation, or any legitimate testing data from Ancor/Marinco on this tool, please forward it to me.
As I always say;”Tools are free, when you DIY”
When you figure that an Ancor hammer crimper would cost you nearly $80.00 and the cost savings in battery cable from a place like Genuinedealz.com is so huge that the high quality crimper is almost no additional expense. This is man math at its best. Do not run this scenario by your spouse.. (grin)
The FTZ 94284, is the non-ratcheting version of this crimp tool. This is an excellent “value” tool that I’ve used & tested extensively.
PLEASE HELP!
This site is 100% reader supported. My wife is urging me to shut it down as it just keeps costing us money. My stroke-recovery, PT & OT is very costly, & not covered by insurance as is authoring this site and keeping it secure. Click BUY ME A COFFEE if you want to help support this site.

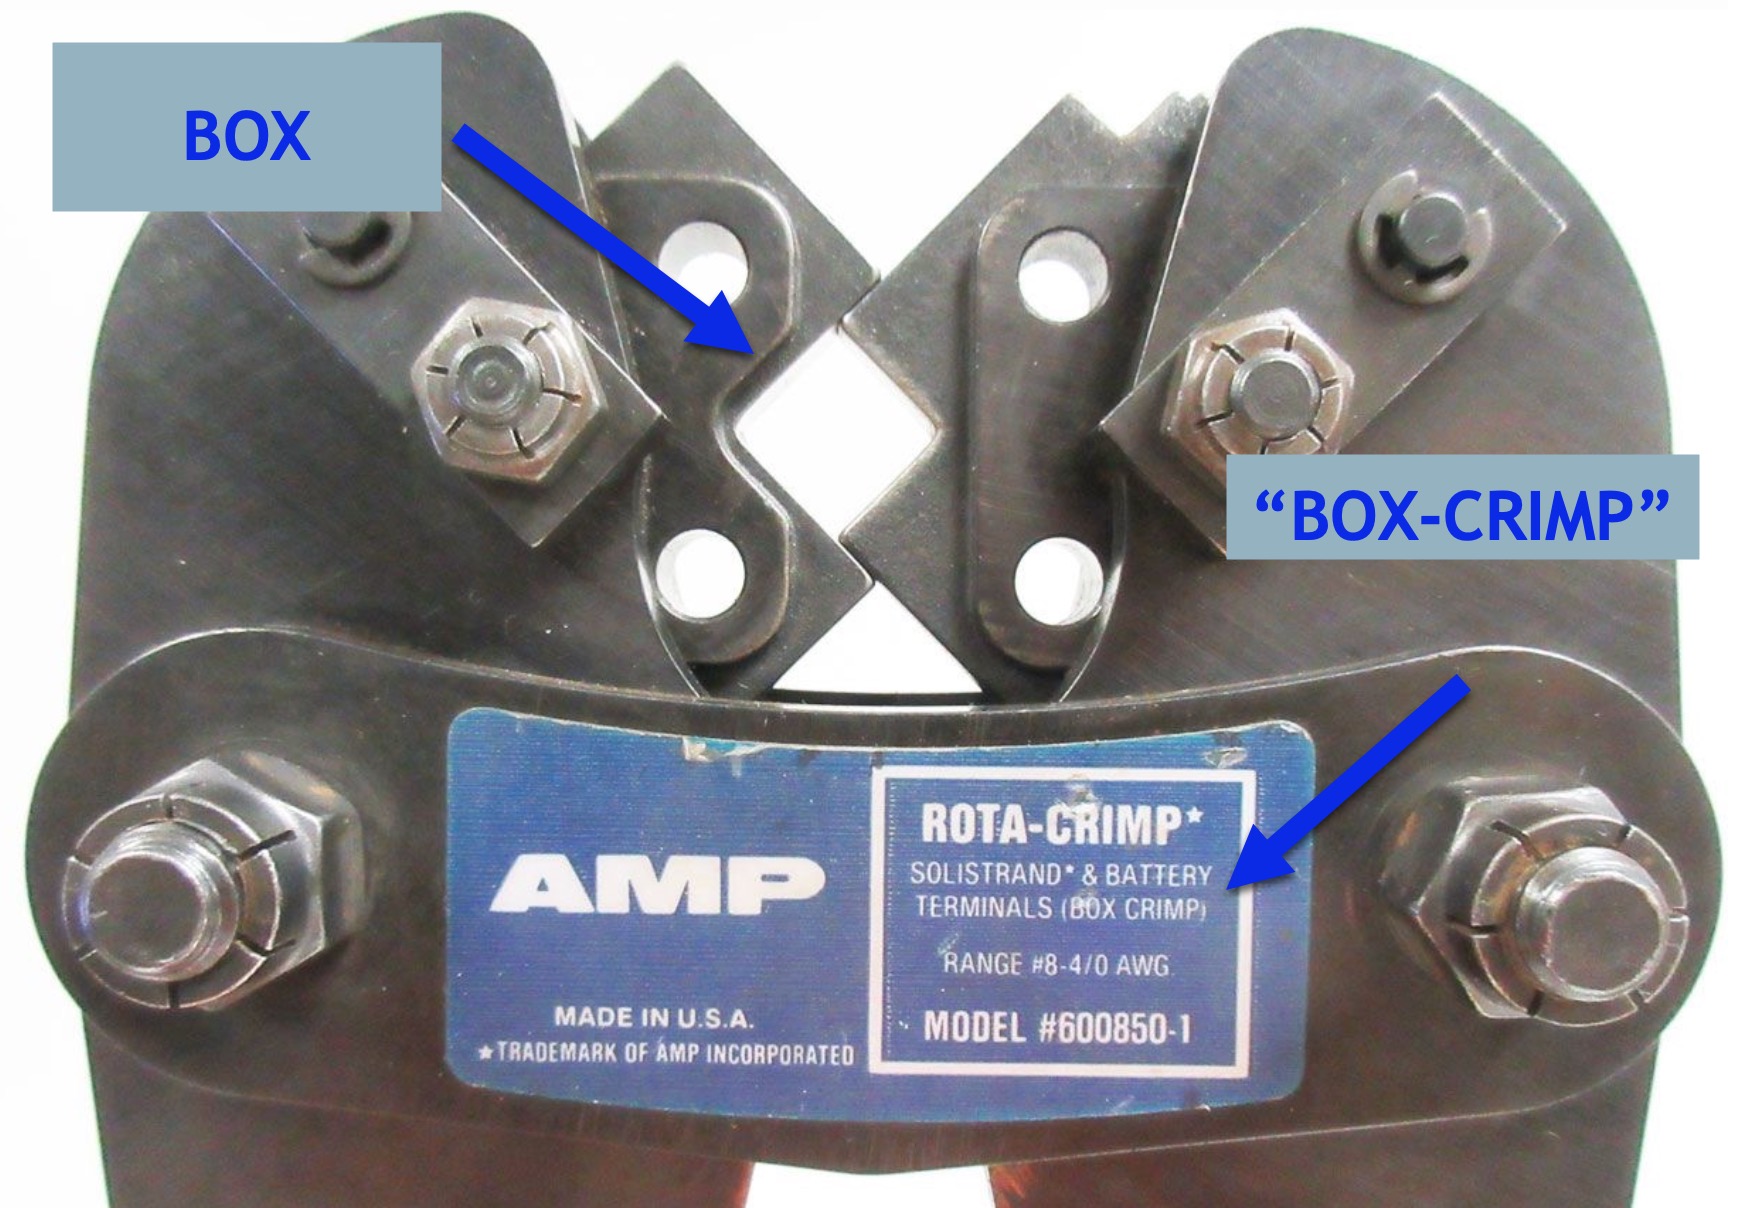
The FTZ & AMP Rota-Crimp Tools
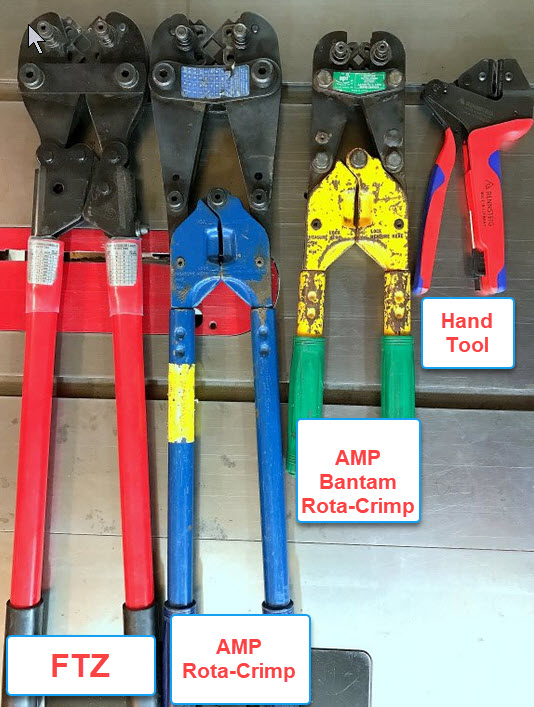
So why is it that I believe the FTZ 94284 lug crimping tool represents one of the best values out there for the DIY or even professional electrician? It’s simple, the FTZ 94284 is about as close as you’ll get to the industry gold standard AMP Rota-Crimp 600850 pictured here with the blue handles.
ABYC STANDARDS:
ABYC calls for a ” box-crimp” for battery lugs. As a matter of fact, I have taken the Electrical certification test at least four-times, maybe five, (re-cert every five years) and every time this has actually been a test question.
ABYC specifically call this out in the Electrical Training manual and in classes.
ABYC Electrical Certification Study Guide
The FTZ is an amazingly good deal. No one else has made a tool comparable to the AMP Rota-Crimp “Box Crimp” for anywhere near what the FTZ sells for. Sure, in pull testing, the AMP tools beat the FTZ slightly but the FTZ beats every competitors crimp tool I’ve tested it against. . It exceeds even Mil-Spec crimp testing requirements.
All one needs to do is a quick google search typing in; “AMP Rota-Crimp 600850” and you’ll see why the FTZ 94284 is an incredibly good deal. Yes, the FTZ 94284 is now made in China, it used to be made in the USA, but in order to deliver value, and hold price, FTZ moved production overseas.
If you desire the crimp consistency, pull out strength, repeatability & overall crimp quality the FTZ delivers you’d need the AMP tools. Yes the Rota-Crimp tools are made in the USA, yet at a price of $1200.00 to $2000.00+ depending upon the source. Ouch!! Sure I love my Rota-Crimp tools & I paid dearly for them, and I use and abuse the hell out of them, but the FTZ is no slouch at all.
Pictured from bottom to top are our:
FTZ 94284 (6GA to 4/0)
AMP Rota-Crimp 600850 (8GA to 4/0)
Amp Bantam Rota-Crimp 601075 (8GA to 1/0)
Rennsteig Hand Held Crimp Tool – Red, Blue Yellow Insulated Terminals (for size comparison only)
Pick Your Lugs
This battery lug is the wrong size for this starter motors terminal post.
A Correct Fit
This lug is the correct size for this stud.
Flared Starter Lug vs. Heavy Duty Power Lug
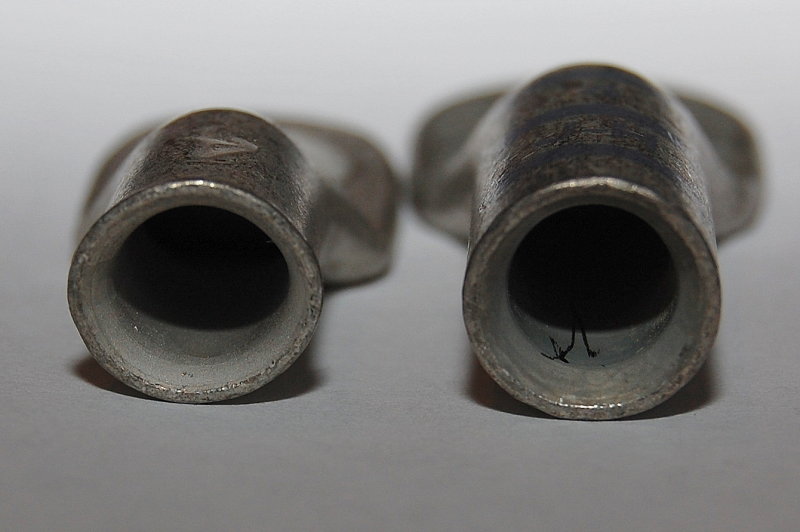
Okay this is where it gets confusing. There are many different lug or terminal standards. The two most common for marine & trucking use are commonly referred to as the Flared Starter Lug, as seen on the left, and the Heavy Duty Power Lug, as seen on the right.
Different manufacturers have slightly different names but FTZ calls them Power Lugs and Quick Cable calls them Magna-Lugs. It is important to note the lug on the left is for 4 GA wire and the lug on the right is also for 4 GA wire.
IMPORTANT: These two lugs use DIFFERENT DIES. When buying a crimp tool please be very careful to choose the correct tool. There are many tools out there marked for 6 GA to 4/0 GA wire that will not work correctly with these terminals and do not come with the proper dies.
When you buy a substandard or incorrect tool you are then left guessing which dies to use for the flared starter lugs and which tool for the heavy duty lugs.
The correct tool will have labels for “Flared Starter Lugs” and for “Heavy Duty Power Lugs“. There are only two relatively affordable tools I know of which meet this lug crimp standard and they are the FTZ and the Quick Cable crimp tools. Most of the other tools out there are made for the industrial lug standard or made by off-shore manufacturers for use with metric wire.
Heavy Duty Power Lugs will always be marked with a color code and have two letters embossed or stamped into the lug. If your heavy duty lugs do not have these colors and letters they are very likely not the proper size for the dies.
Many People have asked me where they can get FTZ lugs from. The answer is: Bay Marine Supply – FTZ Products (LINK)
Flared Starter Lug vs. Power Lug
Flared Starter Lugs and Power Lugs are very different. The heavy duty lug on the right is significantly more robust and has a significantly thicker copper wall. There is no flare at the end of a heavy duty lug because they actually machine-bevel the edge. Due to the power lugs thickness it does not need an external flare like the less expensive & less robust flared starter lugs do.
Even without measuring these lugs one can visibly see that there is no way to apply a “one size fits all” die to both of them. Tools that do not list the proper die selection for both flared starter lugs and heavy duty power lugs should be avoided.
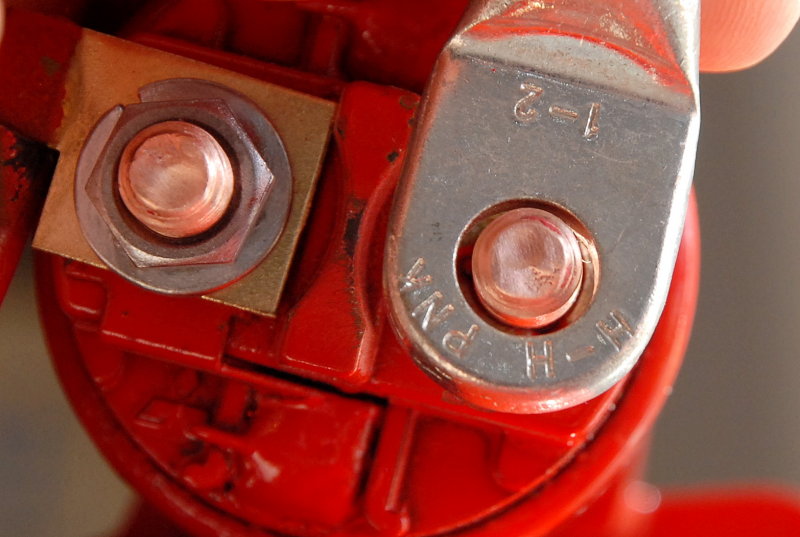
Power Lug Die Settings

Let’s look at the settings for the 1/0 Heavy Duty Power Lug that you’ll see crimped later in this article. The chart shows that you pick the lug with BLACK markings and adjust the dies to “E” and “A“.
NOTE:
With a 2 GA wire and a heavy duty power lug the “H” & “H” dies and pink color code are selected.
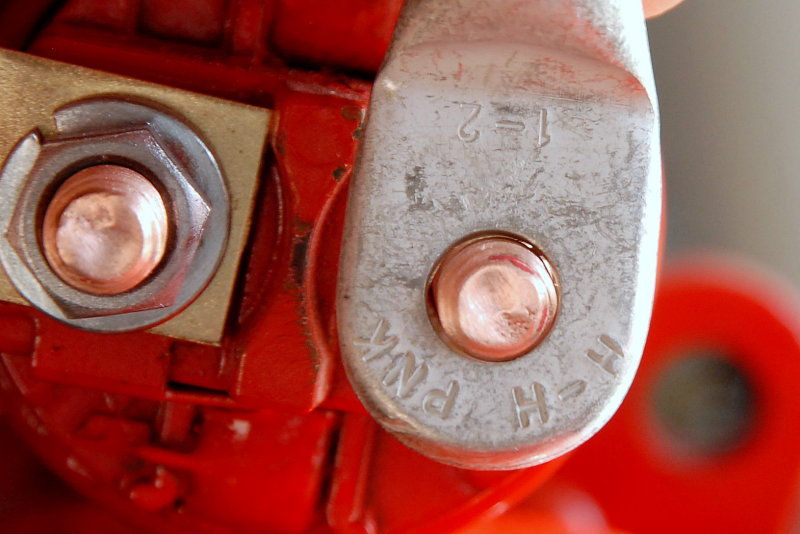
Flared Starter Lug Die Settings
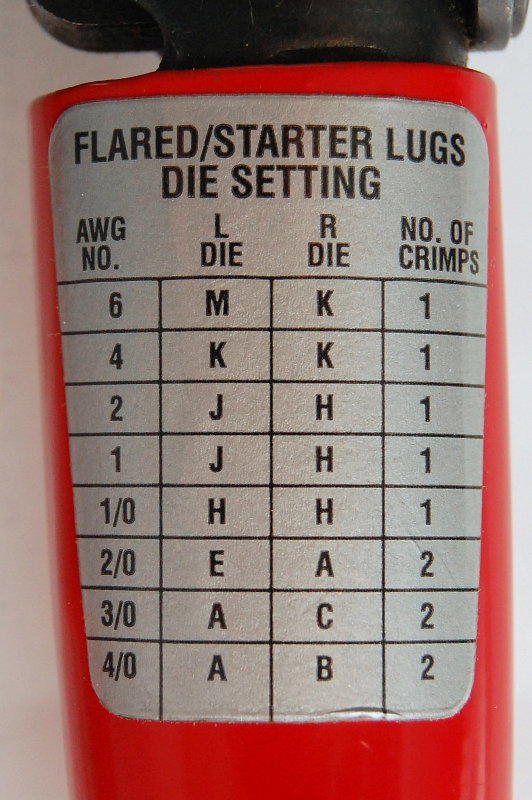
These are the die settings for “Starter Lugs“. In the last image, for Power Lugs, a 2 GA wire took “H” & “H“/pink. You’ll see here that a 1/0 wire using a Flared Starter Lug takes “H” & “H“. This is due to the smaller OD of the Flared Starter Lug as a result of the thinner walled copper used to make the lug..
That is a two whole die size difference due to the quality and raw thickness of the lug. Same wire 1/0 vs. 1/0 but two whole die settings apart. Be very careful to not to confuse flared starter lugs with true heavy duty lugs.
Once again, true heavy duty power lugs will be both color coded and die stamped. Starter lugs are flared at the end and simply marked with the wire gauge.
I personally try and use the heavy duty power lugs when I can but there are some applications where their larger and thicker form factor is a poor fit. There are good applications for both flared and heavy duty lugs. In a high vibration environment, such as an engine, the heavy duty lug is usually the better choice.
Lug & Die Marking / Settings

Industry standardized battery lug crimpers such as the Amp Rota-Crimp, Quick Cable Tools and the FTZ have the die settings and the number of crimps required stamped on the crimp tool themselves. When you use quality marked Heavy Duty lugs like those by FTZ, Quick Cable etc. they will have all the information clearly marked on them as well.
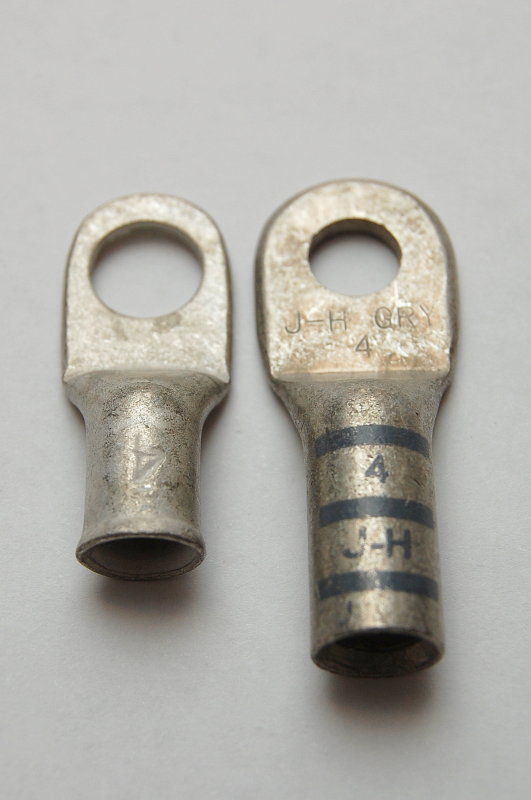
Cheap Lug vs. Quality Lug
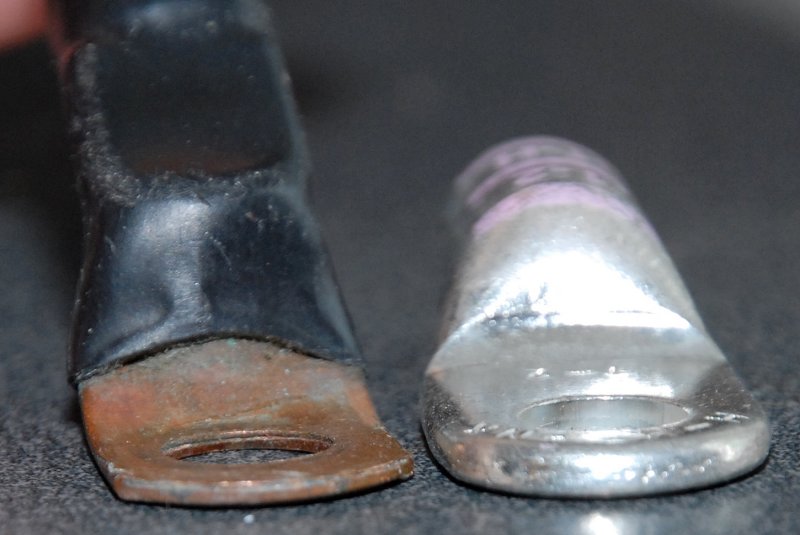
Not all battery lugs are created equal. The lug on the left was purchased at an auto parts store and is cheap, thin & made of un-tinned copper.
The lug on the right is made by FTZ Industries, generally a higher quality product, and is thick tin plated copper. This FTZ lug is a solid connector with no voids or openings.
Anatomy of a Poor Termination

In just this one photo we have;
- Lack of adhesive lined heat shrink
- Bare copper wire
- A battery cable that does not meet the UL Marine spec for stranding
- Oxidation already beginning, too much exposed copper from the wire stripping and a
- A poorly executed hammer type crimp
- Over-crimping
While this fitting did and does work the question would be for how long, and when, not if, it would have let you down? This cable was only two seasons old, located in a very dry area of the vessel and yet was already beginning to oxidize.
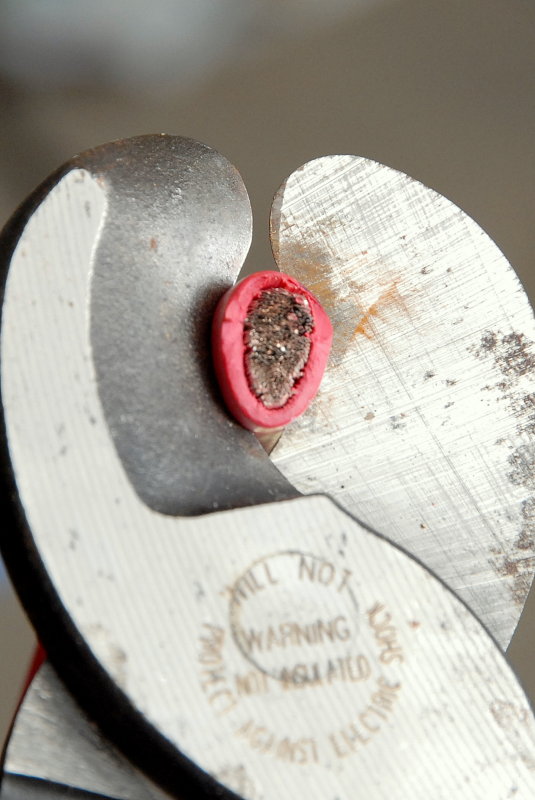
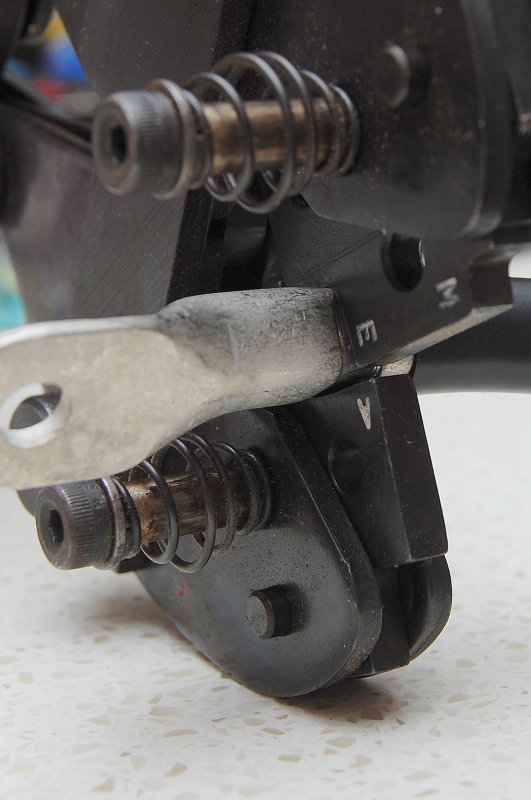
Crimp Dies
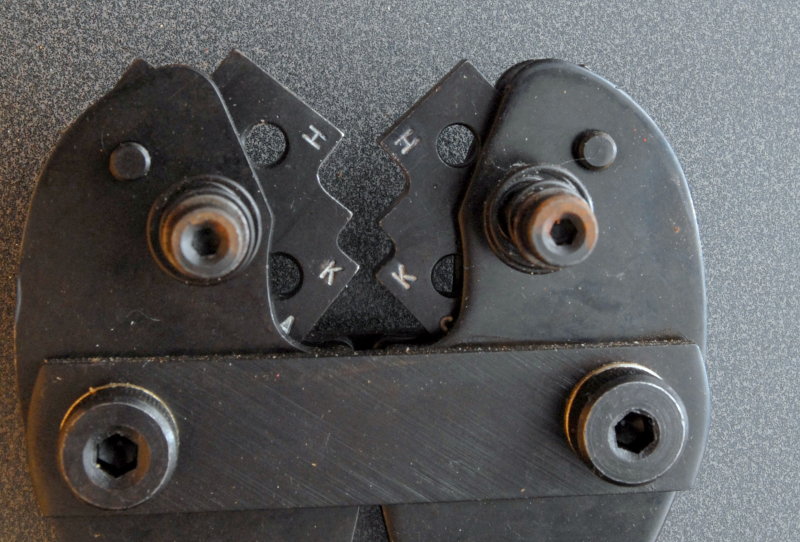
This is the head of the FTZ lug crimper. It compresses the lug in a circumferential manner (360 degrees) making the entire lug smaller and thus creating a true cold formed connection between wire and lug.
Proper crimps create to little to no resistance. A poor crimp can be a point of resistance and heat generation.
The die heads also have letters marking them. Each of these heads rotates and there are dies from 6GA to 4/0 wire.
Check for Strip Depth

To get a rough idea how far back to strip the wire simply lay the wire next to the lug and mark it with a pen or pencil.
Make A Clean Cut
The tools they have at the marine store are often dull and cheap. It’s a good idea to clean up the end before you begin your connection. I used my Klein High-Leverage Cable Cutter’s Part No. 63050 to cut this 2 GA cable and they work OK for this.
A Clean Cut
Good quality tools make nice clean cuts.
This Tool Also Works
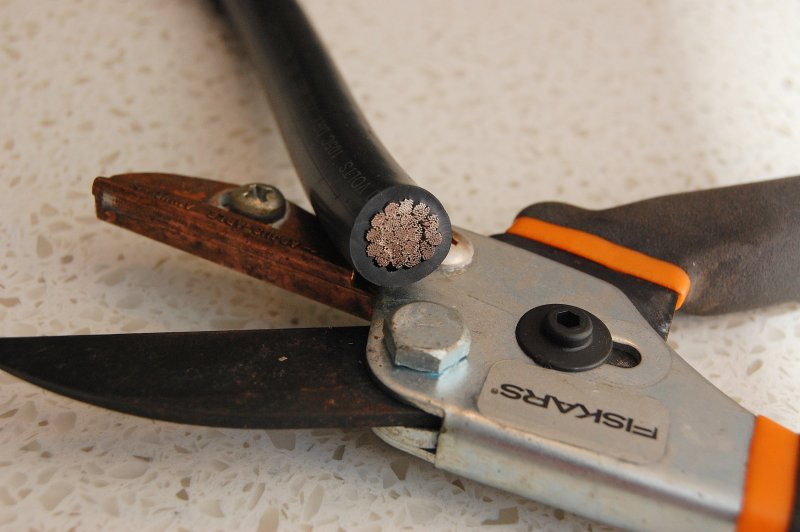
Don’t tell my wife I stole her Fiskars Anvil shears from the garden shed. Laugh all you want but these anvil shears work amazingly well for both stripping the wire, if you’re careful, and for cutting it. I have cut up to 4/0 but it is more comfortable cutting 3/0 and smaller. They costs about $12.00 at Home Depot.
These Fiskars Anvil Pruners are very often my go-to tool for cutting and stripping large GA battery cable. I go through about two pairs per year but overall they cost less than large wire cutters that also go dull and need replacement. The prime reason I like them is because they also fit neatly into my tool bag. I’ve found them on-line for as little as $9.00….
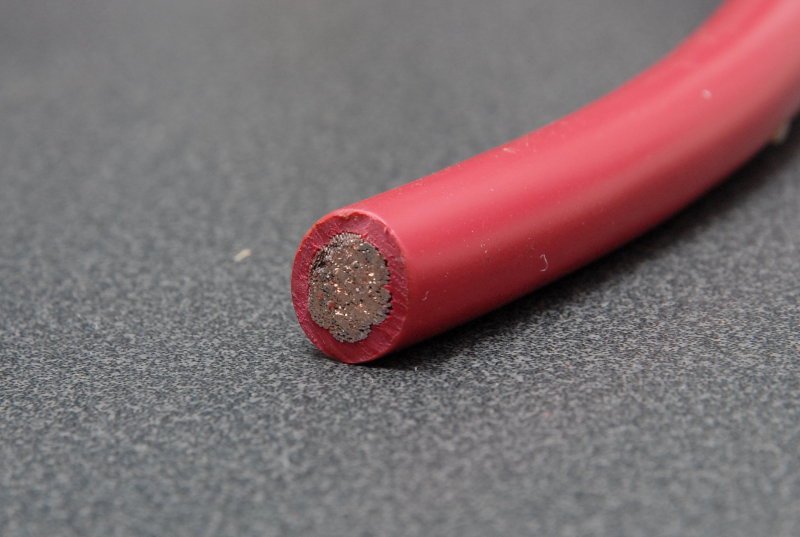
Strip The Wire
To strip the battery cable simply close the wire cutters around the jacket and make a circle. Do not press to hard or you will damage wire strands. If you look closely you can see that none of them have been cut. There are many ways to strip battery cable I just find this one, with a little practice, to be the quickest and easiest. I think the Fiskars do a better job and that is what I use most often.
My only suggestion here is to use proper wire cutters similar to the ones pictured or use the Fiskars. In this photo I’ve chosen to use my Klein High-Leverage Cable Cutter’s Part No. 63050. They cost about $20.00 at Home Depot.
Chanel-Lock also makes a set that are slightly less money but nowhere near as accurate and they dull quickly .
Klein Tools are fairly high quality and will hold an edge for a long time when compared to products like Chanel-Lock. The right tool, for the right job, is always well worth the expense, unless of course you discover a real bargain like the Fiskars tool..
Using a set of Diagonal Cut Pliers or Dykes, as they are often called, will not make as clean or as nice a cut, or strip, as well as a set of cable cutters or the Fiskars.
Test Depth = Incorrect Fit

Here I’ve stripped the wire and inserted it until it bottomed out in the lug. I went a little overboard here for illustrative purposes. This insert dept of stripped wire is simply too long.
Test Depth = Correct Fit
I’ve trimmed some of the wire off, with my Klein cutters, and re-inserted it. The insert depth fit is now ready to be crimped.
Install Shrink Tube
TIP: Depending upon your battery lug and wire size your chosen adhesive lined heat shrink tube may not fit over the lug after it has been crimped. Simply slide the heat shrink tubing over the wire before you make the crimp. I usually cut my heat shrink to about 2.75″ inches long so it’s long enough to be labeled..
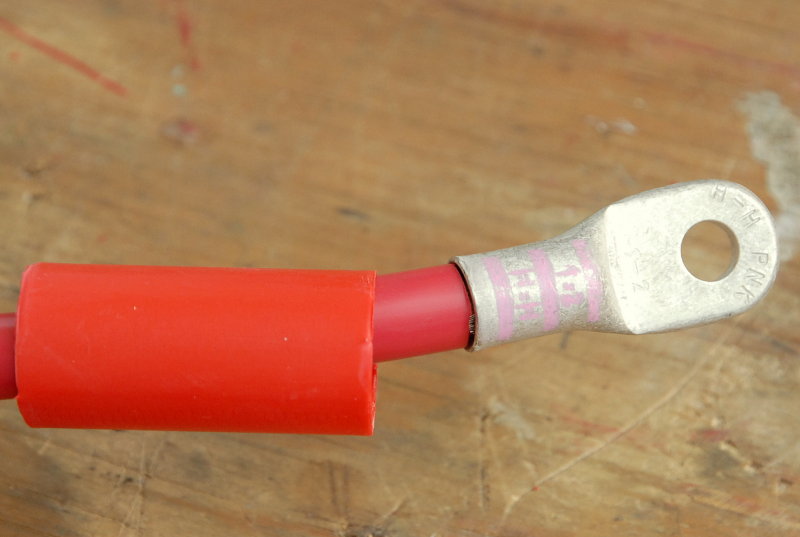
Crimp Position

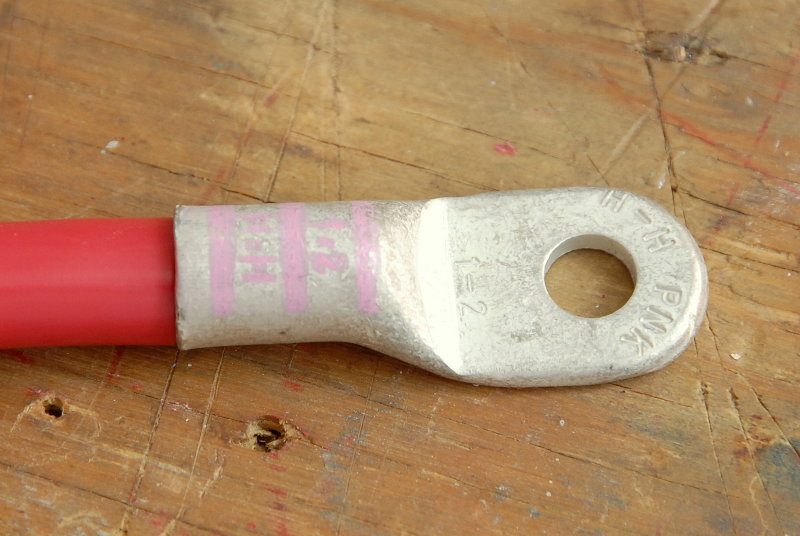
This FTZ Industries battery lug is industry standard black color code for 1/0 wire and is embossed with the letters E-A for the die settings.
This E-A embossing tells you the correct dies to use when crimping with industry standardized crimpers. The industry gold standard crimper for battery lugs is the AMP Rota-Crimp tool. While there is no standard that I can find for lug crimping tolerances the Amp is the tool of choice for many professionals. Unfortunately this tool costs well over $1000.00 and mine is at the bottom of Casco Bay somewhere. D’oh ! For the price I replaced it with the FTZ but it has proven excellent so I’ve yet to purchase another AMP Rota Crimp.
FTZ makes own tool, which is significantly less money than the AMP, yet uses the same rotating die standard with the same letter codes as the AMP tool. I’ve crimped Ancor, FTZ, Quick Cable and AMP lugs with the FTZ crimper and it works equally well on all those lugs.
In the photo there are two positions separated by black stripes where your crimp tool is to make two separate crimps. In this picture I am in the position to make the first crimp.
Make The Crimp
Technically, with battery lugs, the first crimp should be made at the end of the lug closest to the wire. The second crimp is then made closest to the hole. I have done it backwards and never had a problem. This is backwards from the way industrial compression lugs are crimped. With industrial lugs you start at the stud hole end and work towards the wire. I have even seen some battery lugs marked backwards and others marked forwards. I guess if the industry can’t agree why should we really care.
The reason it’s suggested to crimp the wire end first, with battery lugs, is to keep the wire jacket distance from growing away from the lug. You’re applying adhesive heat shrink so a little gap is no big deal.
With the diamond crimp tool you can develop sharp edges on the non-rounded part of the die. In order to alleviate this I consulted with both FTZ and Quick Cable and decided to do two crimps in each spot.
Make the first with the lug parallel to the crimp head then, as seen here, flip it 90 degrees or vertical and make one more crimp in the exact same spot. Doing this rounds over all sides making for a very neat and tidy crimp under the heat shrink. While not entirely necessary it does make for a neater and more professional looking job.
Round Side / Sharp Side

When the lug is crimped once it has two nice rounded corners and two pointy corners. By flipping it 90 degrees and making a second crimp you now have four nicely rounded corners on the lug. Simple & easy..
First Crimp Done

Here is a look at the first crimp after double crimping it, rotating it and rounding all corners.
Finished Crimping

The finished crimp is well executed and well formed. The FTZ crimp tool actually reduces the diameter of the lug similar to swaging standing rigging. The Ancor hammer crimper simply distorts the lug and puts a dimple in it.
It Makes A Beautiful Lug
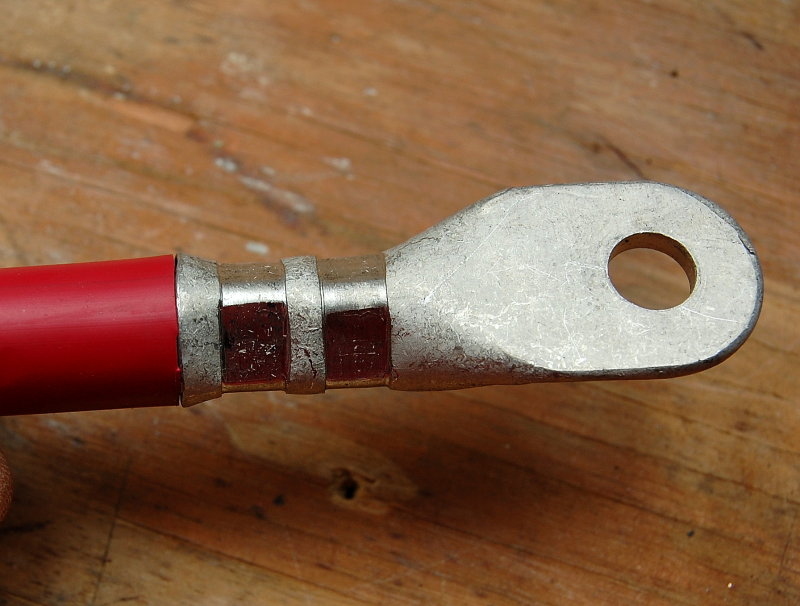
Again here is a positive battery cable & lug made with the rotate method so all corners are nicely rounded. You can see how it physically reduces the OD of the lug.
NOTE: This tool makes such a perfectly crimped lug that when I experimented and tried to also solder one, after crimping, no solder would flow beyond the first crimp band. This crimp tool makes a completely water tight and solder tight joint. In the aerospace industry they refer to this as a “gas tight” crimp.
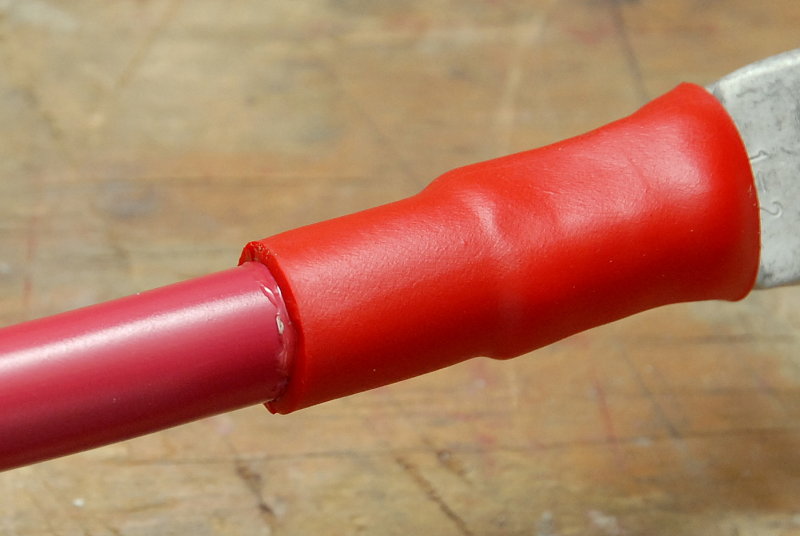
Slide the Shrink Tubing Into Place

The heat shrink tubing is now in place ready to have the heat applied.
Adhesive Lining
When heat shrinking battery cable it is always best to use an adhesive lined product designed for heavy duty use. This is commonly referred to as Dual Walled Heat Shrink. By doing so you create a hermetically sealed connection that will allow no water or moisture to corrode or damage the crimped fitting.
You also need to ensure that the adhesive melts out of the ends of the shrunk connection. If you do not see the glue leaking out, as you do in this photo, continue with your heat gun until you do. Remember to heat evenly..
The Finished Product

This is what your work will look like when done.