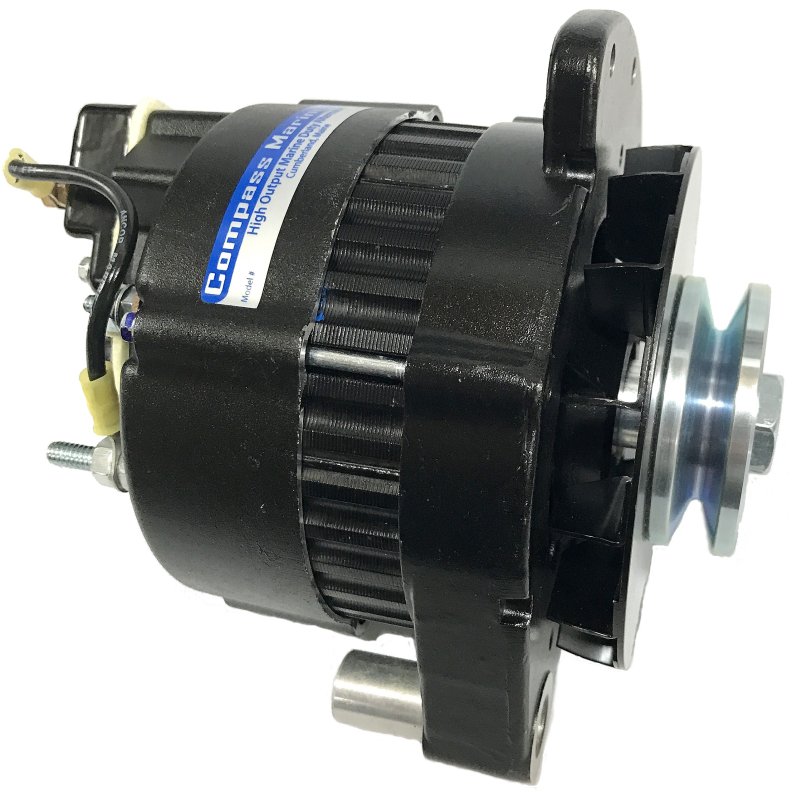
A Stock Leece-Neville 8MR Alternator
Many boats, both power and sail, come equipped with, or have have used, the 5″ small-case Motorola/Prestolite/Leece-Neville style alternator. There are literally thousands of these alternators out there. Even large Caterpillar and Cummins engines have used the 8MR alternators.
This Motorola style alternator is currently still being manufactured by Leece-Neville and they are a darn good small frame alternator, for their size.
Warning:
Be careful buying your LN alternator. There are many shifty / shady on-line retailers selling clone 8MR’s, including Catalina Direct. that are not genuine Leece-Neville and they are nowhere near the same quality. If you intend to use one of these on a boat with an external regulation kit make sure you have a genuine Leece-Neville.
Buy A Genuine Leece-Neville 105A alternator
Important:
Leece-Neville 8MR alternators do not ship with pulleys or the 1″ to 2″ fit kits(LN Part # 118-2) that make them work with most marine engines. These fit kits are getting hard to find but with enough google-foo you can find them. These alternators also use an odd-ball 5/8″ shaft size. The pulley in the link above fits all 5/8″ shat Leece-Neville alternators and is for a 3/8″ belt.
Leece-Neville Accessories needed in addition to the alternator:
3/8″ Belt, Single V, Billet Machined Pulley for a 5/8″ shaft (in Link above)
1/2″ Belt, Single V, Billet Machined Pulley for a 5/8″ shaft (discontinued)
1″ to 2″ Leece-Neville Fit-Kit PN118-2
8MR External Regulation Kit (Discontinued )
Edit:
6-1-23: We have approx 24 of these kits left and a few custom machined 1/2″ pulleys. The ER kits are $70.00 (shipping included) to the 48 contiguous states (not AK or HI). Billet machined 1/2″ belt pulleys are $60.00 + shipping. Email us if you want one. These pulley were custom machined for us they no longer exist.
email: compassmarineservices at gmail dot com
The 8MR series is available from 37A to 105A & available in a 2″ single foot or a 1″ single foot. Some models are a single adjuster ear and others come with a universal ear configuration. The regulators though are all the same old design. While many modern alternators including Denso, Delco, Valeo, Mitsubishi, Hitachi, Paris-Rhone, Bosch etc., use an internal thermistor circuit to reduce voltage as the alternator heats up, for self preservation, the 8MR series does not. Install these alternators on a large enough bank and they will literally cook themselves.
The voltage regulator, that comes equipped on certain new 8MR series alternators, feature an adjustable voltage but they are still only single-stage (really a two stage BULK & ABSORPTION) not a three stage regulator with no temp protection at all. The stock internal regulator lacks temp protection, A float STAGE and a myriad of other features external smart-regulators can offer. This regulator has an adjustable output range from 13.8 – 14.6 V. They ships from the factory set at 14.2V.
In this article we’ll show you how to convert a Motorola/Leece-Neville 8MR style alternator to external voltage regulation. Once you’ve done this conversion you can then use a Balmar, Wake-Speed or other external P-TYPE smart regulator.
One of our favorite external smart regulators are the Balmar regulators. Why? Because Balmar offers more features and programming options than any other regulator on the market at that price point. They also have excellent tech support and answer the phone using human beings.
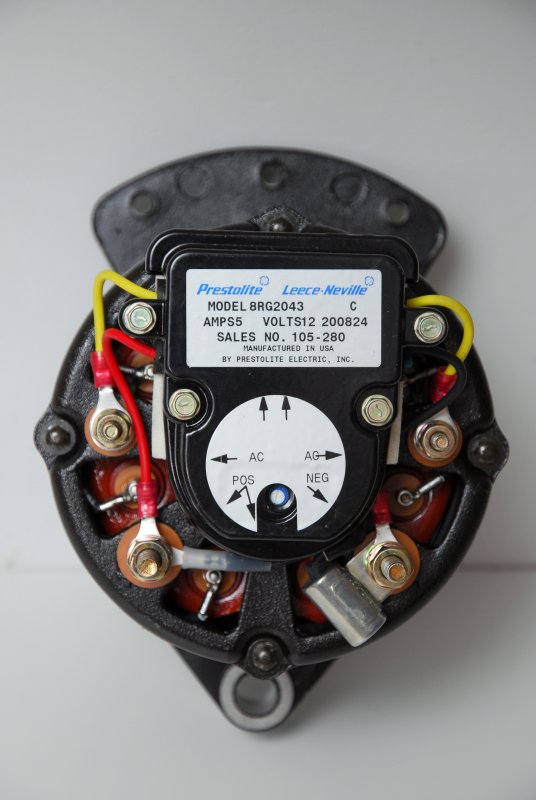
This particular alternator is a 105A Leece-Neville 8MR 2401UA. It features a 1″ foot and universal adjusting ear. It fits most Universal and Westerbeke engines (except those that use a a dual-foot 50A Mitsubishi alternator) as well as many others Such as CAT, Perkins etc..
Remove These Four Screws
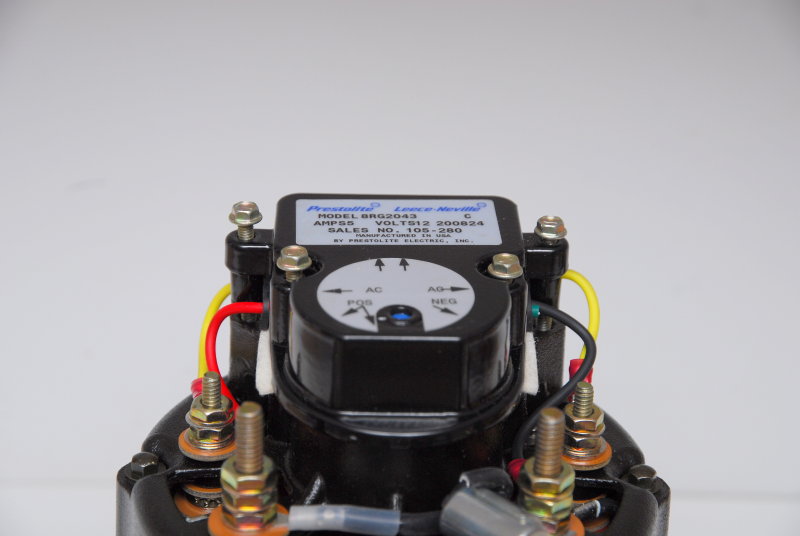
The first step in this conversion is to remove the four machine screws holding the stock-regulator onto the alternator. They are pictured here loose so it’s easy to see which ones they are.
Flip The Regulator Over
The next step is to remove the four wires that connect the voltage regulator to the alternator. For the 8MR-2070-TA this means one red wire, two yellow wires and one black wire. This is as easy and as straight forward as it sounds.
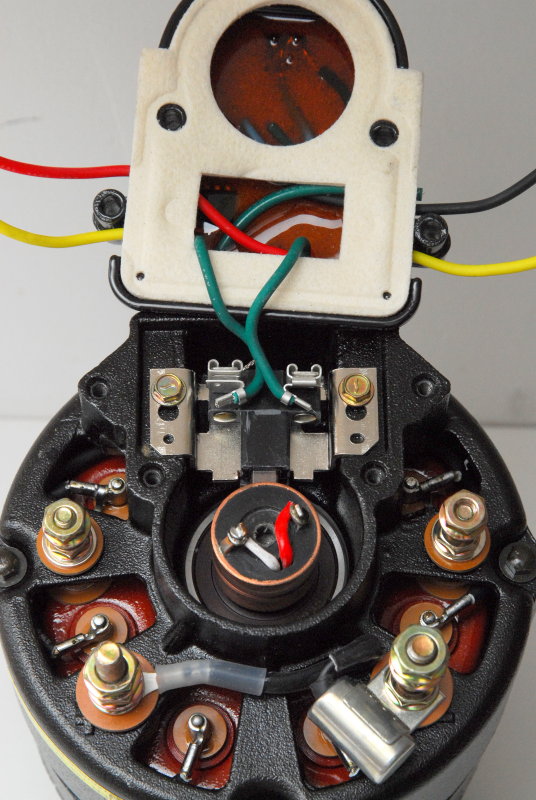
Once the wires have been disconnected simply tilt the regulator up to expose the internal brush connections. You’ll need a set of needle nose pliers to pull the connectors off the brushes. This is quite simple and takes about 20-30 seconds to complete.
Spark Arrestor Gasket
This gasket is what makes the factory 8MR ABYC & USCG compliant for ignition protection.
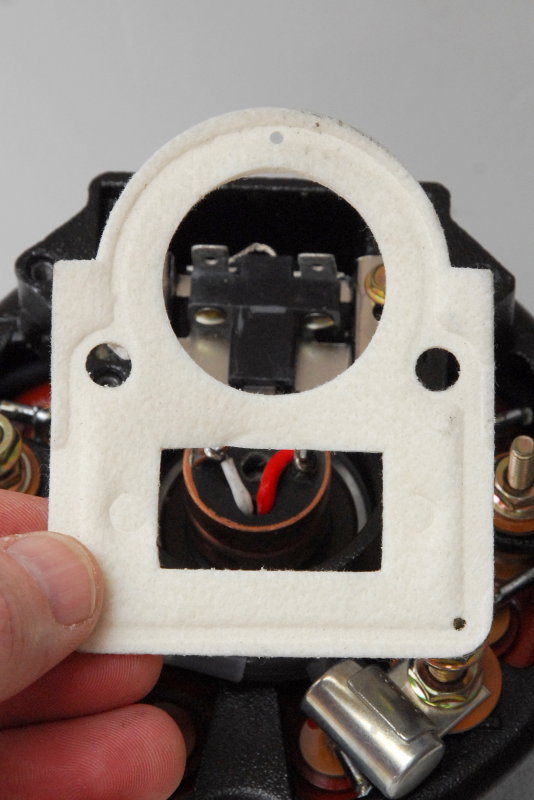
This gasket prevents errant sparks from the brushes from igniting any potential fumes and keeps the brush box sealed. With most diesel engines ignition protection is not technically required, but it’s still a good idea to use this gasket upon reassembly.
The External Regulation Conversion Kit
IMPORTANT: As of June 12, 2017 Compass Marine Inc. was notified that Leece-Neville has discontinued this external regulation kit. We spent an entire year tracking down every last bit of inventory, of these kits, and actually re-imported over 150 of them from Europe. We then talked Leece-Neville into doing one last production run for us before the machine was scrapped. This allowed Compass Marine Inc. to continue supplying these kits to our readers. The supply is dwindling.
Leece-Neville used to manufacture an external regulation conversion kit for the 8MR series of alternator. The original was a design done for Balmar and then, when Balmar discontinued the Model 81, they added the conversion kit to their product line.
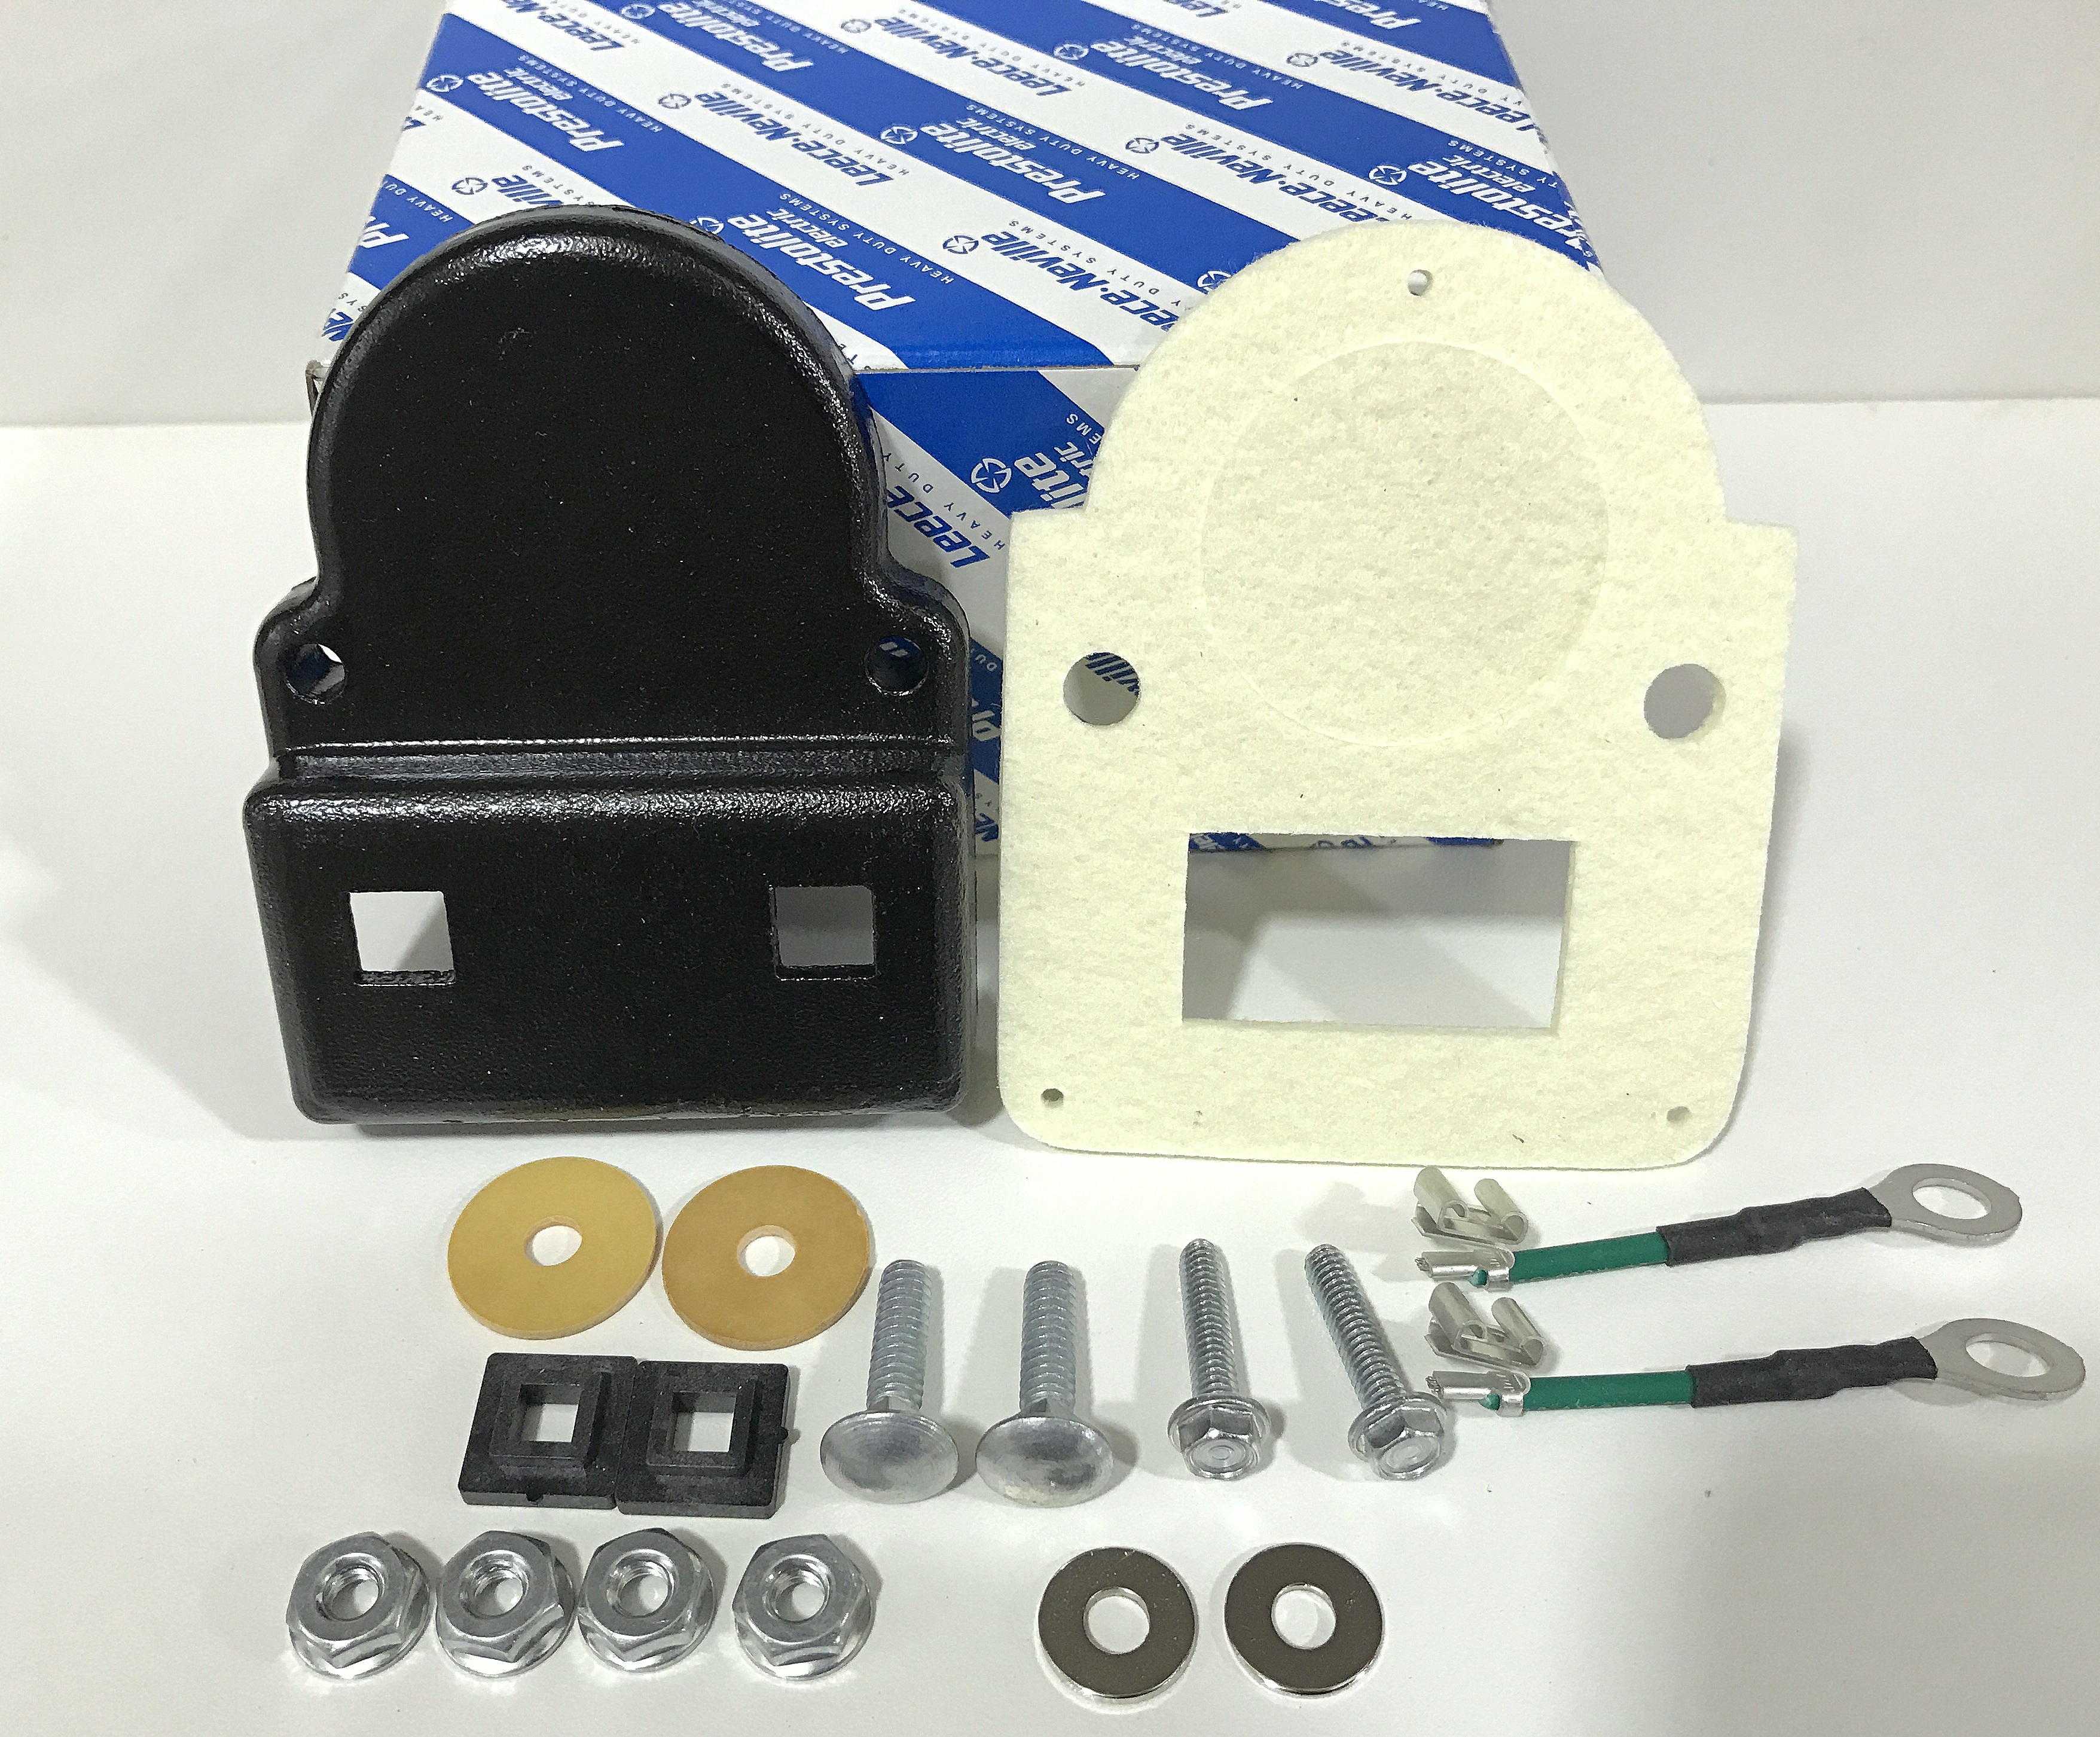
What’s In The Box
The external regulation conversion kit comes with everything you’ll need, including the wires, bolts and insulators, to make this a simple process.

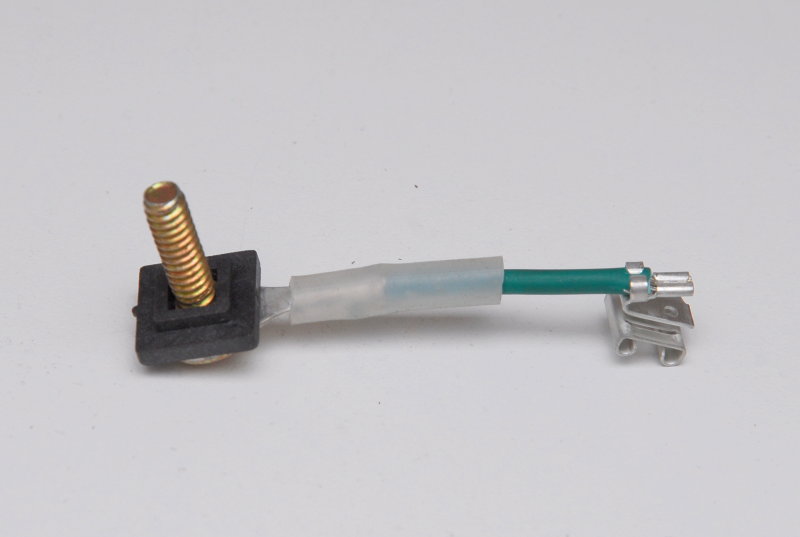
Step 1
The first step in assembling the kit is to slide the ring end of the wires over the carriage bolts as shown here.

Step 2
Now slide the black plastic insulators over the carriage bolts with the flat side facing the ring and the side with the smaller square facing up as shown.
Step 4
Because voltage & current is running through these wires it’s rather critical they be installed and insulated correctly. If the insulators are not installed correctly, you can literally create a dead short and ground out on the alternator case. This could ruin your day.
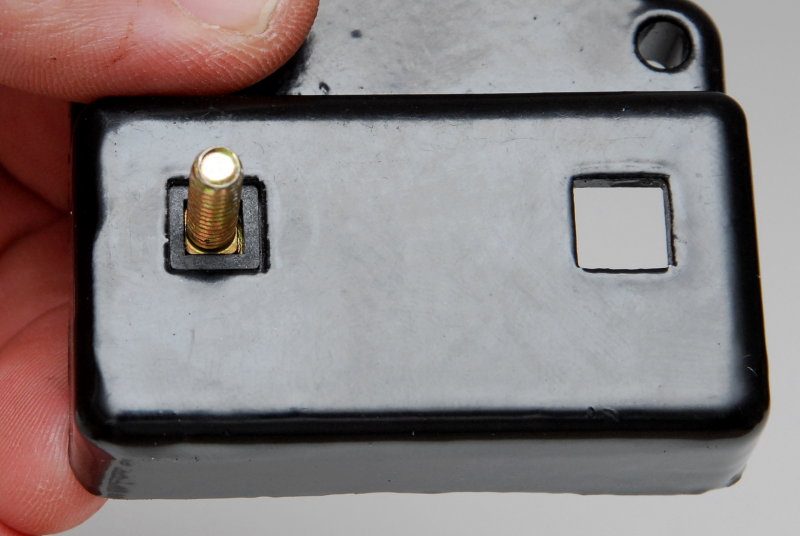
In this image the small square is properly oriented to prevent the machine screw from making contact with the cover plate.
Back Side View
Here’s what it looks like from the back.
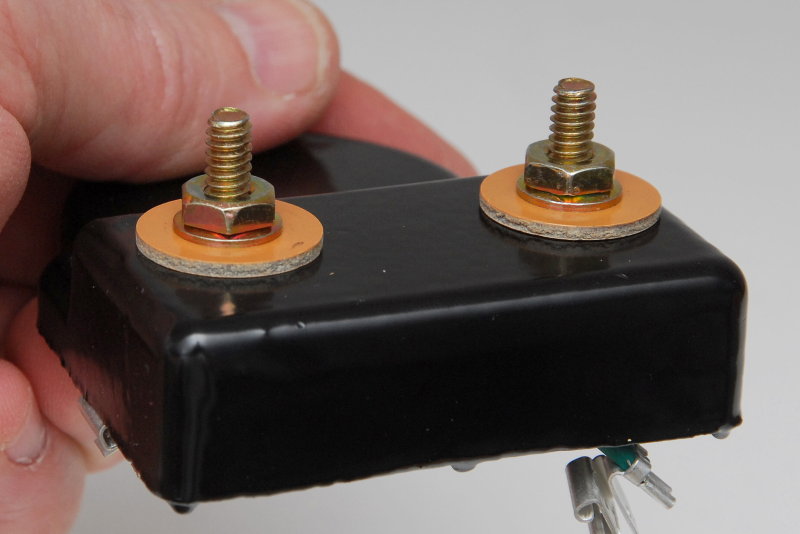
Step 4 – Install External Insulators
With the studs, and the internal insulators pressed in place install the large insulating washers over the studs. Next drop the two small washers supplied on top of the insulators, add the nuts and tighten them down.
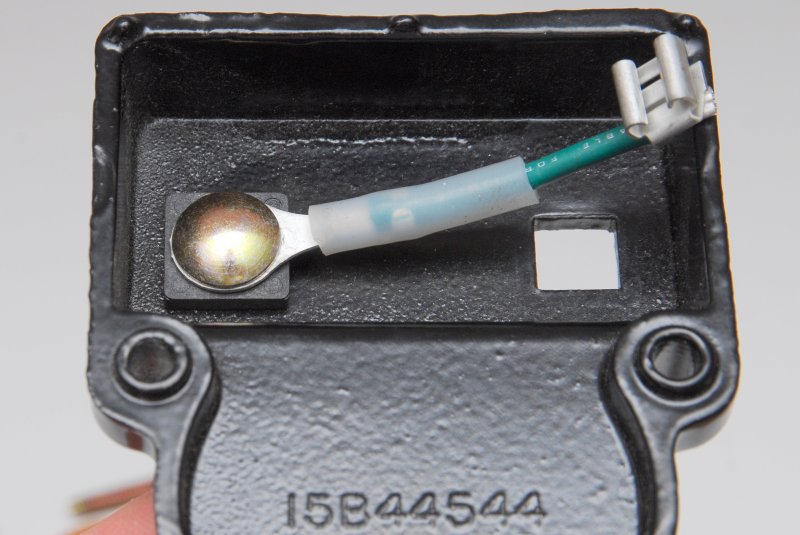
Inside View
Here’s the view from inside the cover plate with the insulators & studs installed & snugged tight.

Step 5 – Install The Spark Arrestor Gasket
Place the spark arrestor gasket over the conversion plate before connecting the wires to the brush holder.
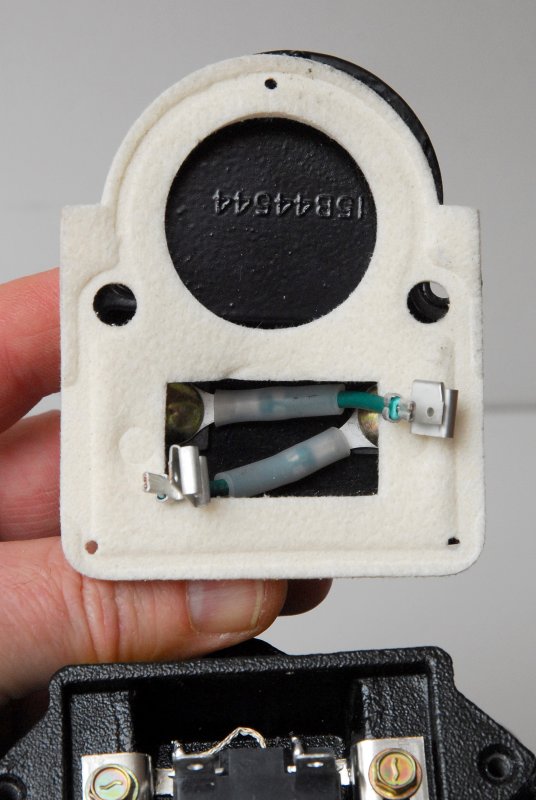
Step 6 – Slide The Connectors Onto The Brushes
Slide the contacts onto the brushes male studs, in the reverse order you removed the stock regulator wires. It does not matter which way you connect these green wires because one will become the field contact and the other will be connected to the alternators ground stud.

Step 7 – The External Wiring
One last detail you will need to do is to create a jumper wire from one terminal of the plate to the B- / Negative stud on the alternator. This is the black wire in the photo with the yellow crimped ring terminals.
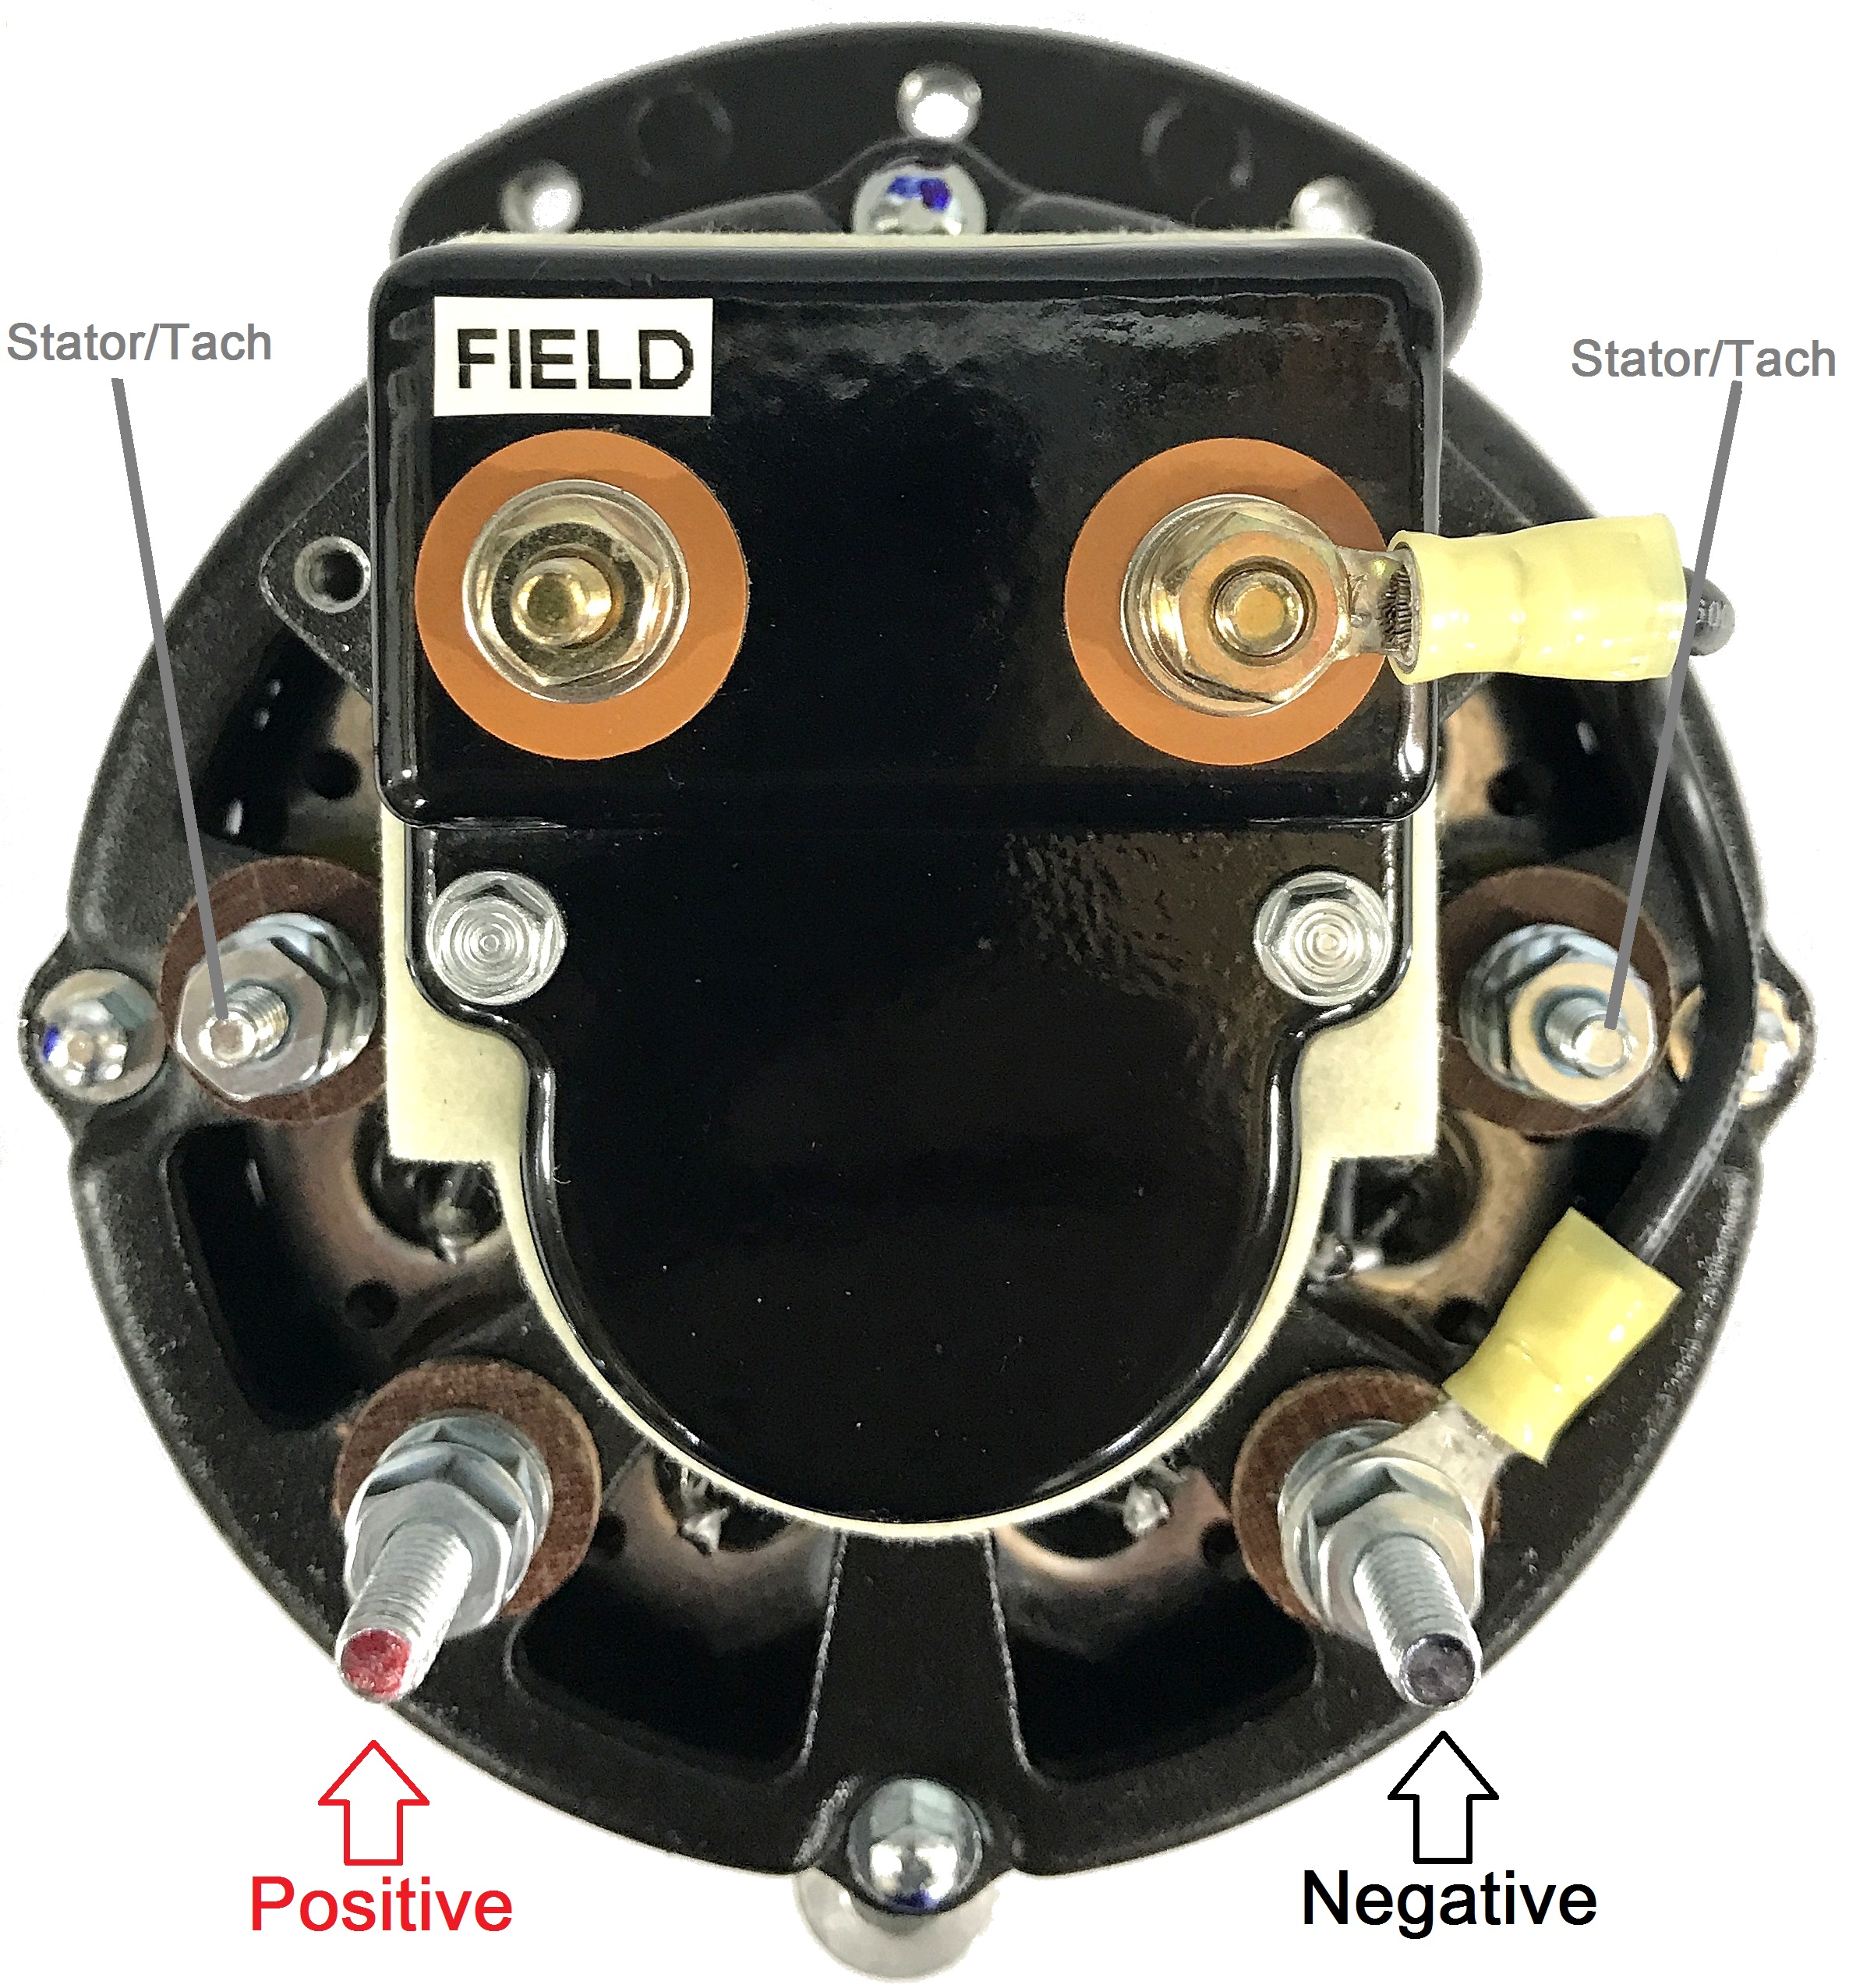
Leece-Neville recommends a 12GA to 14GA wire for this jumper. We’d recommend using a 105C tinned marine wire. 14GA is more than adequate for this jumper.
IMPORTANT: If you do not connect one of the cover plate studs to the alternators negative / B- terminal the alternator will not work. The alternators B- / Negative terminal must also be grounded to the ships DC negative bus. Because many of the 8MR alternators are isolated ground the B- stud is 100% isolated from the case. This is why you can’t just connect the negative brush to the alternator case. It must be connected to the B- stud as shown here.
For future reference, we advise permanently labeling the + field stud so it’s easy to wire and remember which is which. The alternators B+/Output stud gets wired directly to the positive side of your boats electrical system. For best performance we recommend wiring this directly to a battery bank, preferably the house bank. One reason for this is so you don’t risk blowing the alternator diodes by turning off the battery switch when the motor is running and teh alternator is producing current.
If you wire the alternator directly to a battery, there needs to be a fuse within 7″ of the batteries + terminal post. This fuse should be rated at 150% +/- of the alternators amperage rating.
For a diesel engine tachometer, if the tachometer is alternator sensed, simply wire to either of the studs marked “AC Tap”. An AC Tap is also called a “Stator Tap”, Stator terminal or “stator pulse”. On this particular 8MR these stator taps are redundant, so either one is fine. Just don’t use both simultaneously, pick one or the other. You may need to re-calibrate your tachometer after the installation of a new alternator. The8MR series of alternators are a 12 pole alternator.
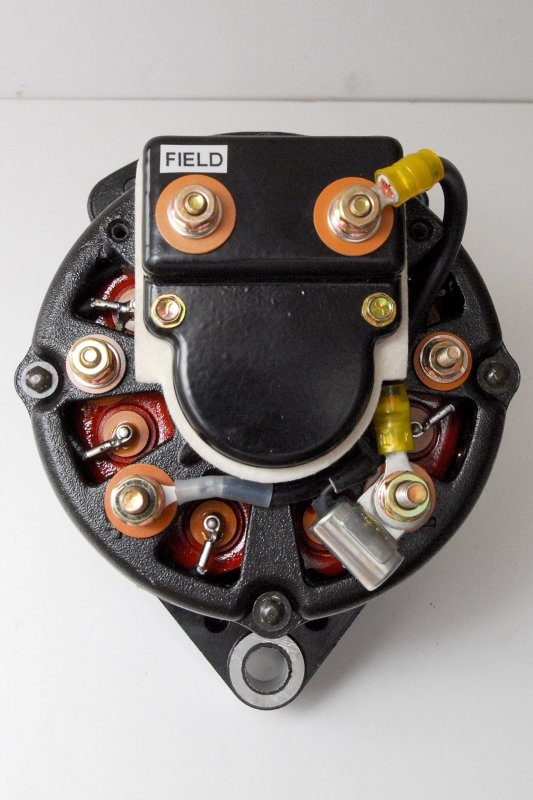
Conversion to External Regulation is Complete
This 105A Leece-Neville alternator is ready to be installed and wired to an external multi-stage regulator such as a Balmar MC-618H or Balmar ARS-5H.
IMPORTANT:
If installing this alternator to charge a large flooded, AGM or GEL bank you will definitely need a Balmar MC-TSA-80 alternator temp sensor. You will also want to use Balmar’s Belt Load Manager feature and set it to at least level 3 to 7. You can read about programming a Balmar regulator at the link below.
Programming a Balmar Regulator
Balmar’s Belt Load Manager
Belt Load Manger is a permanent reduction in the maximum field voltage to essentially current limit the alternator to a lower output. This helps the alternator survive driving large loads where maximum output could be required for 30 minutes or more. These are great little alternators but they are definitely not a true high-performance alternator. They need and require adequate protection from overheating events in order to survive charging large battery banks.
DISCLAIMER: While these are good alternators, provided you get a genuine Leece-Neville and not a clone, they are still not a true high output continuous duty alternator. They are really a medium duty alternator. They can be quite reliable but, when pushed hard, they will not last nearly long a as a purpose built high performance alternator such as a Balmar.
P or N-Type?
Once converted in this fashion the alternator will be a “P Type” or positive field alternator and can be used with external regulators such as Balmar, or Wakespeed. My personal preference for high quality external regulation at a good price-point is Balmar.
Does This Look Familiar?
This is a genuine Balmar Model 81, not the alternator you saw above just painted white. We have had both a Model 81 and a Leece-Neville 8MR apart on the bench and they share many similarities both on the inside and out but they are by no means the same. When we build our CMI-105-ER (discontinued) it is built to the same standard as the alternator below.

Balmar no longer sells the model 81, it has been replaced by the newer and very excellent Balmar 6-Series alternators. The 6-Series is a very, very good alternator, with better performance, and a more robust build than the the Model 81. For many years Leece-Neville has been one of the OE suppliers to Balmar, and they still are, for some alternators. Today, most Balmar alternators are physically built in-house by Balmar.
If your goal is pushing an alternator hard, with a large battery bank or you have AGM, GEL or LiFePO4 batteries you would be wise to consider a better & more robust alternator than an 8MR..
The newer Balmar 6-Series or the new XT-Series small frame alternators are a big leap forward in terms of better cooling, and higher output for longer periods. If you don’t need that type of performance the 8MR is a very good low cost option to pair with a Balmar regulator.
When setting up a Balmar regulator, for the 8MR series, we recommend Balmar’s Belt Load Manager be set to at least level 3 or 4. This will de-rate the available current output of this alternator and allow it to run into large loads for longer periods of time with less risk of over heating.
Running these alternators wide open/full field into large loads, for long duration’s, will eventually cook them. Use alt temp sensing as added insurance and Balmar’s Belt Load Manager as your primary tool to keep these running cool.
Good luck & happy boating!
What About LiFePo4?
IMPORTANT:
If you plan to use this alternator for LiFePo4 you’ll need to use a Balmar alternator temp sensor (MC-TS-A). You will also want Belt load manager set at level 7 to 9 or you run a huge risk of burning it up. In a continuous Duty application,(LiFePo4 is continuous duty). do not expect any more than about 50% of the alternators rating.
Emergency!
We do not want to put this website behind a pay-wall!
Please make a donation, that’s all we ask. Your donations & affiliate purchases are all we have to fund this web site. Please help to keep MarineHowTo.com a FREE source of information!