Port to Starboard Orientation
This photo is simulating a sailboat heeling with flooded batteries.

For years I’ve wanted to write this article, but until my friend Dave let me shoot this polycarbonate cased UPS battery, it was going to be tough to explain. As they say “A picture is worth a thousand words”.
Here we can see the three individual cells of this 6V battery. A 12V battery would have 6 cells. Even heeled like this the positive and negative plates are not and have not “uncovered” and this is good. The vents are also not having electrolyte try to escape out the vent holes. In a port starboard orientation, like this, the cells are in their “thin” orientation compared to port or starboard tacks. Cells running port to starboard, not bow to stern, is the preferred method for installing flooded batteries on a sailing vessel to minimize plates uncovering.
Sorry for just telling you this now, if you have them running bow/stern, but I needed the pics before the article could happen.This is a problem I had discovered back in the late 80’s. I was on a friend’s boat that we’d put a “state of the art” charging system on due to chronic short battery life. At the time, we incorrectly assumed it was “overcharging”. Even after the new alternator and regulator he still had short battery life.
He went through the first bank in less than a season. One day, while helping him work on it, I noticed electrolyte spilled in the cases. The plastic cases for the batteries were black and so were the battery boxes making it tough to see or notice.I removed the batteries and discovered quite a bit of electrolyte. I cleaned it out, neutralized the acid, and we went for a sail with no charging. We put her up on ear, beating to weather, and sure enough electrolyte began to drain out of the batteries fill/vent ports. The cases were not cracked or leaking but it was spilling out when heeled. It then dawned on me that the orientation of flooded batteries on sailboats actually mattered.
I looked at the cell layout, and fill/vent ports, and simply rotated these batteries to port/starboard orientation. After that quick fix he never again had a single drop of spilled electrolyte. This may not be an easy fix on all boats as many builders really stuff you into a box, by using built in battery trays oriented incorrectly for flooded batteries. That bank lasted 5 or 6 years, after those first few days of spilling. After multiple years of replacing batteries almost annually the fix was actually pretty simple. I can’t say all the issues were related to the exposing of his battery plates, and chronically low electrolyte, but it certainly did not help any.
This problem gets compounded with batteries that have “off set” fill caps meaning they are closer to the edge of the battery than the center. Orient offset cap batteries, in a bow/stern orientation, and you’ll have some real leakage issues on one particular tack.
Exposing the plates, especially under charge or discharge, can lead to considerably shorter battery life. Is a failure immediate and catastrophic? No, but if the opportunity exists to orient them, more optimally, then it should be something you consider. Monohull sailboats should ideally have flooded batteries installed so as to minimize electrolyte spillage and to minimize or prevent the positive and negative plates from uncovering during normal sailing activities.
It is important to note that battery manufacturers such as Trojan, actually weigh in on this. Trojan suggests a maximum angle of just 22 degrees for flooded batteries. This is really not enough for a typical mono-hull sailboat, so by simply rotating the batteries you can gain a bit more heel angle. If you race or keep your boat on ear a lot then a GEL, AGM or LiFePO4 battery can be a better choice.

Bow To Stern Orientation
Here is the same battery, only now it is oriented with the cells running bow to stern.

In this orientation the positive and negative battery plates are exposed and uncovered from the electrolyte. On these particular batteries spilling is not an issue, due to the height and design, but on certain 12V & 6V groups GC2, 24, 27, 31 4D & 8D batteries etc. this can not only lead to exposed plates but also electrolyte leakage.
Exposing or uncovering of the positive and negative plates of a battery from the electrolyte, especially when under load or when being charged, is not good for the battery. Even if you are not spilling electrolyte you may be exposing the plates.
While sailing most sailors are using the batteries to power house loads, auto-pilots etc. so proper orientation of the cells could actually be that elusive piece of the puzzle that finally leads to longer battery life.
Many owners have invested thousands of dollars in solar, wind, regulators, alternators, desulfators, fancy chargers, new large gauge wire, bank fusing and more, but if your batteries are improperly installed you’re still missing that last piece of the puzzle.
Side Profile = Uncovered Plates
Here’s a close up side profile of what happens when the batteries are installed in a non-optimal orientation for the vessel type.

This battery was also at the low level for electrolyte. If it was full, to where it should be, then leakage possibilities could increase a bit. Either way the positive & negative plates are exposed and this is certainly sub optimal for battery life.
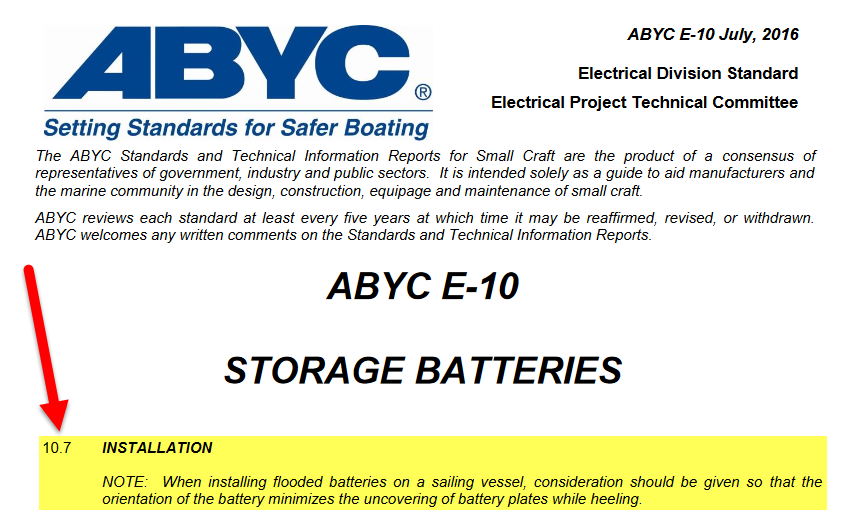
It’s not just battery manufacturers, & MarineHowTo.com, that advise on maximum installation angles & orientation of flooded batteries. ABYC E-10 Storage Batteries addresses the issue as well.
Fill Levels
There are some construction differences between 2V & 6V batteries and the typical 12V batteries often used in marine applications.
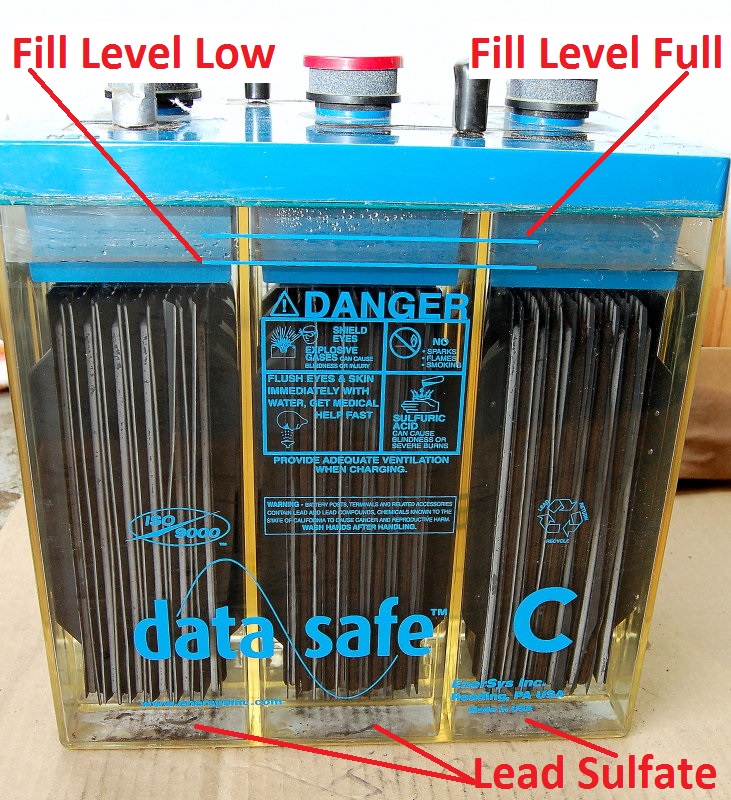
In this photo you can see the blue line representing low mark for electrolyte levels, and this battery needs topping up. The bottom line is the low mark and the top blue line is the full mark. Even at low, this battery still has sufficient electrolyte covering the plates to sustain typical heeling angles, if properly oriented.
A 2V or 6V deep cycle batteries are taller than typical “marine” 12V batteries in order to leave room in the bottom of the case to collect lead sulfate. Why? They are sold and used most widely into heavy deep cycling use such as industry or golf car applications, and the added height benefits these batteries in two important ways.
1- The added height sometimes, but not always, gives more electrolyte depth covering the plates when compared to typical 12V “deep cycle” batteries where the plates are considerably taller than a starting or dual purpose battery. Golf carts are often driven on hilly terrain, parked at steep angles and this type of movement is closer to what a monohull sailboat undergoes. Only off road jeeps and four-wheelers put flooded batteries through the same pains as a golf car or sailboat. This added case height, and centered fill caps, allow for less chance of the plates uncovering when the golf car moves about on hilly terrain.
2- In deep cycling applications, like golf cars or sailboats, sulfation of flooded batteries is just a fact of life. The bottoms of 6V battery cases are deeper thus allowing for the collection of more shed lead sulfate to collect. This battery shows very little sulfate in the bottom of the case but I have cut open / autopsied batteries with a depth of lead sulfate in the bottom of the case that is actually touching the bottoms of the cells in 12V form factor G-24, 27 & 31 batteries.. The typical marine 12V batteries can actually become shorted internally, due to the build-up of lead sulfate, which eventually can reach the plates. This same phenomenon is quite rare in quality deep-cycle batteries.
A Proper Orientation
While this picture shows the battery cells lined up port to starboard, this is not how they shipped from the factory.
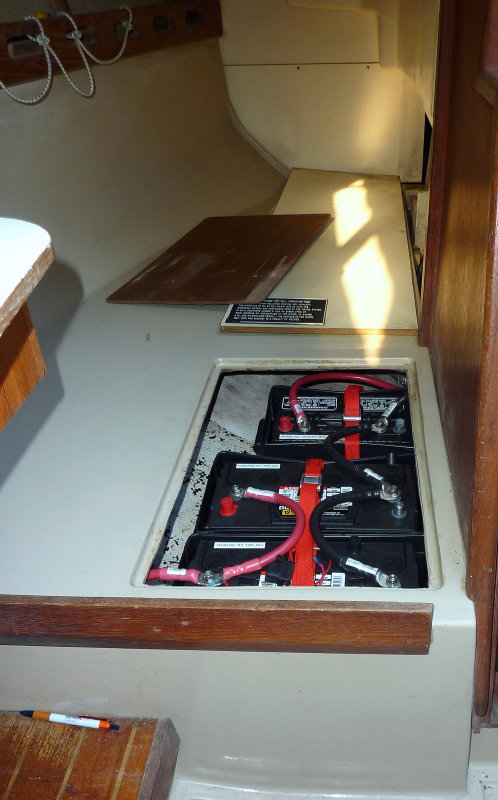 This entire battery compartment was re-configured to allow for a larger house bank of two group 31 12V batteries, no height for GC2 6V batteries, plus a group 27 starting/reserve battery. The factory installation had the batteries oriented in a bow/stern configuration, and only had room for two group 27’s.
Unfortunately the physical height of this compartment would not allow for deep-cycle golf cart type batteries so a compromise was made to use 12V automotive-cased light-cycling batteries.
Port/Starboard
If you look closely at this photo you can see the cell dividers dimpled into the top of the plastic battery cases. Look at the faint lines and you can count all six cells on each battery.

This is an example of a good factory installation. This bank happens to be on an older Sabre 34 MK I. This past fall, at the Annapolis Boat Show, the Sabre I was on, one of the last ones built, still had properly oriented flooded batteries. Nice job Sabre!
While this battery compartment is small, at least by today’s standards, the batteries are properly oriented.
Builder Blunder
I will certainly give kudos to builders who do it right, but there is no need to slam an out of business builder by calling them out by name. Those who own this model will know this battery compartment well. Note the recessed battery wells that will only fit batteries one way.
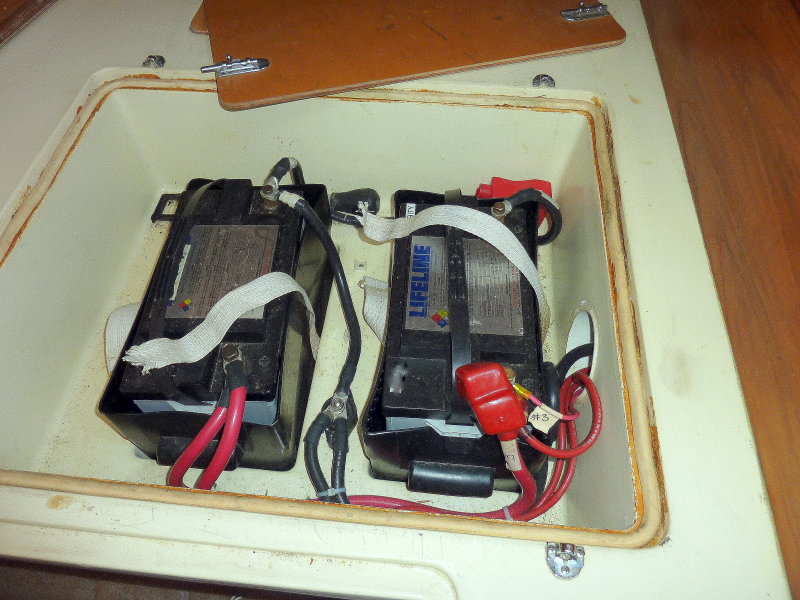
This owner has actually tried to do the right thing by installing AGM batteries. Of course they lasted all of two years, on a mooring, because he lacked solar, but that is a topic for another article. It just goes to show that nearly everything on a boat is actually a compromise.
Unfortunately this builder left no possibility for a proper installation of flooded batteries short of cutting fiberglass and re-configuring the battery tray. There is no way, in this tray, to orient the batteries any way other than bow/stern. Doh’….!
On a boat like this GEL or AGM batteries will be the only good option, short of major battery box surgery.
Mounting
Any discussion involving battery installation would be incomplete without addressing securing the batteries into the vessel. For this task I often prefer a set of heavy duty pad eyes and heavy duty polypropylene canoe/kayak straps, not nylon.

The other pad eye in this photo is for the house bank which has not yet been installed into the battery tray. Containment of acid is critical so that any metal tie downs don’t get compromised by acid. For containment plastic battery boxes will suffice.
Also important is that the battery box not be able to move fore, aft or side to side. In this installation it is entrapped by a 1.5″ tall X 1.5″ wide mahogany frame on the battery platform. There are many ways to secure your batteries, just be sure you do. A good way to think about installing your batteries is to mentally visualize your boat in a knock down. So, take a moment to picture your vessel in a knock down. Not very pretty is it!
Now, where are your batteries…? $hit happens so please install your batteries safely. A little spilled electrolyte, if you have flooded batteries, is arguably better than multiple 70 pound chunks of lead flying through your cabin.
I generally dislike the cheap battery hold down straps that come with plastic battery boxes. The AGM photo before this one is a prime example of sub-par hold down straps. Neither of them was still operable. These cheap straps, with their plastic buckles, are marginal to useless at best. Northwest River Supplies (NRS) sell the type of canoe/kayak straps we typically use. Just be sure the material the strap is made from is polypropylene not nylon. Nylon is prone to acid attack and polypropylene is not. NRS straps work extremely well and are very, very strong. *TIP: Coat the metal buckle with Boeshield or similar.
Off Set Fill / Vent Caps
Here’s a prime example of a 12V group 31 battery (Deka/East Penn) that really needs to be installed properly. If not installed correctly, they will leak on one tack and this leakage can quickly ruin the batteries.
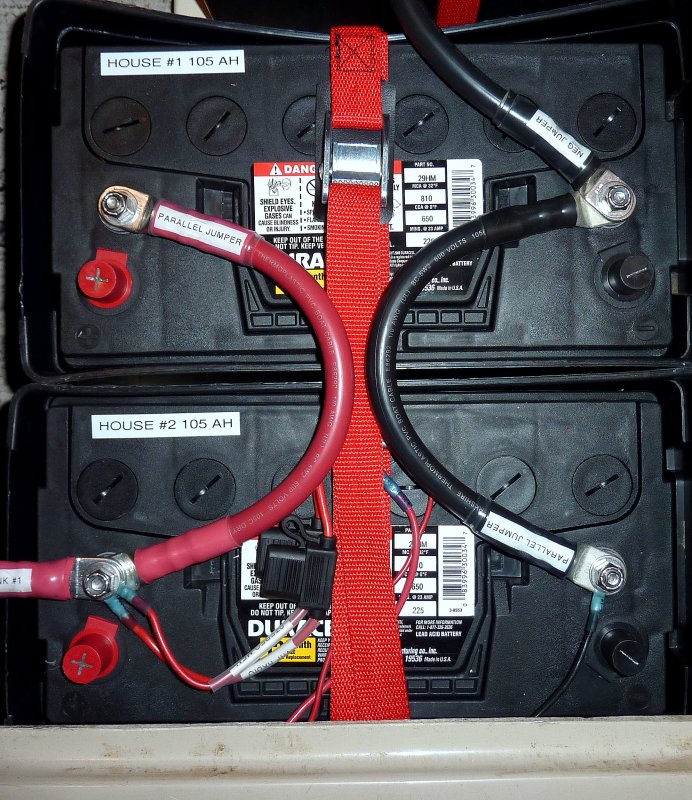
In this image the batteries are installed with the neg post facing PORT and the positive post facing STARBOARD to minimize plate uncovering and electrolyte leakage.
I can not stress enough how critical proper orientation is with batteries that have offset fill/vent caps as these do..
4D Orientation
With 4D and 8D batteries the placement and orientation of cells is different than a typical 6V GC2 or 12V G24, G27 or G31 batteries. Both 4D and 8D batteries are generally unsuitable for sailboat installations.
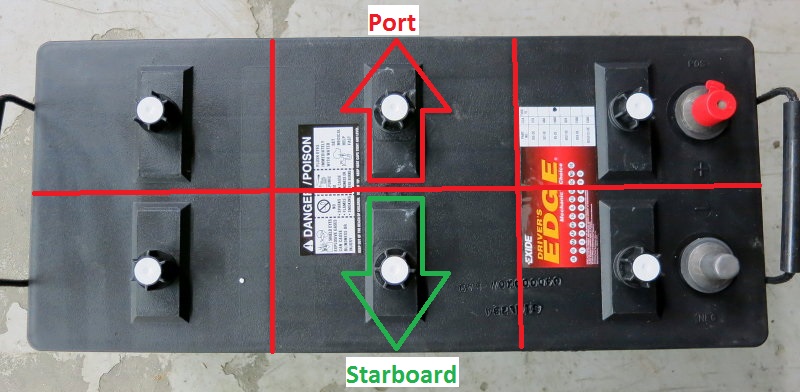
In a flooded 4D battery the cells are mostly rectangular, as shown here via the red lines. While not ideal, a flooded 4D is better than an 8D for use on a sailboat. If you insist on using 4D’s the cells on 4D batteries are best mounted so the long length of the battery runs bow to stern. This puts the narrowest profile of each cell oriented to minimize positive and negative plate uncovering during sailing conditions. The red lines represent the cell dividers inside the battery box. Each rectangle/cell is sealed from the others.
8D = NOT OPTIMAL
In this image I have left the red lines off the cell divisions. If you click the picture, and blow it up, you can see the faint divisions of the cell dividers imprinted into the plastic cover.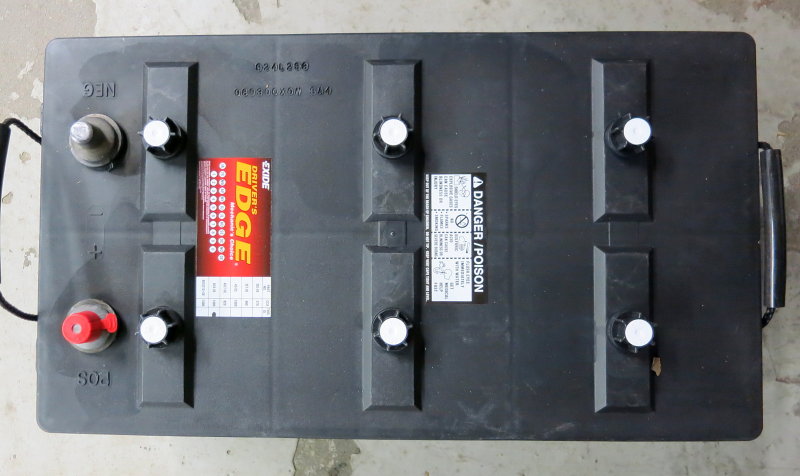
When you look close at the cell layout of an 8D battery you can clearly see that these cells square.The 4D has rectangular cells, which can be better situated, the 8D has no optimal configuration for a heeling sailboat.
Because of the square cells on an 8D battery there is no orientation that is better than another. Any way you install a flooded 8D battery, on a monohull sailboat, can result in the plates uncovering when heeled. This is not great for the batteries.
Good luck and happy boating!
Like What You Saw Or Read?
Would you like to see more articles like this? Is so feel free to donate, support the site and keep it growing.
Please DO NOT feel obligated at all. If you like it and want to make a small donation than that’s all I ask.
Your donations help keep the content coming and also help keep it free.
Click the DONATE button below if you would like to make a donation via PayPal.