New Port Lights For an Older Boat
Choosing to install new portlights sounds easy but can be a complicated decision process. There are numerous companies out there building poor products that sell for big money and others building beautiful products that sell for a reasonable amount. My decision involved lots of research and investigation into the minute details of portlight construction. Many of the larger, well known, companies did not stack up when I began to dig into the small details. In the end I chose New Found Metals as my portlight supplier.
This project is not for the boater who barely knows the difference between a Phillips head and a slotted head screw driver and is about a 5-6 on the 1 to 10 complexity scale. The task is straight forward and does not require artist like skills, akin to blending and color matching gelcoat, but this is a long and time consuming task.
Our boat has 8 ports and I figure this project took me a little over 45 hours of time. Hopefully this article will save you some time and you can learn from any my mistakes and use my time saving tips. I figured each port would take about two hours but I was a little off.
I do hope this article helps someone considering new ports or who needs some guidance installing NFM portlights.
As always click on any photo to make it larger. This article is quite long and includes more than 40 photos.
Step 1 – Measuring Exterior Offset
Before you can even order your New Found Metals ports (NFM from here on) you’ll need to know the thickness of your cabin sides. All NFM bolts are metric therefore I used my caliper in metric mode to determine an accurate bolt size.
You need to measure the exterior off set from the widest point of the old port to the cabin sides. To do this I used my adjustable carpenters combination square as in the picture. Once I had the measurement, I locked the set screw.
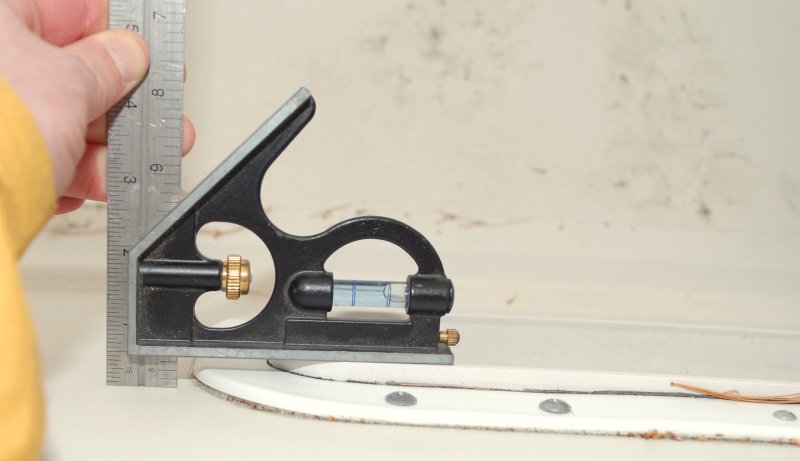

Reading Exterior Offset
Before moving on to the next measurement you need to write down your measurement or transpose it, as I did, to my calipers. The exterior offset reading was rounded up to 13.5mm.
The picture shows the accuracy a little bit off but it was hard to hold the caliper and square in one hand and the large Nikon DSLR in the other and keep it perfectly in place..
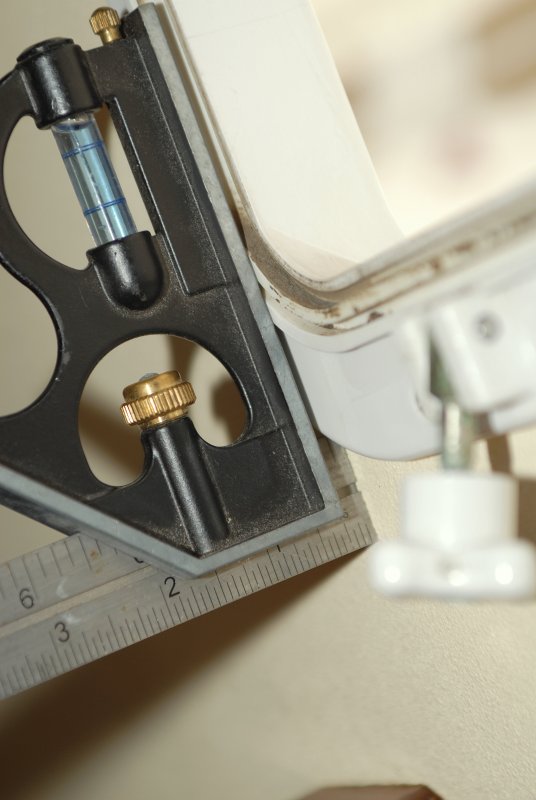
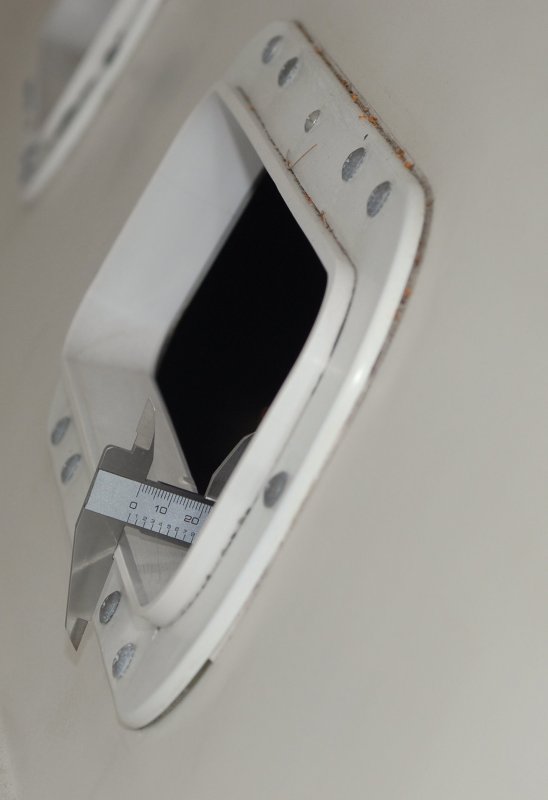
Measuring Interior Offset
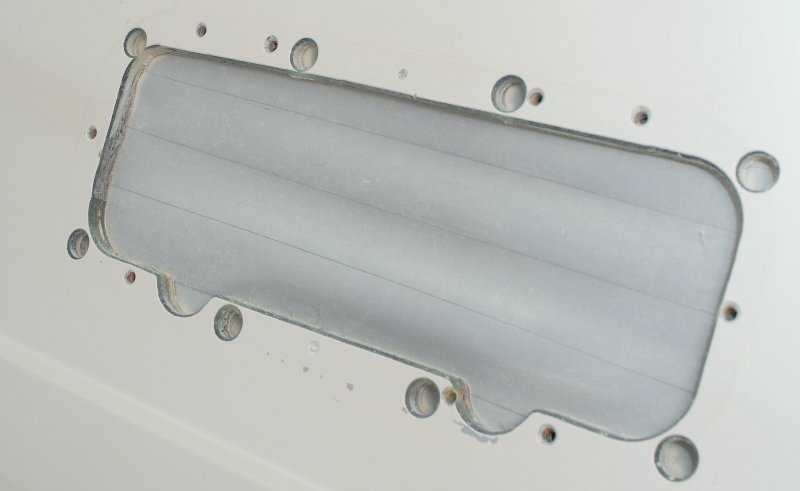
You’ll also need to measure the interior offset. I did not want the gasket compressing under the square, and throwing my reading off, so I removed the gasket/seal on the Beckson ports to get a more accurate reading.
Note the gasket groove or slot on the port and the staining & grime from leaking. I had completely cleaned each of these slots last spring and installed new gaskets, yet a few of these ports continued to leak. I guess plastic, in the marine environment, has a useful lifespan that had been surpassed..
Reading Interior Offset
Do the same for the interior offset and write this number down. I rounded this up to 9mm.
Measuring Port Total Thickness – Interior View
Now you need the ports total thickness as measured from the widest/thickest point on the interior of the frame to the widest/thickest point on the exterior. I rounded this number to 34mm.
The math is now very easy. Simply add the interior and exterior offset numbers together. It looks like this:
13.5mm + 9mm = 22.5mm
Next, simply subtract the offset totals of 22.5mm from 34mm. It looks like this:
34mm – 22.5mm = 12.5mm
The cabin sides of the boat were roughly 12.5mm thick which translates to 0.4921 or roughly 1/2″.
This hull thickness is the number NFM will use so they can calculate your total bolt length for you. It is very important to know this number before placing your order as it will save lots of time later. Physically cutting eight + bolts per port would be a tedious and time consuming task.
On a cabin with solid fiberglass sides, as this boat is, you will probably want to order interior teak spacers or the spigot will protrude further than necessary.
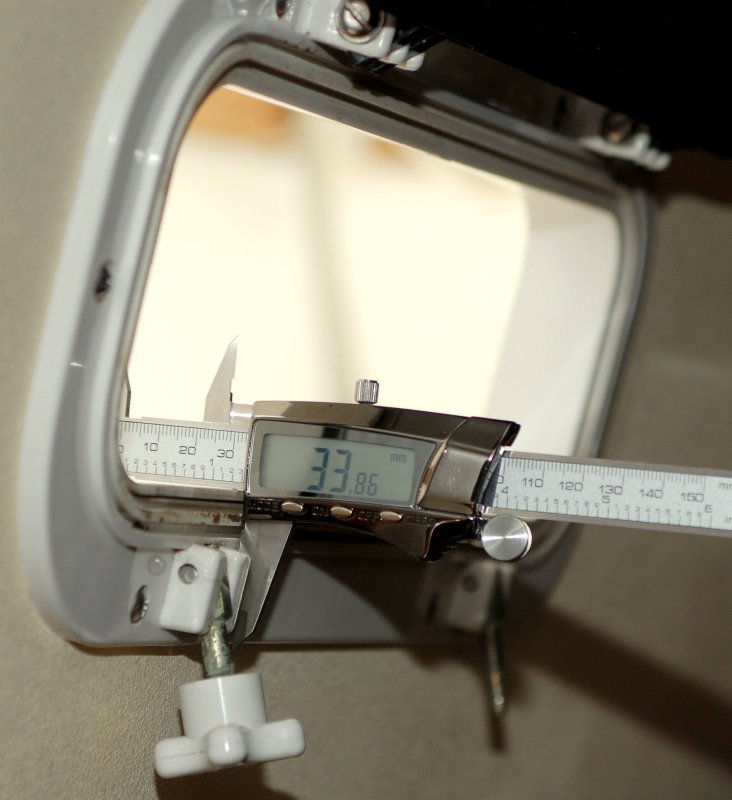
Measuring Port Total Thickness – Exterior View
You can see the caliper clamped to the widest point of the port in this exterior view.
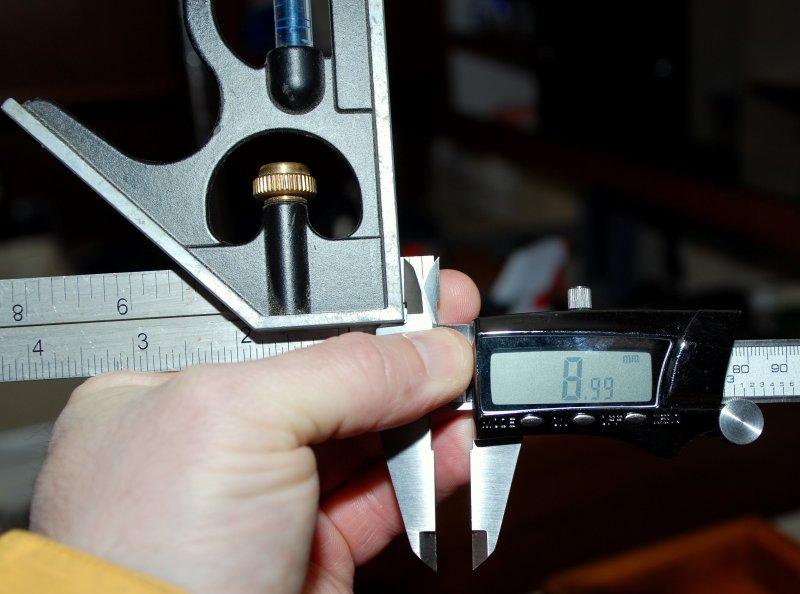
Trim Ring Thread Depth
I had this metric bolt kicking around and decided to illustrated why proper cabin thickness is a must. I inserted the bolt until it bottomed out then wrapped some Teflon tape around it and backed it out.
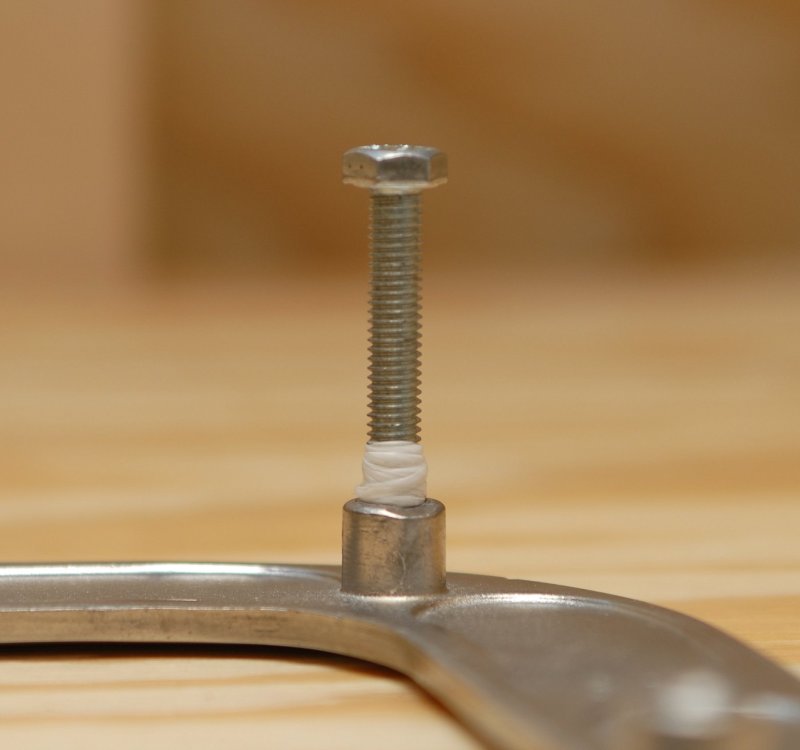

Actual Depth
My caliper shows this hole at 7/16 but most of the others were 5/16 just as NFM says they are. Plan on a quarter inch of room, as a safety margin, and you’ll be fine. This bolt depth measurement obstacle is a bit tedious but it prevents any screws from being visible on the out side of the portlights. It also minimizes the chance of leaks by having less exposed holes in the trim ring..
The Old Ports
As you can see these ports were not very attractive. To make matters worse the barrel nuts used to hold the trim rings on were chrome plated brass not stainless. I’m guessing stainless barrel nuts were not available back in 1979..

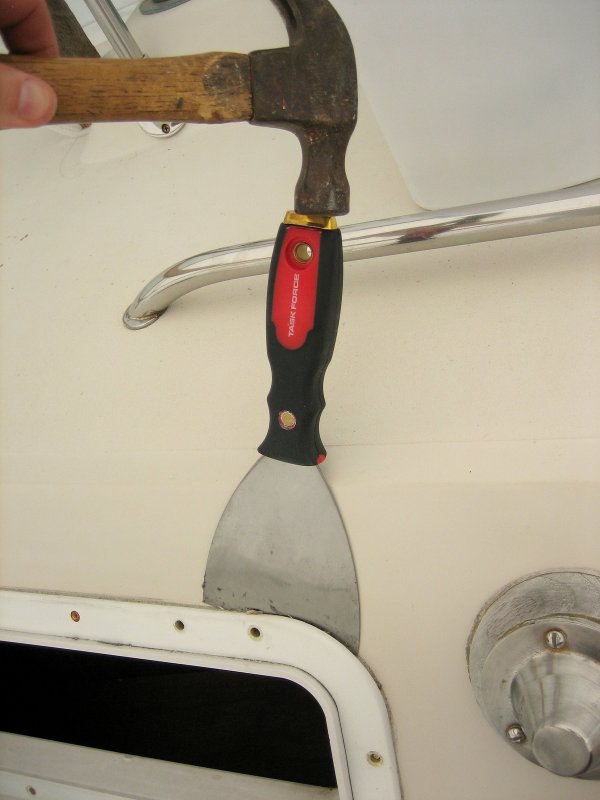
Step 2 – Removing The Old Ports
Lucky for me, the Beckson ports had been installed with butyl tape and a double sided foam weather stripping, and not one of the high tenacity polyurethane sealants like 3M 5200. All I needed was to pry the trim rings off the cabin sides and then apply a constant pressure to slowly stretch the butyl and remove the ports. keep in mind these ports were installed in 1979 and this boat has been nearly all the way around the world and back. Interestingly enough it was the Beckson gaskets that had been leaking and not the butyl tape.
For removal of the trim rings I used a heavy duty putty knife. Prior to using this putty knife that I have softened / dulled the sharp edges so I would not scratch the cabin sides.
If your ports were installed with 3M 5200 please be very, very careful removing them. The tensile strength of 5200 is anywhere from 40-700+ PSI and the fiberglass to gelcoat bond is roughly 400-500 PSI. If you are not careful and you try to force the ports off the boat you can literally tear the gelcoat clean off the substrate.
In my opinion, garnered over many years of removing this stuff, 3M 5200 has no place being used to hold a portlight into a boat! Use products like 3M 5200 at your own risk..
If you’re at a loss with 5200 you can try using products such as De-Bond to soften it. Sometimes heat will help to soften the 5200 too but do be careful using heat guns. They can burn the gelcoat if not used carefully and kept moving at all times.
30 Year Old Butyl Tape – Still Very Flexible
For those who doubt the utility of premium marine grade butyl-based tape on boats, such as Bed-It Tape, and who chose to use polyurethane products such as 5200, for installing ports, this photos speaks for itself.
As you can see, after nearly 30 years the pre-EPA butyl tape still had elongation before break of more than 2000% at a minimum. The butyl tape on all 8 ports never failed and all the leaks were from the Beckson port gaskets, even after replacements had been installed.
I also had a couple of fasteners, that went through the foam weather stripping gasket used on the trim ring (not butyl), also leak. Pre EPA change butyl tape was excellent. Today, the only comparable product to what was used on this vessel is Bed-It Tape.


Clean Up The Surface
To clean up the residue I used my boat chisel. My boat chisel has been tuned to minimize scratching the surface. If you’re not skilled in the use of a chisel or dulling or sharpening them the right amount, find another way of removing the vast amount of sealant or you could scratch your hull.
Once I had the majority of the surface clean I used mineral spirits, it works well on butyl.I then followed up with Acetone, wearing chemical resistant gloves, to do a final cleaning.
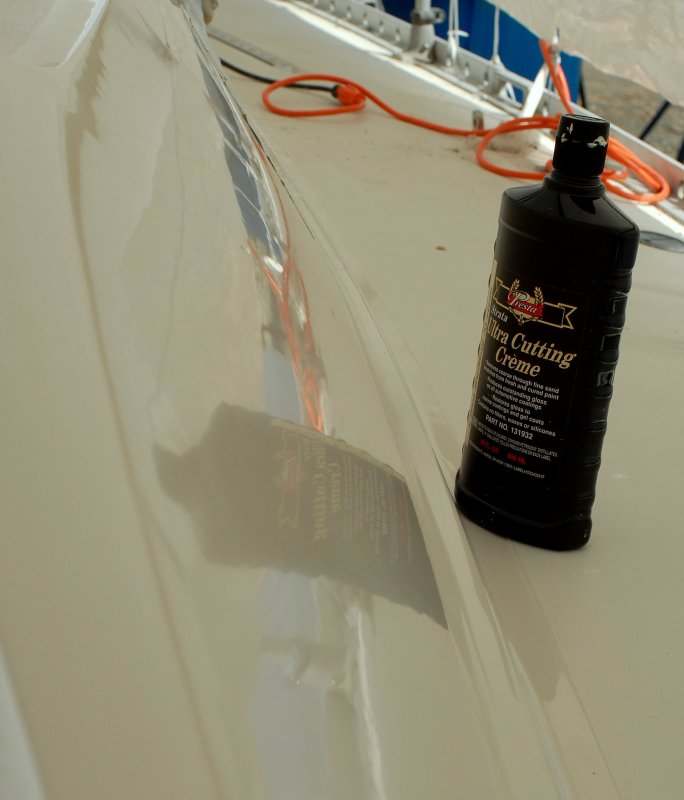
Step 3 (optional) – Cabin Side Compounding
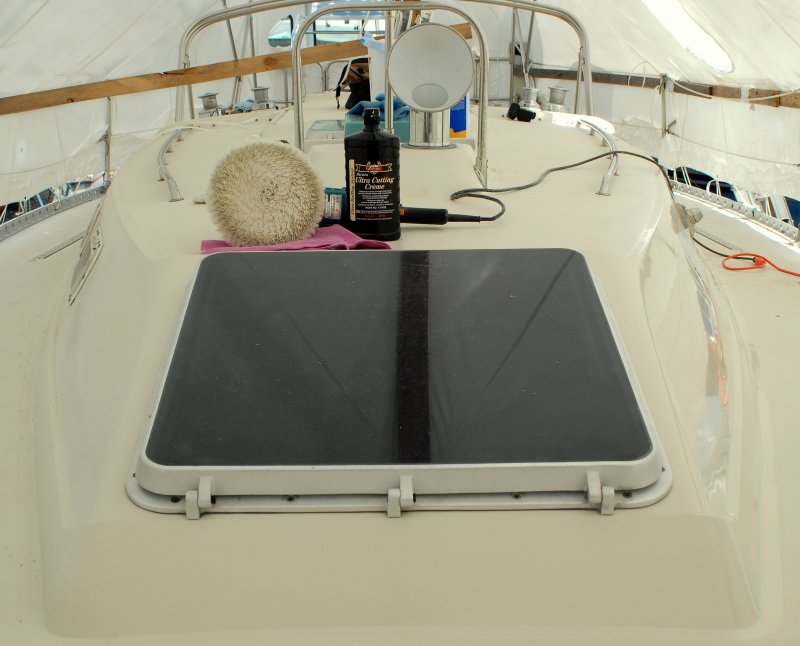
While you have your ports out you may want to take the time to compound and polish the cabin sides. It’s much easier without the ports getting in the way. I simply used Gorilla tape on the inside of the cabin to seal off the port openings then buffed away.
For the compounding phase I used a Makita 9227C buffer at 600-1500 RPM, Presta Ultra Cutting Creme compound and a 3M compounding grade pad part #05711.
For the polishing phase I used a Makita 9227C buffer at 600-1500 RPM and Presta Chroma 1500 polish with the blue wool Presta polishing grade pad.
Taping Off The Inside
Here’s the Gorilla Tape (duct tape) I used when compounding the cabin sides to prevent any messes inside the boat..
Polishing The Cabin Sides – Before & After
There’s no doubt it’s well worth it to take this extra step. While it takes a bit of work the 30 year old gelcoat came right back to life.

Temporary Duct Tape To Cover The Openings
TIP: This is for keeping your boat dry while the work is in process. I chose to remove all the old ports then prep, cut, drill, chamfer and bore the openings all at the same time but needed a way to keep the boat dry as I was going through the installation process.
I have been using Gorilla Tape, from the makers of Gorilla Glue, and it is far and away the finest duct tape I have found for this. It’s thick, does not leave much if any residue, and sticks tenaciously to just about anything.
To seal the port openings, until you can install the ports, start at the bottom of the port opening and work your way up like clapboards on a house overlapping each seam by about 1/2″. If you worked your way down water will get in but if you tape from the bottom up the seams over lap so they don’t drain into one another.
Even though the boat was covered I didn’t want to take any chances, and yes Gorilla Tape will keep rain out.
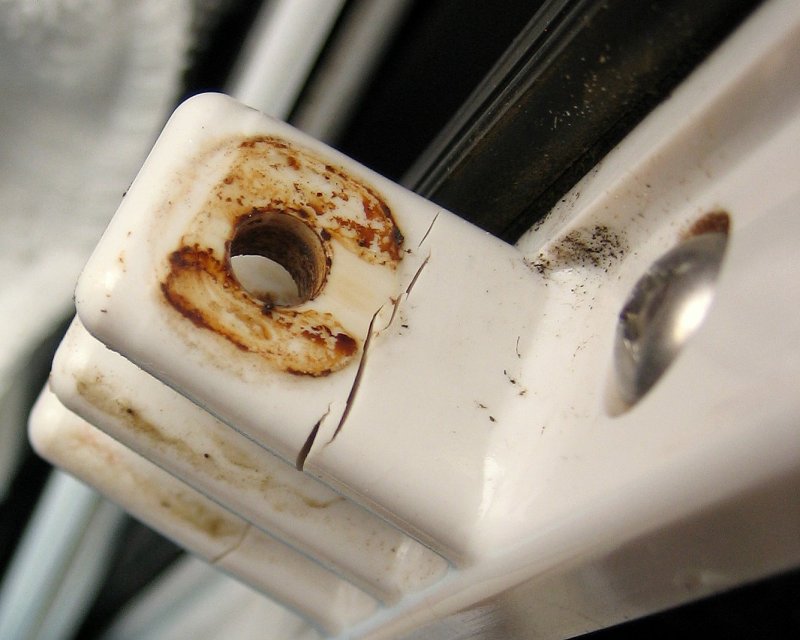
Why I Needed to Replace These Ports
After 30 years the plastic had become quite brittle and many of my hinges looked like this or worse. I won’t have to worry about the NFM cast stainless steel ports degrading or becoming brittle.. Unlike plastic, 316 stainless steel is not negatively effected by UV..
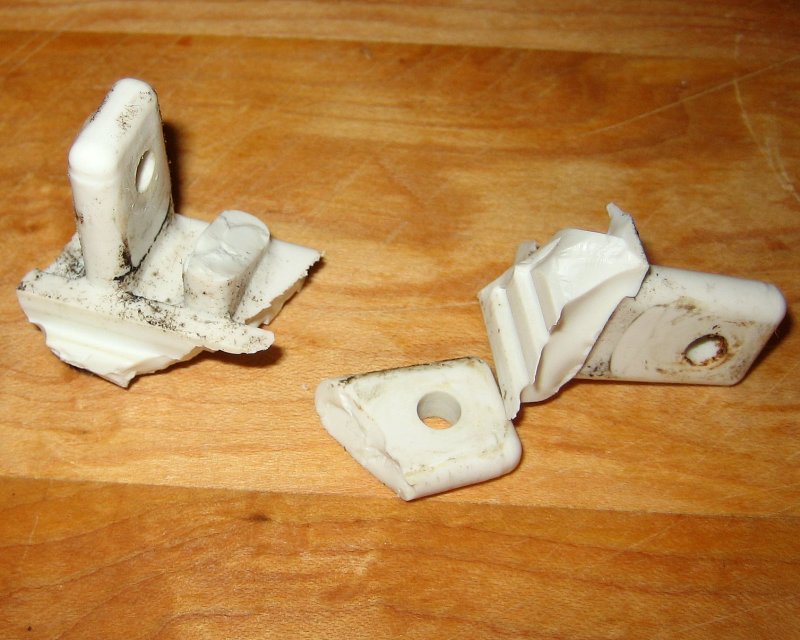
Why I Needed to Replace These Ports #2
As I said some were worse.. This hinge literally crumbled apart after I removed the port. In defense of Beckson these plastic ports lasted about 30 years, but ideally should have been replaced about ten years ago.
These Beckson ports were no longer safe for any sort off-shore sailing. One big wave surely could have broken them, in the brittle state they were in, and allowed the boat to take on green water.
Phase 4 – NFM 4X14 Template With Drill Guides
This is the actual template from NFM. They charge you for it but when you return it they will credit back your $90.00.
TIP: Installing new ports without the NFM jig is a penny wise and pound foolish move. Do yourself a favor and use the jig!
These templates are very heavily made and feature built in drill guides. The guides make drilling straight holes, through angled cabin sides, very easy. I’ve included a pen in the photo to show how robust these jigs really are.
IMPORTANT: Please plan ahead when buying from NFM, they often run out of jigs. I waited nearly 5 months to get one and I came very close to not buying NFM ports because of this.
If you do use a template please send it back when you’re done so others don’t have to wait eons to get one.

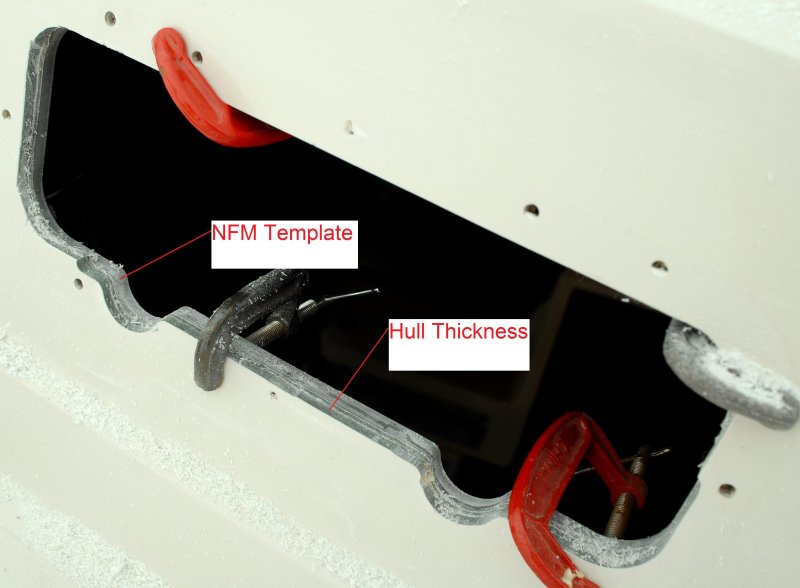
Step 5 – Template/Jig & Hull
For this step I needed to cut the openings for the NFM ports slightly larger than the Beckson’s had been. The new opening also needed to accommodate for the portlight spigot. I used the NFM template (shown in the previous photo). As I mentioned earlier this is really a should have item for this job.
To cut the openings I chose to use the NFM template as my router guide and use my Ryobi laminate trimmer with a bearing guided flush cut bit. Using a jig saw, hand saw or sanding drums just seemed like an awful lot of work, though some have actually done it this way.
This photo shows the template clamped to the inside of the cabin sides.
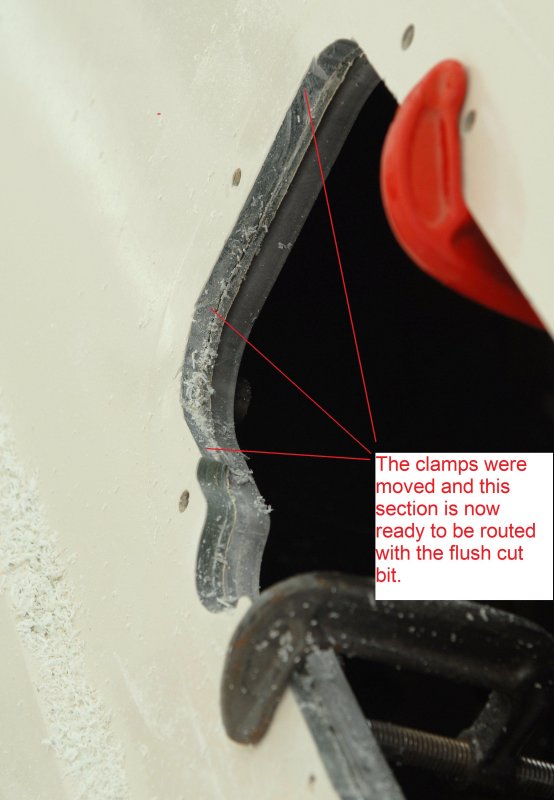
Cutting The New Port Openings
TIP: In order to work the laminate trimmer around the entire port opening you’ll need to move the clamps as you go. Just cut a section then move the clamps. I was able to cut an entire port with only three clamp moves and the template stayed put. The more clamps you use the less risk you will have of the jig moving.
As evidenced by the photo, using the flush cut bit and the NFM template as a guide, leaves a perfect cut that was smoother and cleaner than the original factory cut openings..
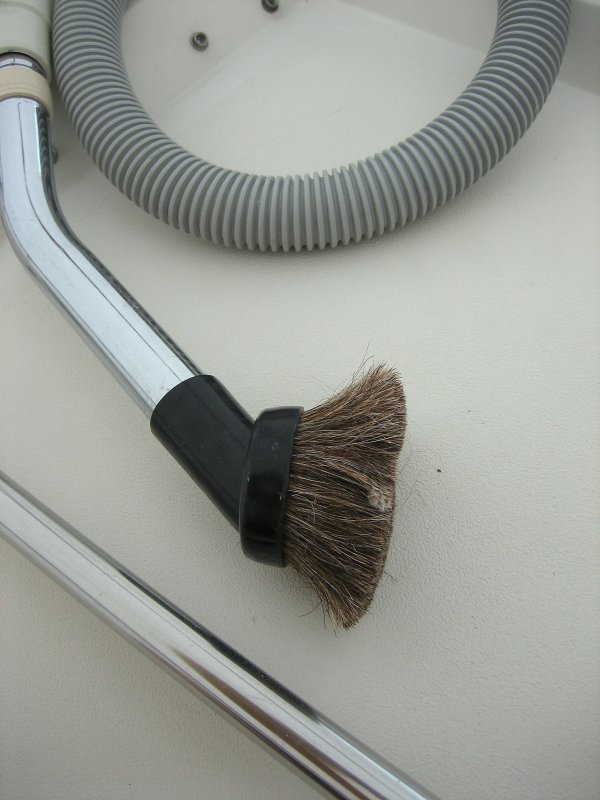
Vacuum Tip
I know this has nothing to do with NFM portlights but the little Rigid 6 Gallon wet dry vacuum, from Home Depot, at $39.00 is a great investment for working on your boat. I actually got rid of my big shop vacs and now have three of these little 6 gallon models. One for the barn, one for the garage and one for working on boats. It’s tiny, powerful and easy to lug up and down ladders.
TIP: I generally ditch the hoses that come with shop vac’s and visit a local vacuum shop for an adapter and about 20 feet of central vac hose. This makes using a cumbersome shop vac a pleasure. The home attachments are better too. The horse hair brush (pictured) is one of my favorites. Within 25 minutes I had totally cleaned the interior of all the routing dust with the horse hair brush and the central vacuum hose. It’s a handy little combo for sure.
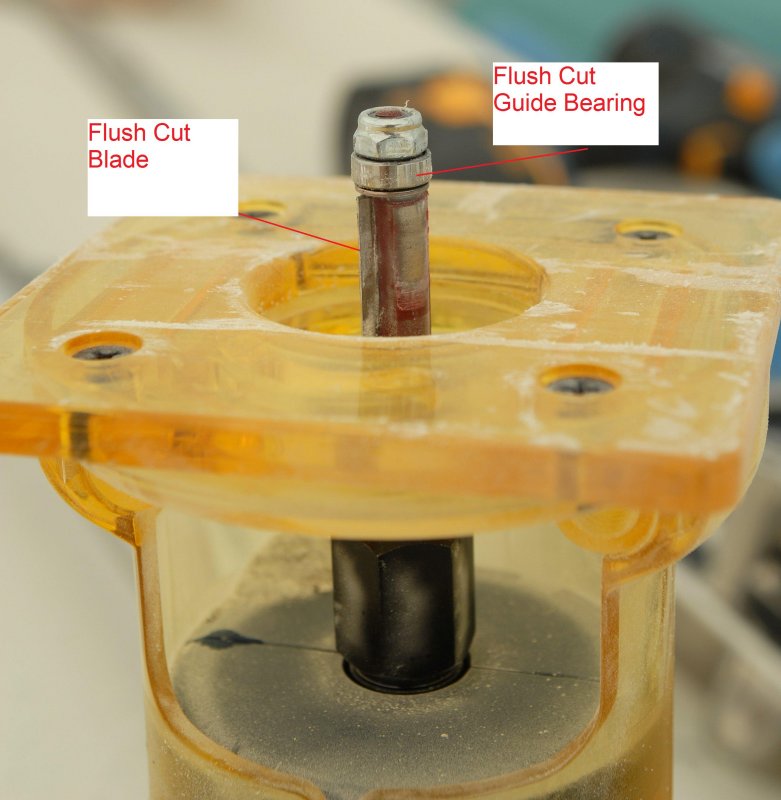
My Ryobi Laminate Trimmer / Flush Cut Bit
Here’s a close up of a laminate trimmer. The base of my Porter Cable router was just a bit large for cutting these port openings and a battery operated laminate trimmer was better suited to this awkward task.
Unless you have lots of flat cabin side real estate on your particular boat I would suggest using a laminate trimmer as opposed to a router. The base of a laminate trimmer is nice and small and it works very well in tight spaces. The cabin liner on the inside of the boat interfered with the laminate trimmer base and this is why I chose to cut from the outside.
Once adjusted for proper depth of cut the guide bearing rides along the surface of the template and the blade cuts the fiberglass. It’s quick easy and neat, but not clean.
I advise having a shop vac on board for this job. No matter how you try and contain the dust it makes a mess.
TIP: Remove your interior cushions before doing this job or mask off the interior with plastic.

The Laminate Trimmer
This little battery operated laminate trimmer was a $49.00 bargain. As a marine business we own lots of heavy-duty professional grade tools from Hitachi, Porter Cable, Milwaukee, Makita & DeWalt but I often find my self reaching for this inexpensive Ryobi. This article was even written well before Li-Ion batteries came out and this little trimmer worked well even without a Li-Ion battery.
I have yet to kill one of these budget level tools, and I actually use some of the Ryobi stuff professionally.
Whether you chose to use a Ryobi, DeWalt, Hitachi, Bosch etc. a small laminate trimmer, vs. a router, is the way to go.
Ready To Bore The Holes
This photo shows the completed port opening after moving the clamps to complete the full circle. It matches the Template perfectly.
Once the opening is cut leave the template in place and use the built in drill guides to drill the 8 3/8″ trim ring holes. You will notice in the picture that I have drilled, from the inside, while the template was still in place, many of the eight 3/8 inch trim ring holes.

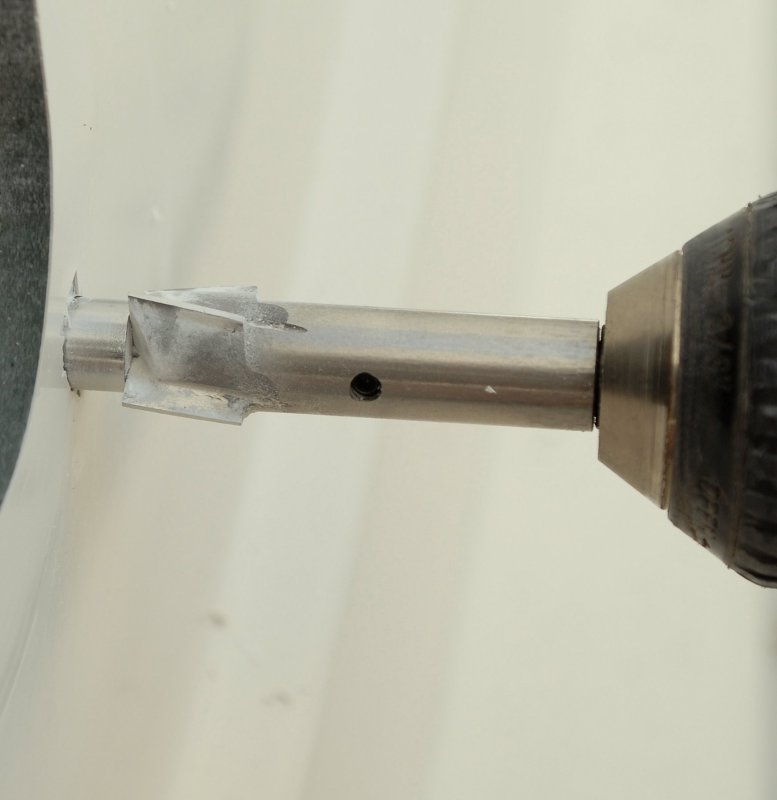
The NFM $29.00 Counter Bore Is Worth It
Once you’ve drilled the 3/8″ holes you’ll need to counter bore into the cabin side exterior 1/2″ deep to accommodate the bolt studs on the trim ring. My cabin sides were 1/2 inch deep so I had to go all the way through, which is fine.
The NFM counter bore has a 3/8″ guide pin, to match the previous 3/8″ holes you drilled, and it bores it out to 5/8″. It is well worth the $29.00 and is a very high quality & clean cutting tool.
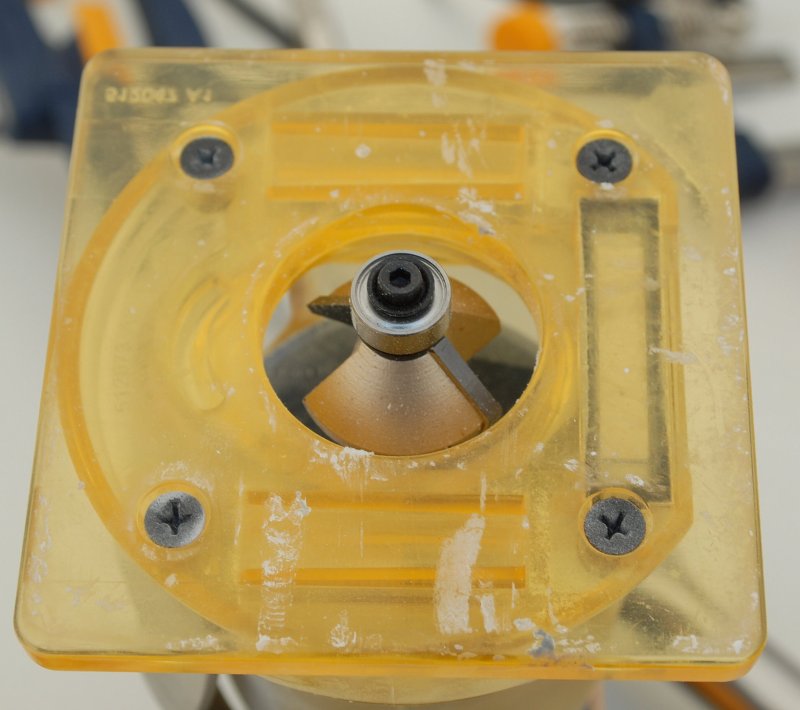
45 Degree Bearing Guided Chamfer/Bevel Bit
Having learned the art of bedding fittings from some of the guys at Hinckley Yachts I believe in the bevel/chamfer and tighten once method for most things. I don’t generally subscribe to the “tighten over a few days to create a gasket” method.
Beveling the edges of the holes does a few things:
- 1)It forces bedding compounds into the hole, like a funnel, as you tighten the fitting.
- It creates an o-ring of sealant that is about 6-8 times the thickness of what would be there without a bevel.
- It allows you to tighten the fitting all the way down without coming back days later to do so which can break the seal that has already cured around the bolts threads.
- It creates a surface area that forces sealant against and around the bolts threads or shank.
- It prevents gelcoat crazing and checking around the bolt holes.
To use the bevel method for the ports I again used a laminate trimmer and a 45 degree bearing guided bevel/chamfer router bit. The router bits guide bearing fits in the 5/8″ hole so I used the laminate trimmer for those holes too.
On these ports, using the butyl, it is very, very difficult to tighten them down all the way at once. I tightened the ports over two days, which is short enough so my polysulfide sealant did not fully harden, but long enough to fully compress the butyl.
IMPORTANT: I differ from the NFM instructions on this particular procedure. NFM says to tighten over a few days letting the sealant harden to form a “gasket”. Here is my explanation of why I do it the way I do:
I’ve been bedding fittings, tighten once or before the bedding is dry, this way for a very long time and never once had a re-leak. The idea that tightening a fitting all the way down squeezes out all the sealant is just not true. Take for example the aluminum valve cover on the Volvo 5 cylinder engine used in the V-70 series and others. This valve cover uses no gasket and only a thin layer of Permatex (Silicone) is required to seal it. You apply the Permatex, install the valve cover, and torques the bolts. Valve cover gaskets are under positive crank case pressure and deck fittings or ports are not.
I have used the above method (bevel then tighten at once) on underwater fittings as well and still never had a leak. It’s your choice as to how you seal your ports and I’m merely telling you how I differ from the manufacturer on this one point.
EDIT: If I had to do this job over again I would not use the NFM black butyl tape. I would instead use Bed-It Tape which is gray and is formulated not to “bleed” or do what is called “cold flow”. Using Bed-It Tape will completely eliminate the need to use both a sealant and a tape. The light-gray color of Bed-It Tape is far less messy than the black tape from NFM and it does not stain. Bed-It Tape is also specifically formulated to resist cold flow or creep in warm temps. Bed-It Tape was specifically formulated for bedding marine deck hardware, after this article was written back in 2005. Bed-It Tape offers a wider working temp range, has much less propensity for cold flow or creep/bleeding, has a higher level of chemical resistance and more elongation before failure than cheap “butyl tapes”.
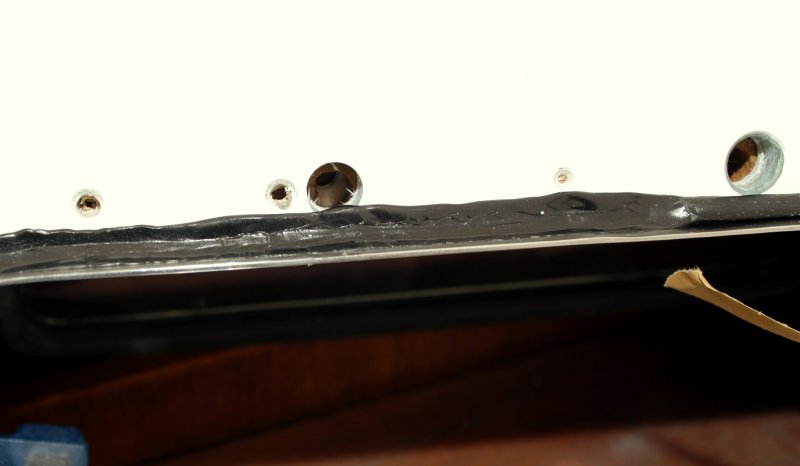
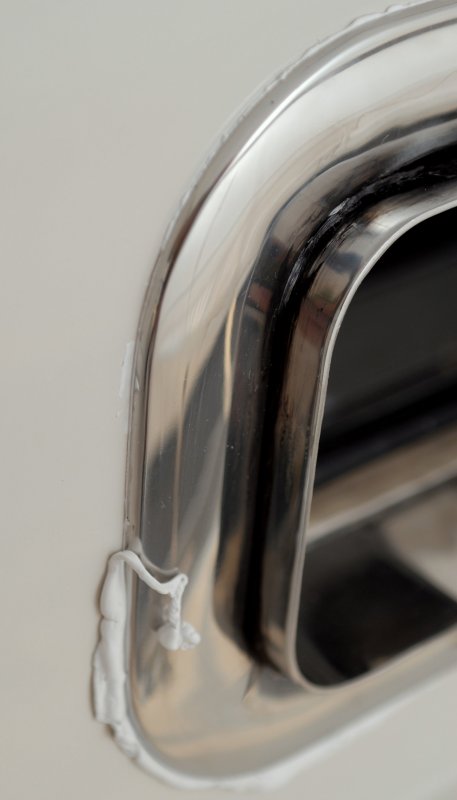
Depth Of Chamfer/Bevel
This photo shows the depth of the bevel cut. It does not take much to create a good seal..

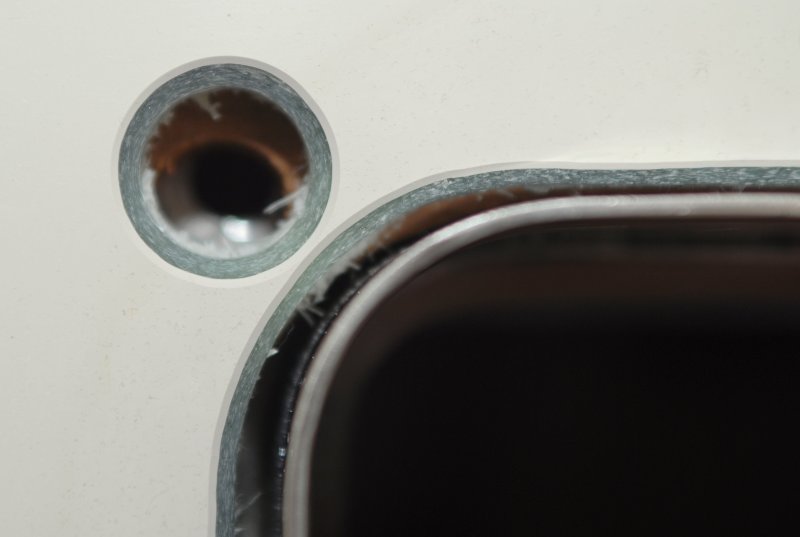
The Chamfer / Bevel
Here is a close up of the beveling or chamfering. It runs all the way around the port and around each bolt hole. Every bedded fitting on the entire boat is, or will be, as I get to them, bedded using this method.
Most times I just use a drill and countersink bit but for big holes like this a laminate trimmer is a good option. While that bevel may look big it’s really only about 1/16 of an inch.
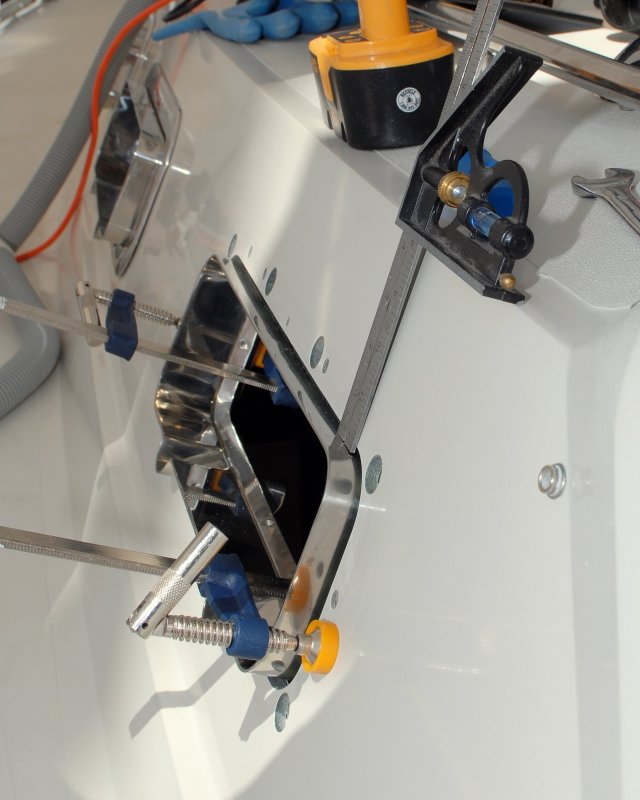
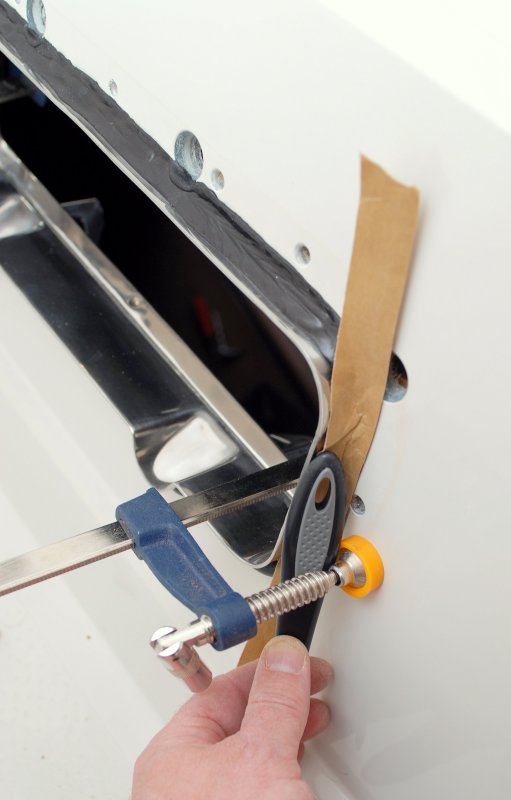
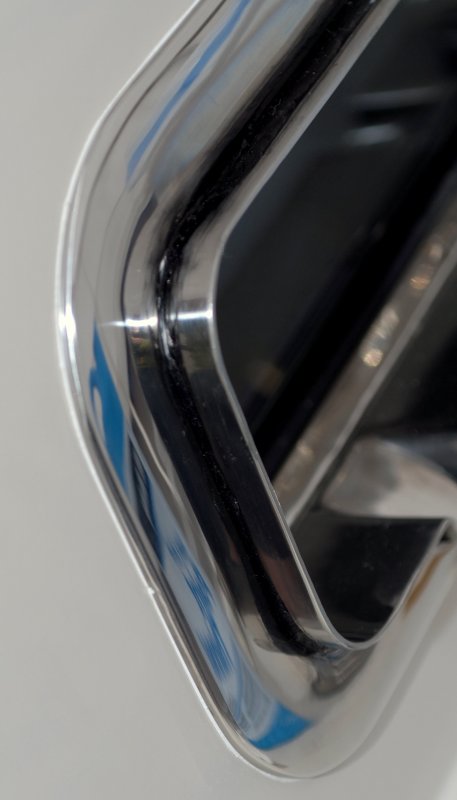
Dry Fitting & Leveling The Ports
When I routed the holes using the NFM template I made sure it was line up parallel with the cabin top. Some boats have a large smooth radius cabin top, so you’d need to find a way to measure for level or parallel, but this boat has a nice square, clean edge to work off of.
Before applying the butyl tape I made sure to line up the ports and make sure they were level by using my combination square. Once they were level I tightened down hard on the clamps making sure to use a block of wood on the inside to prevent scratching the port.
This photo shows me checking the right side of the port with the combination square.
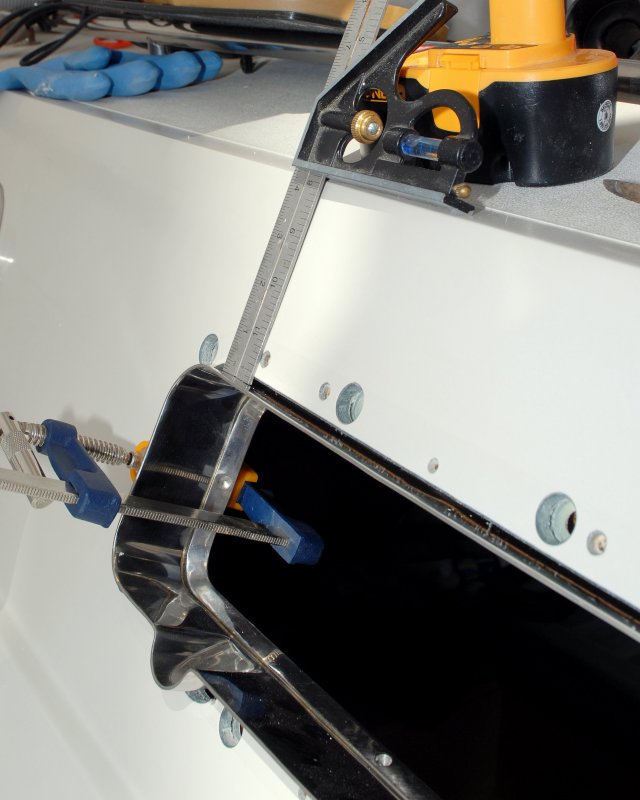
Dry Fitting & Leveling The Ports #2
Checking the left side of the port for level. You can see, when the camera pulls away, how slight the bevel is. It’s there but hard to see in this photo.
IMPORTANT: On a boat with no clear cabin line, for the ports to align with for level, you may need to set up a ladder and back away from the vessel. Climb the ladder and use the old-school MK I eye ball as your determination of what looks level.
TIP: Click any photo to make it larger.
With Teak Spacer & Without
The port in the foreground of this photo has the teak spacer installed and the port in the distance does not. This is why the spacers are needed on a boat with thin solid glass cabin sides.
The NFM teak spacers are 5/8″ thick and by adding them it left about 1/4″ of the spigot protruding vs. almost one inch without. As they say measure twice, cut once..


NFM Teak Trim Rings
These are the NFM teak spacers. They run about $40.00 each but are well worth it. Do yourself a favor and do any finish work or varnishing before you install them.
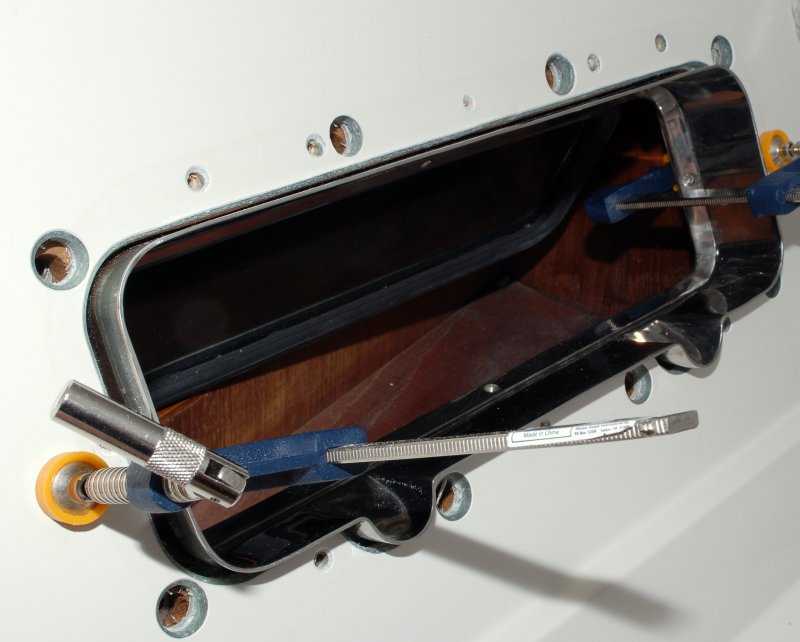
Interior View
This image shows the teak trim ring and the wood blocks I used for clamping and aligning the port.

Ready For Butyl
In this photo I’m getting ready to level the port and clamp it down in order to begin applying the butyl.
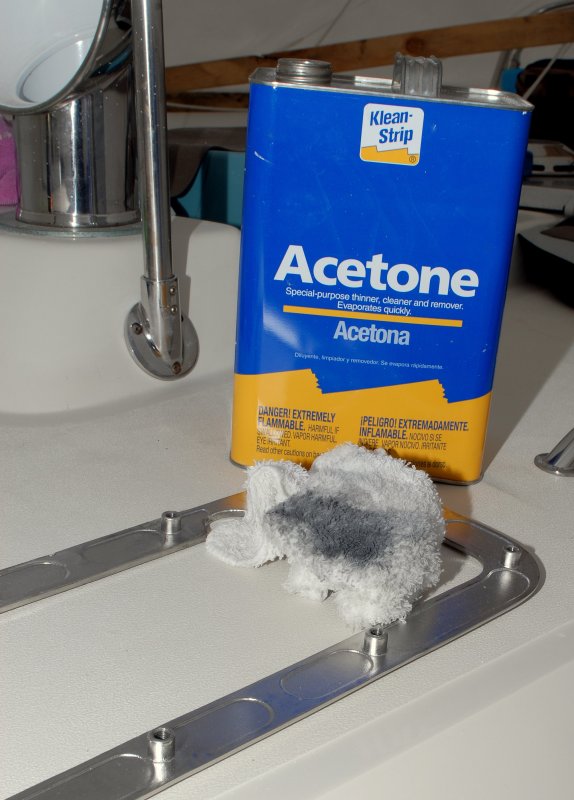
Clean The Port & Trim Ring
In the previous photo I’d already cleaned & prepped the cabin sides. I can’t stress enough how important cleaning and prepping the surface of the boat is and cleaning the ports is also equally & very important.
That rag, in the photo, was white when I began cleaning this port. Just because the ports are brand new does not mean they are clean. I wiped the exterior of the spigot and the hull side of the flange with Acetone and there was plenty of cutting oil and grime to be taken away.
If you don’t properly clean the stainless you’ll run the risk of a leak. These ports are filthy when they arrive so please do clean them with a non-oily solvent of your choice.

Wrapping The Butyl
EDIT: When this article was written Bed-It Tape did not yet exist. One of the main reason Compass Marine Inc. developed Bed-It Tape was due to the low quality and continual bleeding and staining of the NFM black butyl. The NFM butyl tape is a cheap run-of-the mill butyl formulation.
If I were doing this job today, it would be done using only Bed-It Tape and no marine sealant. Bed-It Tape can be purchased at the link below.
In this picture I’ve already forced one round of the NFM butyl into the gap and I’m working on my second round. I found a silicone kitchen tool that worked really well for forcing the butyl into the grove without it sticking to the tape.
With the teak spacers it’s very difficult to wrap the ports spigot first, as NFM illustrates in their instructions, before inserting it. Instead, I chose to clamp the port, level it, then install the butyl from the outside.
Again, I varied from the NFM instructions on this issue and installed the butyl from the outside, not the inside, but both methods will work.
TIP: I applied the butyl from the outside for one major reason. I don’t believe in sealing any fitting, installed on a boat, from the interior side of the vessel. If you do get an external leak, between the fitting and hull, you’ll want to know about it.
If I sealed or bedded the cabin side (inside the boat) of the fitting I may be trapping water or worse diverting it somewhere else because it can’t escape out the back side of the fitting. Diversion of water by, internal sealing, creates an almost impossible scenario for tracing external leaks.
Even though this boat does not have cored cabin sides, kudos to CS-Yachts for this move, I still chose to only seal from the front of the port to prevent trapping any water in there that could potentially freeze, expand and do damage in the cold Maine winters..
In short, I did not want any sealant between the ports inside flange and the hull only the outside flange, trim ring and the spigot. I was able to get about five pieces of butyl around the spigot drain and two laps of butyl around the rest of the port, but I can assure you, this was NOT easy.
Squeezing in the butyl and seating it took almost 50 minutes per port before I even began to install the trim ring and bolts or clean up the “squeeze out”.
If your previous ports were installed with silicone you should, at a minimum, wet sand until you get NO water beading when you spray the surface with water. There is no chemical that will remove the embedded silicone from the gelcoat other than sanding. If anyone knows of one please email me! I’ve already tried just about every chemical known to man, even stuff only body shops can buy that is specifically intended for removing silicone. IT DOES NOT WORK ON FIBERGLASS either because it’s too porous or it eats the gelcoat.
TIP: If water beads around where the trim ring is to seal it’s not clean. I use a spray bottle filled with water for this test and do it every time I re-bed a fitting. Do not skimp on this detail.
Using The Kitchen Tool
Here’s the kitchen tool I used for seating the butyl. In combination with the waxed butyl paper this end worked well. The other end, with the white silicone spatula part removed, worked great for stuffing it in between the hull and port.
I applied all the butyl with the clamps in place. When the butyl is finally installed, and packed in place, you can quickly remove the clamps, install the trim ring then re-place the clamps until you get the machine screws in place.
Second Round Seating The Butyl
In this photo the second round of butyl is just about ready. You do not want to leave the butyl too thick here or it will squeeze out the outer edges of the trim ring and make a huge mess..
I had to redo my first port because I used too much butyl when installing it.
EDIT: If you use a gray butyl tape like Bed-It Tape there will be no need for the marine sealant.
You need enough to make a seal, and to squeeze out between the trim ring and the spigot, but not so much that is squeezes out the outer edge of the trim ring..
Butyl Tip
TIP: When installing the butyl you need to understand and know this stuff is very sticky. It’s like Silly Putty but tenaciously gooey. Use the paper that it comes wrapped in to help seat it.
You can see how I’ve forced it into the seam using the paper. When your done simply remove the waxed backing paper.

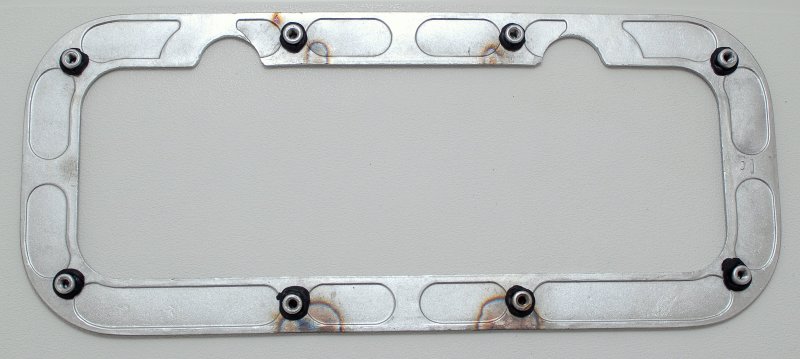
Prepping The Trim Ring – Butyl
Before you can even begin to install the trim ring there are three steps that need to be taken.
The first is to actually clean the trim ring as stated above. The second, pictured, is to wrap butyl around each of the trim ring studs. I found out the hard and messy way that you do not want HUGE globs of butyl around the studs or it will squeeze out the top of the trim ring and make for some messy clean up. I actually re-did my first port because of this.
Seeing as I countersunk each hole I wanted just enough to fill the bevel and a touch more, that’s it.
To make the butyl thinner I simply rolled it between my fingers while pulling slightly at the same time, like you would do with a joint, If your not familiar with this action a visit to any college campus will teach you. I then cut it using a knife and a silicone cutting board and wrapped it around each stud.
Prepping The Trim Ring – Sealant
The next, or third step, in prepping the trim ring, is to apply the sealant. Do not skimp on sealant. Sure it will squeeze out and you will waste a lot of it but it’s important that you have enough in there to seal the entire face of the trim ring. I also doubled up around the studs by applying the sealant on top of the butyl rings.
For this task I used 3M 101 which is a one part polysulfide. It has a bond strength of about 140 PSI and an elongation at break of over 400%. I have been using 3M 101 or Sikaflex 291 a lower bonding (220 PSI) single part polyurethane sealant for years and had great success.
I chose to use 3M 101 polysulfide because it’s easily removable in the future, never hardens as it’s what they used for the UV exposed seams in teak decks. Polysulfides are quite UV resistant by nature, without added UV stabilizers like the polyurethanes need. Even the lowest adhesion polyurethanes like Sikaflex 291, at 221 PSI, offer more adhesion than is necessary in a mechanical fitting which a port is.
NFM recommends, in their instructions, Sikaflex 295UV, a one part polyurethane. The problem I have with 295UV is this. 295UV bonds at 450 PSI (adhesion strength per square inch) which is 150 PSI more than other polyurethanes such as Sikaflex 291 at 221 PSI and 3M 4200 or 3M 4000UV which are both 300 PSI. Anyone who’s ever used 3M 4200 knows how difficult a 300 PSI product is to remove let alone a 450 PSI product like Sikaflex 295UV.
I know the owners of NFM have the utmost confidence in their ports but at some point they will need to be removed or re-bedded and with a 450 PSI adhesion it will be difficult, more difficult than is necessary. Heck, it’s even hard to remove stuff bedded with 3M 101 at 140 PSI.
IMPORTANT: 3M 101 has been discontinued. If doing this project over again I would use gray Bed-It Butyl tape and avoid the entire marine sealant process.

Setting The Trim Ring
Once the butyl is in place and you’ve prepped the trim ring with a polyurethane or polysulfide, of your comfort and choosing, it’s time to set the trim ring.
If you used the method I outlined it is possible to remove the clamps, for a brief period, after you’ve seated the butyl tape so you can install the gooped up trim ring.
Once the clamps have been removed slide the trim ring over the ports spigot/flange and re-set the clamps. Do not over tighten them and use just enough pressure to get the machine screws started from the inside.
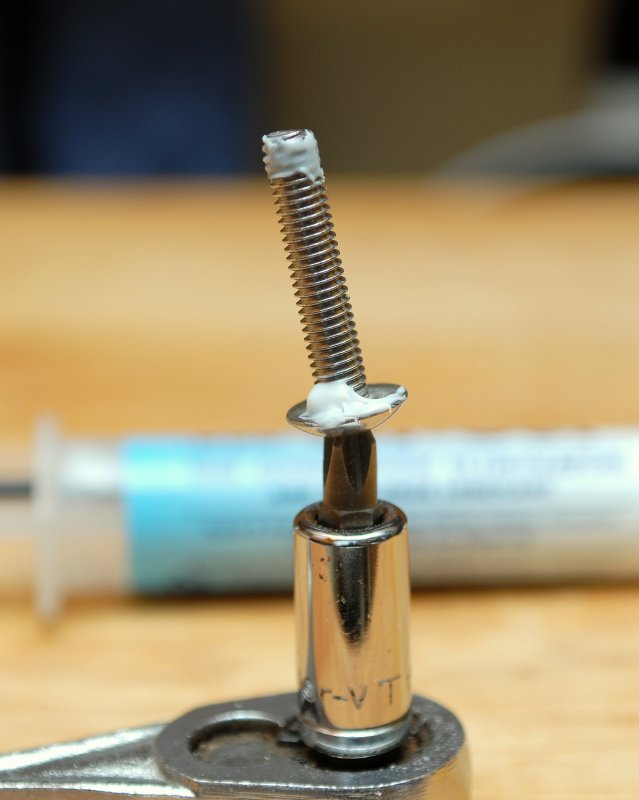
3M 101 On Bolt Threads & Tef-Gel On Bolt Head
Why did I used 3M 101 & Tef-Gel on this machine screw?
Over the last 35 years of boating and messing with stainless steel nuts & bolts I’ve come to know a phenomenon called thread galling quite well. Some may not know what this is, even though they may have experienced it.
Thread galling is most prevalent with fasteners made of stainless steel, aluminum, titanium, and other alloys which self-generate an oxide surface film for corrosion protection.
During fastener tightening, as pressure builds between the sliding thread surfaces, protective oxides are flaked, sloughed or perhaps wiped off. These flaked off pieces create an interference or high point and thus seize or lock the nut and bolt together. This clogging action causes increasing surface adhesion. In the extreme, galling causes seizing or the actual freezing together of the threads. If tightening is continued, the fastener can be twisted off or its threads ripped out.
Some stainless nut & bolt manufacturers actually refer to this phenomenon as cold welding. Anyone who has seen a bolt and nut seized in this manner understands the nature of this description.
TIP: Use some sort of lubrication for the threads as this is the only way to minimize thread galling.
Galling is a problem that can occur at random between two un-lubed stainless pieces such as a nut and a bolt. Essentially, as you begin to tighten they bind together never to come apart again. You never know when this will happen, it just does.
The last thing I wanted was to gall one of the machine screws into the flange as this would require a drill out and re-tap of the trim ring. I could have used Loc-Tite on the threads, to prevent galling, but I know from experience that 3M 101 works and it too prevents the bolt from backing out. I used Tef-Gel at the head of the bolt for lubricity for the stainless to stainless mating where the pan head machine screw meets the ports interior flange. It allows a very smooth tightening of the machine screw with no false torque grabbing..
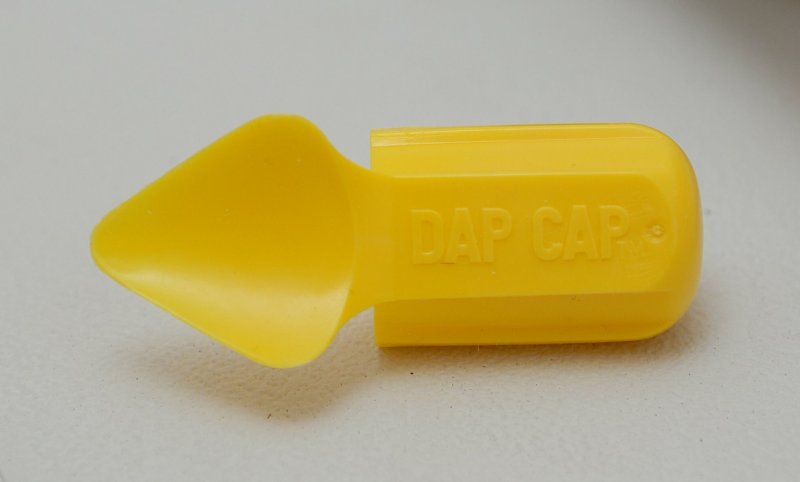
The DAP CAP
TIP: This handy little item is called a DAP CAP and it’s available in the Home Depot paint department. It serves two purposes.
1- It can be used to clean up the excess sealant that squeezes out.
2- It fits over the end of an open tube of caulk to seal it for future use.
NOTE: The DAP CAP does not fit Sikaflex nozzles but does work on 3M brand tubes.
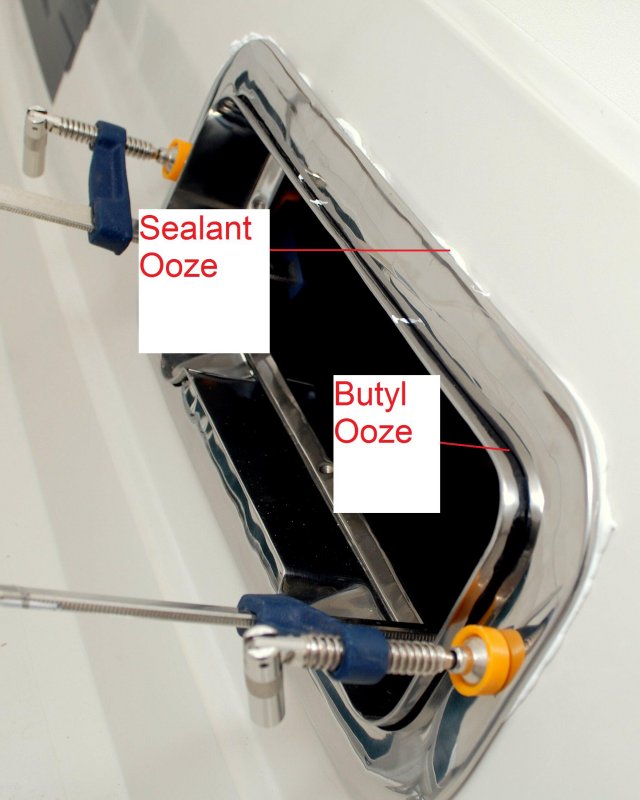
Clean Up The Squeeze
This is how you use the DAP CAP. Once the scoop is full simply wipe it onto a paper towel or rag and toss in a bag-lined trash can. Now you’re ready for your next scoop of goo..

Tighten The Machine Screws
This photo shows the clamp still in place and the bolts inserted about two to three turns. At this point, if you have subscribed to this particular installation method, you may now begin tightening the machine screws in an alternating pattern. If you subscribed to the NFM method of creating a “gasket” follow their instructions.
It’s important for the seal, and even distribution of sealant under the trim ring, using either method, to tighten the machine screws so the trim ring compresses as evenly as possible.
I find it considerably easier to tighten until you meet some resistance, then stop, wait and repeat in 15 minutes or so. I would move onto another project and come back fifteen minutes later and take another few turns. Torquing the trim ring screws slowly allows the butyl to compress slowly and evenly rather than force tightening all the screws immediately.
You’ll notice the Tef-Gel around the bolt head which made for easy turning with minimal grabbing of the two surfaces. Once done, I simply wiped this excess up with paint thinner.
Day Two Clean Up
I let all the ports sit after the tightening them down and then came back and did the final clean up. For the fine detail cleaning I used my favorite boat chisel.
After the Chisel
By letting the 3M 101 set up overnight it was pliable enough to remove with the chisel and yet still soft enough to get a clean edge with a solvent wipe down..
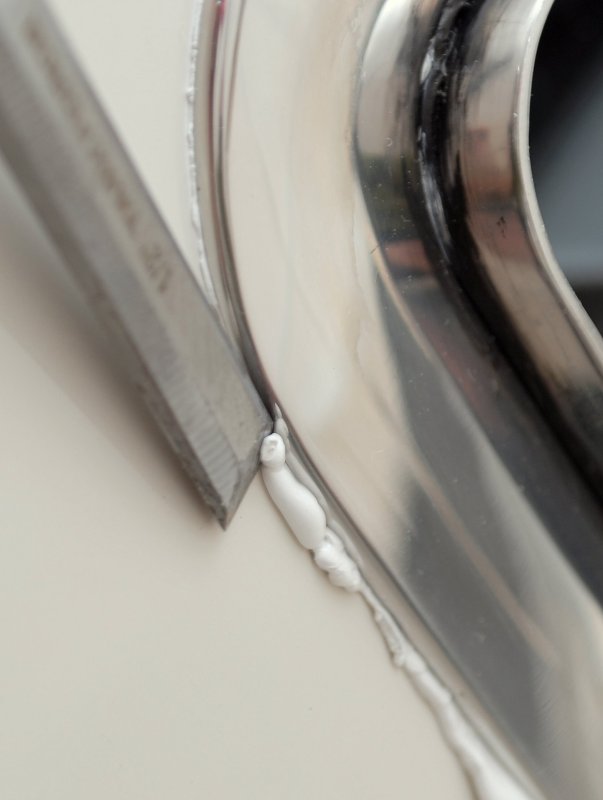
After The Paint Thinner
Here’s the finished edge. I used paint thinner on a terry cloth rag to get that edge.
IMPORTANT: Do not soak the rag in the solvent. You want just enough solvent to keep the rag damp, to smooth the outer edge of the sealant, that’s all.
You do not want the solvent to eat into or soften the sealant through transfer of of the liquid from the rag to the surface you just want it to smooth over the seam.
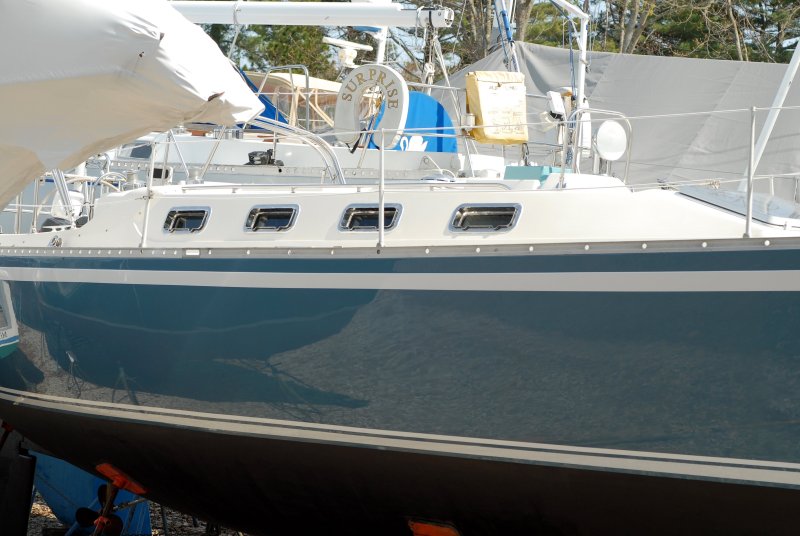
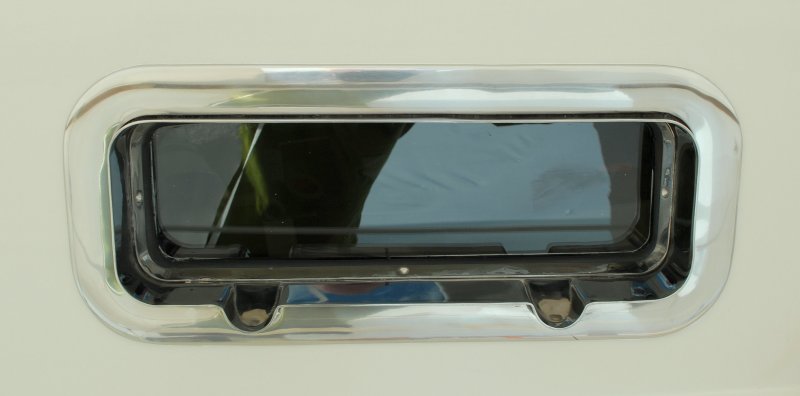
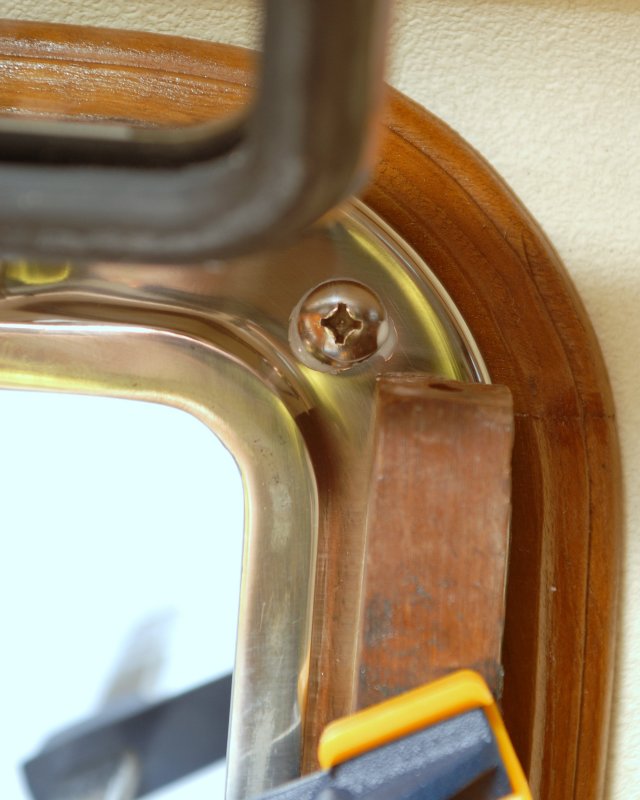
The Final Result
Now that the ports are in I was finally able to remove the cover and snap a photo.
TIP: Since I installed these NFM ports, I’ve treated the port gaskets religiously with 303 Aerospace Protectant. This has resulted in rubber gaskets that look and perform as well today was when they were installed 14 years ago. There has been absolutely no sticking of the gasket to the frame thanks to the judicious use of 303 Aerospace Protectant. Each time I open the ports I squirt a bit onto a rag and wipe the gasket before closing the ports. It adds minimal time but ensures the port gaskets will last for a good long time.
EDIT: It has now been 15 years since this project was completed and the ports look as good today as the day they were installed. They have performed flawlessly, never leaked a drop of water, and really lead to a lot of aesthetic compliments. The only gripe I have about this installation is the cheap black-butyl tape from NFM. It is low quality, stains and bleeds in hot weather. If Bed-It Tape had been used, none of these issues would exist.
Good luck and happy boating!