Yale Maxi-Moor II Pendant
Over the last few years I have been repeatedly asked how I handle my mooring pendants. This article is about how and why I use the methods I use to keep our boat safe and sound. There are many ways to skin this cat but after observing & photographing mooring system failures, for close to 42 years, I have come to my own findings and choose what I do based on my own evidential findings.
Myself and my family have had boats on moorings for 50+ years. In that time we’ve never lost a boat to a storm and never parted a single pendant to chafe. We’ve come close but always had a second to back it up.. PPPO! Proper preparation pays off.
Let me first say that I am a strong proponent of dual UNEQUAL LENGTH mooring pendants. However, done incorrectly, dual pendants can cause more harm than good. The methods in which they are laced together and installed and connected to the system are critical to the performance outcomes. Others whom I respect greatly, such as Wayne Hamilton, the Searsport Maine Harbor Master, and owner of Hamilton Marine, believe in only one pendant. You could not pay me to lay our vessel to one pendant, but Wayne does.
Wayne and I disagree on this and I will go into detail to explain where my beliefs stem from so you can make your own educated decisions.
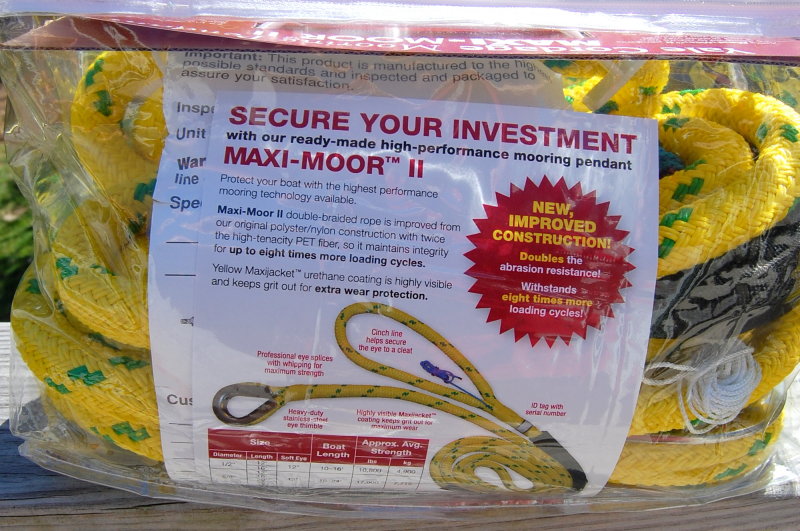
The mooring pendants I choose to use are made by Yale Cordage right here in Maine. They are time tested, proven and extremely durable. They are made of a polyester jacket with a polyester PET core and then treated with a proprietary MaxiJacket coating to resist marine growth grit and to aid in abrasion resistance. They also utilize stainless steel thimbles, which don’t rust and abrade the pendant, and they have a built in chafe sleeve.
The Yale family takes mooring pendants very seriously, so seriously that each pendant has a traceable serial number! The mooring field in Falmouth, ME just happens to be some of Yale’s prime testing grounds.
Hands down The Yale Maxi Moor II brand of pendant are the most tested and proven mooring pendants made. You can buy less expensive pendants, but not the same pendant, as a Yale Maxi-Moor II.
Lay Them Out
In this next series of photos I am going to go through the steps I have been using to lace mooring pendants for nearly 30+ years. In that time not one failure or incident has occurred nor damage to the pendants from the lacing. The process of lacing is critical in that you don’t lace them too tightly.
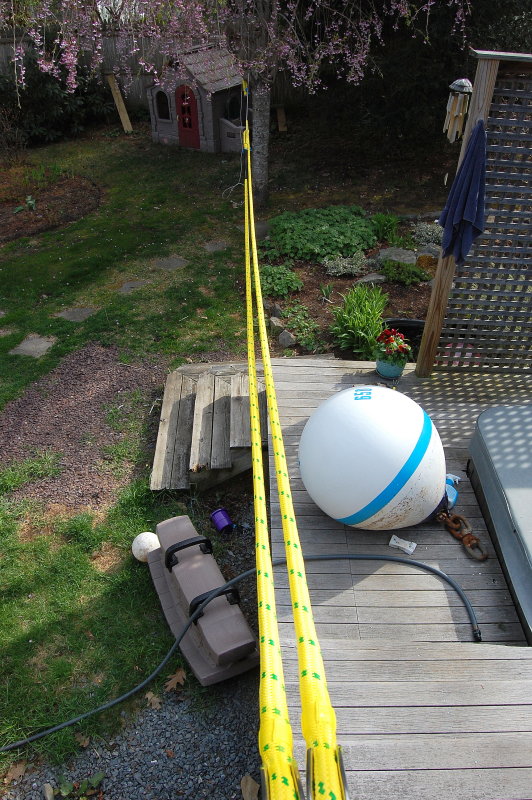
#1 Lay out the pendants parallel to one another and stretch them so you can work them easily. I use the deck and the fence in our yard to do this. Here they are ready for lacing.

The Lacing Begins
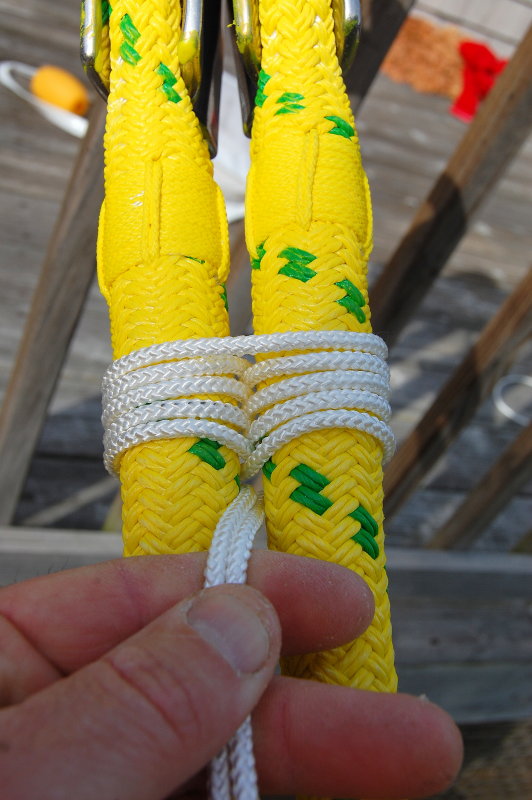
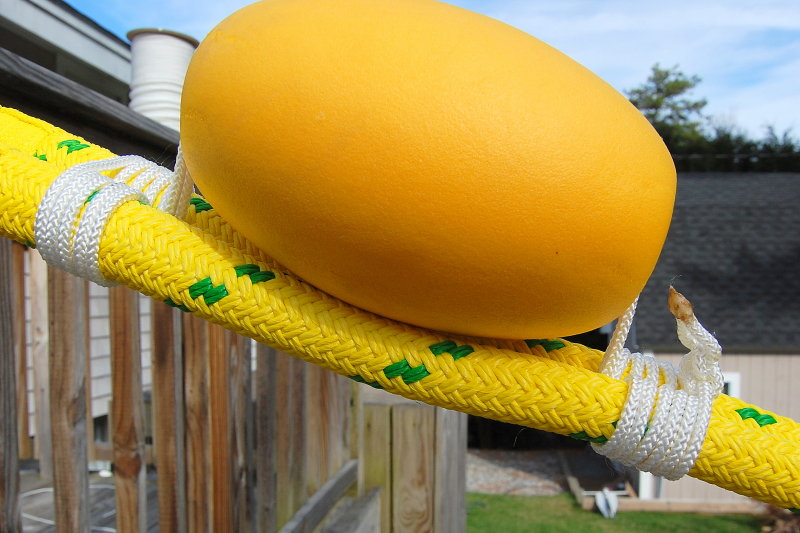
#2 The lacing begins as close to the thimbles as possible. This keep the thimbles from “hockling” and interfering with each other on the shackle.
#3 Begin the lacing by starting your first figure 8 around the two pendants. Do not snug this tightly. The number of figure 8’s you do around the pendants will hold the toggle buoys in place without being too tight.
Figure 8’s Complete
#4 Continue the figure 8’s until you have at least five. Remember, do not do this too tightly. End your 8’s with the two lacing lines in between the pendants.
Insert The First Toggle Buoy
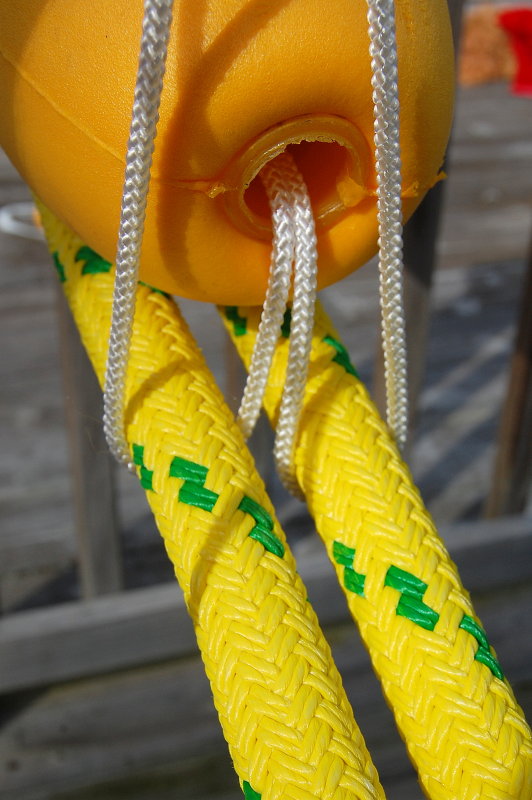
#5 Grab your first toggle buoy (Hamilton Marine stocks them #729314)and run the two lines through the center and again begin figure 8’s on the other end of it.
First Toggle Buoy Complete
#6 Tie off the end of your figure 8’s using a square knot then melt the two ends of the line together. Remember none of this is done tightly. The Chinese Finger Cuff action of the figure 8’s holds the toggles in place without impeding the pendant. They ride loosely on the double braided outer jacket.

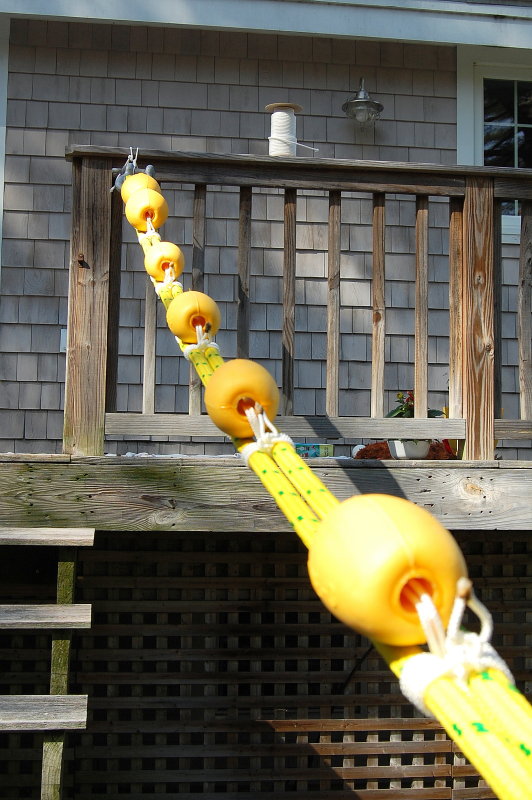
The First Two Are Close Together
#7 I only use only below the ball mooring connections & soft mooring balls. The pendants & ball are connected to the top a large swivel and the mooring chain to the bottom of the swivel. The two toggles close together keep the shackle in plane and don’t allow it to drop and twist around the swivel.
These two toggles are critical and they help to nearly eliminate the pendants wrapping around the chain, as is seen so often in mooring fields. These two toggles need to be able to “float” the thimbles and shackle, as you will see later on.
The Swivel
I mentioned the swivel earlier and here it is. A swivel is a critical part of any permanent mooring system. In Falmouth, Maine it is an enforced ordinance that you use a swivel.. Unfortunately they are also one of the biggest weak links in any mooring system.
Because I know & understand that swivels are weak links, & wear items, I purposely use over sized eye to eye swivels. This one is made by Campbell and was purchased through Hamilton Marine (#106233). These are not the cheap Chinese imposter products that have flooded the US market, they are high quality load rated swivels made right here in the USA. If I recall this is a 1″ swivel and it still gets replaced every 2 to 3 years.

All Laced Up & Ready For Install
#8 You want to lace about 8-10 feet from the ball so when you leave the mooring the lazy end of the pendants does not wrap the chain when you’re gone. I have yet to come back to a tangled pendant using this method but it could still happen, in the right conditions, anything is possible with boats.
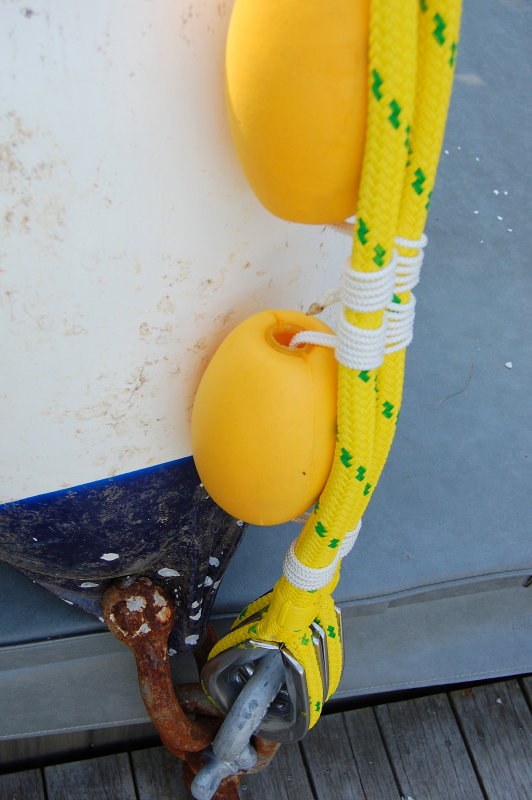
Toggle #1 & #2 Perform An Important Duty
As can be seen here the pendants are attached to the top of the swivel and the toggles face the ball. I install it this way because the ball can attract hard growth which could chafe the pendants. By placing the toggles up against the under side of the ball they see the wear, not the pendants.
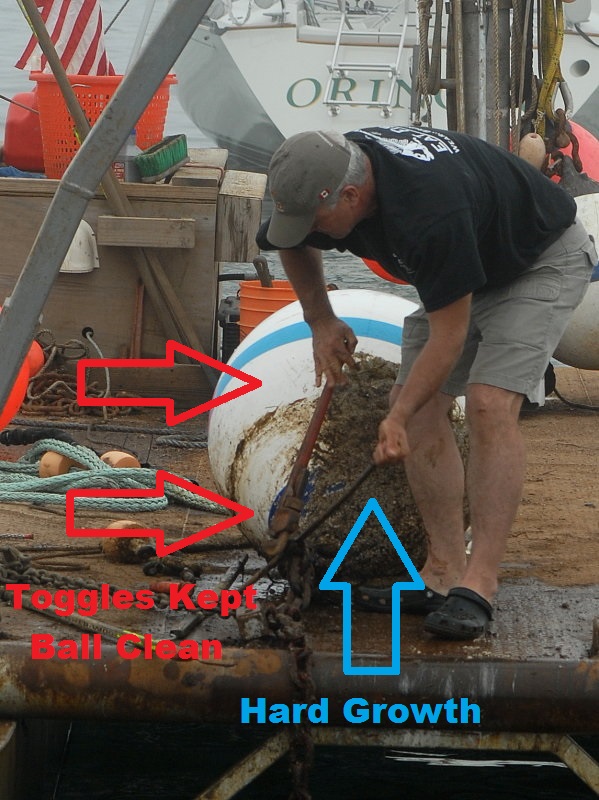
Toggle Riding Spot
After a bad Nor’Easter I took my usual precautionary approach and replaced my pendants, mid season. In this image you can see the role the toggles have from one side of the ball to the other. This is why the toggles face the ball and not the pendants. Marine growth being ground into the pendants could be damaging. Due to the way I install the pendants, with the toggle facing the ball, I don’t have to worry about the pendants rubbing the under side of the soft ball and picking up hard marine growth..
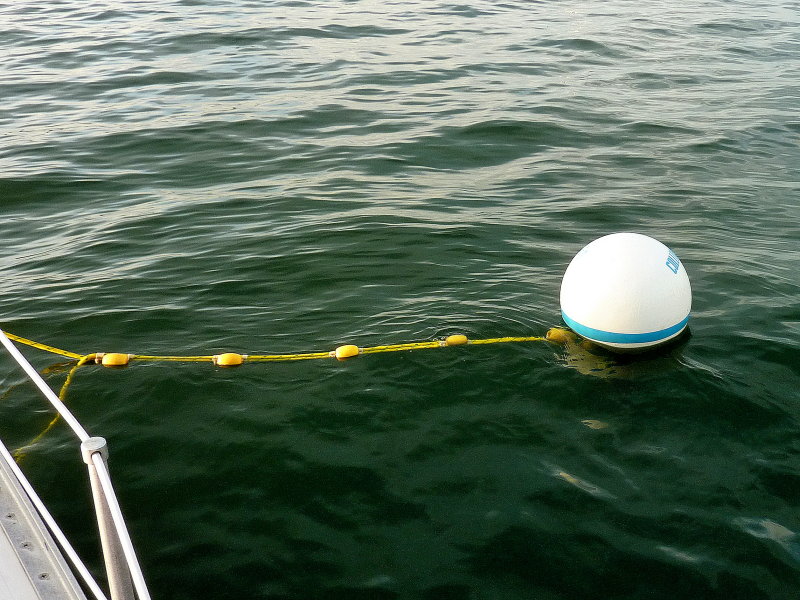
In Water Shot
So just what does this actually look like in the water? Here you go.
As can be seen in this image the toggles are keeping the pendant & shackle oriented up, and the pendants / toggles ride nicely against the under side of the ball. Done properly they will stay this way indefinitely & will not not droop or hockle the shackle around the swivel or chain.

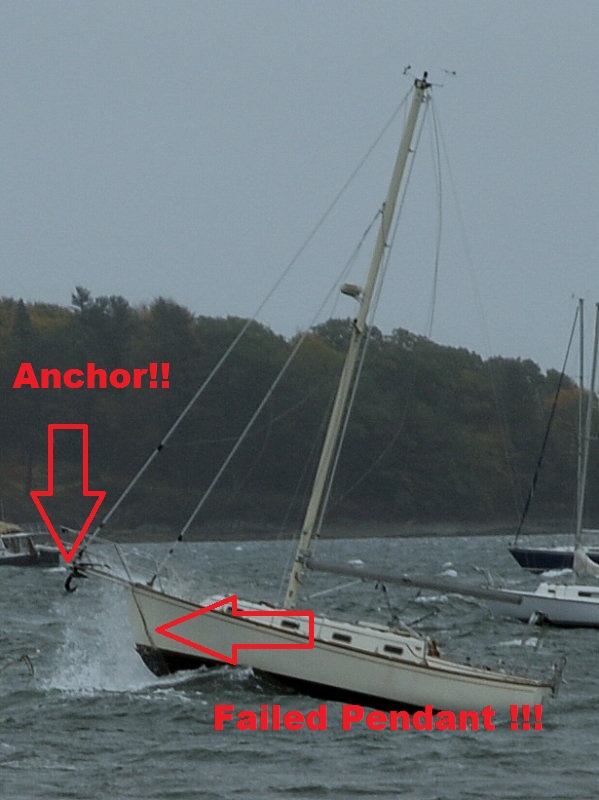
Pendant Too Short
There is so much wrong with this picture, where to begin?
#1 This pendant is far too short. When this bow raises up 4-5′ in a storm the tension and friction over the bow chock will be intense and can lead to accelerated chafe and physical melting of the fibers. The pendant needs to be longer.
#2 This anchor is going to be a major issue in a storm. There is already evidence of pendant damage caused by the anchor.
#3 When, not if, this pendant fails in a storm this boat will be on the rocks. A second pendant, longer, lazy and unused could save this boat but the anchor still needs to be removed.
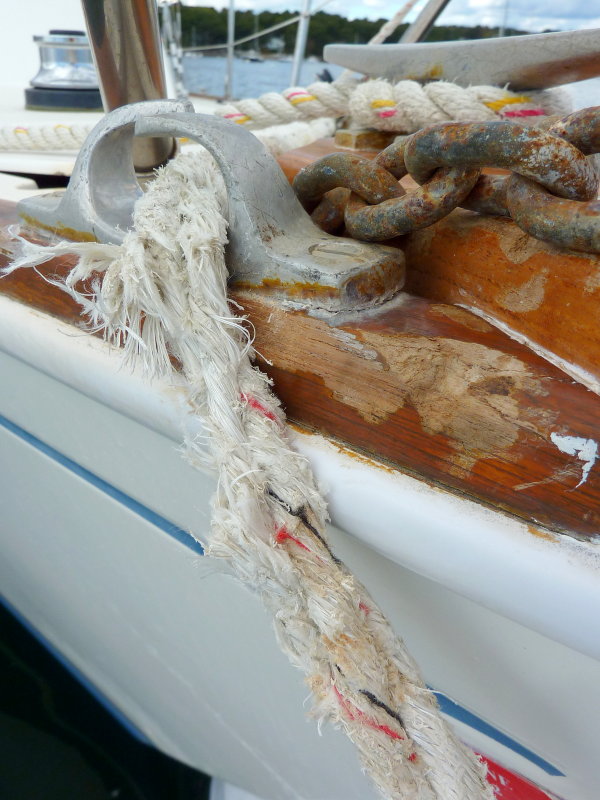
Result of Pendants Too Short
This is a prime example of the heat that can be generated over a bow chock with mooring pendants that are too short.
This nylon three strand pendant has physically melted into a blob of hard solid plastic. Not good especially when the other “equal length” pendant had already failed. These equal length pendants failed at almost the exact time. By the hair of a chin this one made it through the storm and the other one failed.


Become Your Pendants
I suggest that anyone who has a boat on a mooring take a moment to stand on the bow and mentally picture your boat in a storm. Picture it like this and ask yourself;
What are my pendants doing right now?
Is my anchor interfering?
Do I have bow appendage catching/interfering with the pendants?
Picture Your Boat In A Storm
Do I have adequate chafe protection?
Are my pendants long enough to minimize friction heat over the chocks?

The Moment A Pendant Fails!
Oops I left my anchor on the roller and it chafed through my port mooring pendant!!!
What if there were only ONE PENDANT????
DUAL UNEQUAL LENGTH PENDANTS!!!!
THIS IMAGE IS THE WHY!!!
Primary Pendant After Storm
Why dual unequal length Pendants? This and the next image are examples.
Keep in mind that storms bad enough to chafe through pendants are often short in their peak intensity & duration. This primary pendant actually survived this Nor’ Easter storm, but just barely.
Secondary Pendant After Storm
And here is the secondary longer “lazy” pendant ready for an entire storms duration. It is untouched, unmolested and ready for use when the primary pendant fails.
Equal lengths pendants almost always wear EQUALLY, go figure…..
Unequal length pendants don’t wear equally and can simply buy you more time. Time is your friend in a violent storm when it comes to chafe.
There are many ways to skin this cat and here are my criteria:
#1 Dual unequal length pendants such as Yale Maxi Moor II.
#2 Pendants must be long enough to create a shallow angle over bow chocks. Short steep angles caused by pendants being too short can lead to accelerated chafing, heat and melting of fibers.
#3 Additional chafe protection during storms. I use Chafe-Pro products and find them excellent quality.
#4 Consider a storm pendant for known storms. I use a 1″ Dynema storm pendant for big storms. It becomes my secondary lazy pendant and connects to my existing secondary lazy pendant. Despite this being Dynema, highly resistant to chafing and nearly melt proof, I still use a Chafe-Pro sleeve over it.
#5 Our anchor never resides in the bow roller when the boat is on the mooring. It is stowed in the anchor locker each time we leave the boat for more than a day. Chafing of mooring pendants leading to failures are very, very often caused by anchors being left on bows.
#6 Always check with your local town or harbor master for local rules & regulations regarding moorings. Many municipalities have mooring regulations that totally SUCK and can be dangerous to your vessel. Just because luck has been on their side, up to now, only means the luck will eventually run out.
#7 Finally no mooring system is any good unless the cleats or strong points on your vessel are up to the task. Be sure your mooring cleats, Samson post or mooring bit are adequately backed, with substantial backing plates, and solidly mounted into your deck. Reinforcements of thin decks or cleats that penetrate deck core may often be required. Do not forget bow chocks when addressing the mooring cleats. These also often get torn out then the pendant gets cut like a knife.
Please don’t be afraid to challenge the local regulations if you feel they are inadequate or unsafe to your vessel. Do bring your evidence when you challenge them. You would be amazed at how clueless many municipalities are to mooring constructions and best practices. Many are very accepting & open to insight into what may be a more reliable system. Some towns do get it, but many don’t.
As I always say “Don’t just take my word for it.”. Do your research, beyond this article, and find out what makes YOU comfortable leaving your vessel on the mooring.
I am so confident in the approach we use for mooring our vessel that I actually prefer to have our boat on our storm mooring during big storms. I actually prefer this to being on the hard in a boat yard. You need to figure out for yourself what will give you this level of confidence in your own mooring system.