The Stuffing Box (click any image to see a larger version)
While digging around in some old boat parts boxes I found a stuffing box from an older sailboat. I though it would be a good time to rig it up in my shop and illustrate how to replace the packing material inside one of these tried & true work horse style stuffing boxes. Stuffing boxes are also called stuffing glands, packing glands or packing boxes but they are really all the same thing.
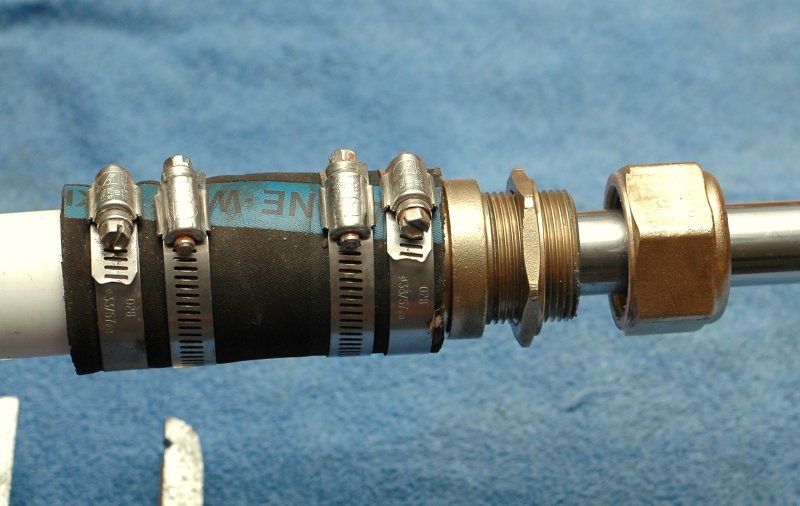
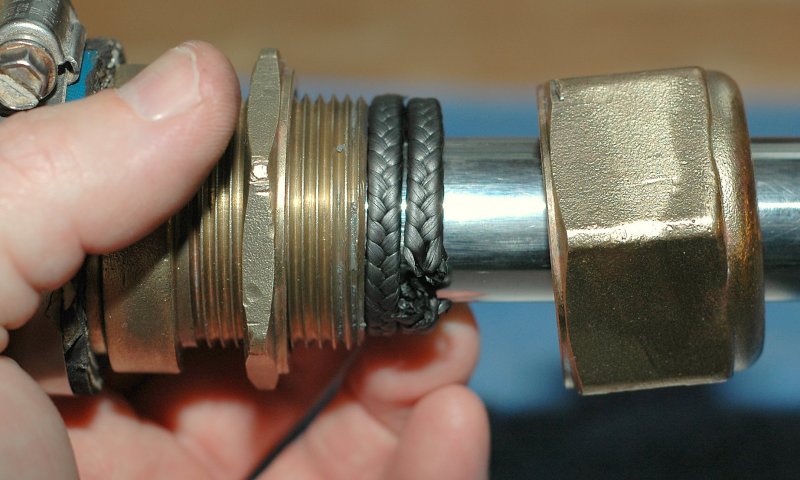
For illustrative purposes I cleaned the stuffing box of it’s oxidation and grime with my a stainless wire brush. I used a piece of 1″ diameter stainless steel as my makeshift prop shaft to complete the picture and present this as it would look inside a boat.
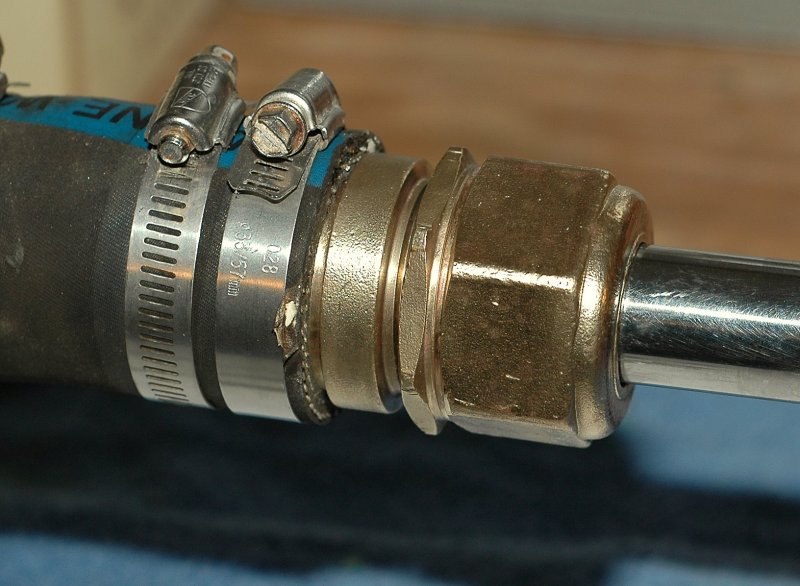
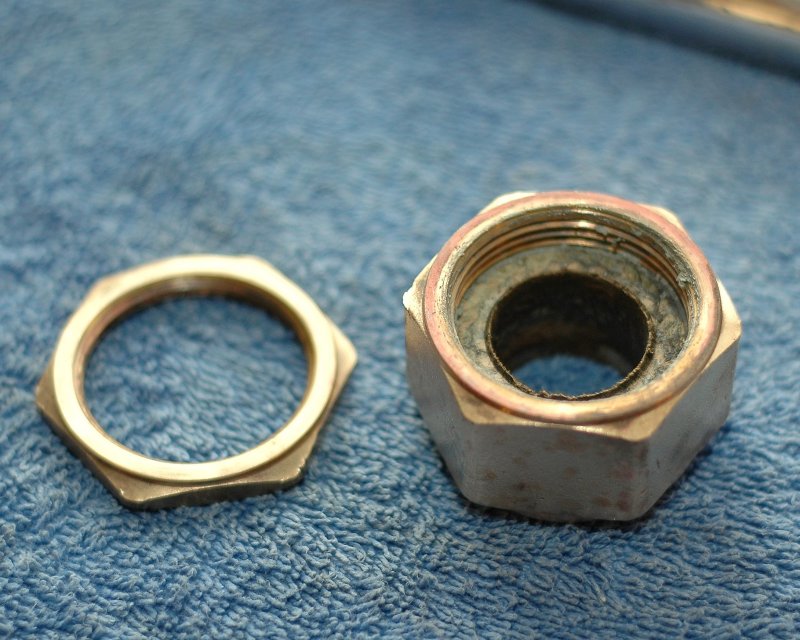
In this photo what you are actually seeing are two nuts not just one. The larger of the two is where the flax resides. The thin nut, on the left, is the locking-nut. Once re-packed, & properly adjusted, you lock these nuts together with two large wrenches.
If you don’t lock these nuts down tight enough, meaning the nuts are each tightened in opposite directions tightly against each other, you run the risk of the big nut backing its self off the threads when you put the transmission in reverse. Over the decades there have been more than a few boats sunk by improper adjustments of the stuffing box nuts.
IMPORTANT: I am not advocating the use of perforated hose clamps on a stuffing box. I would strongly urge you to use non-perforated AWAB 316 SS hose clamps instead. This article was done in my shop and I used what was easily on hand to make the article work. On the day I shot this I did not have any non-perforated AWAB hose clamps to fit this hose. The article is about re-packing the stuffing box not about the hose clamps.
Stuffing Box Wrenches
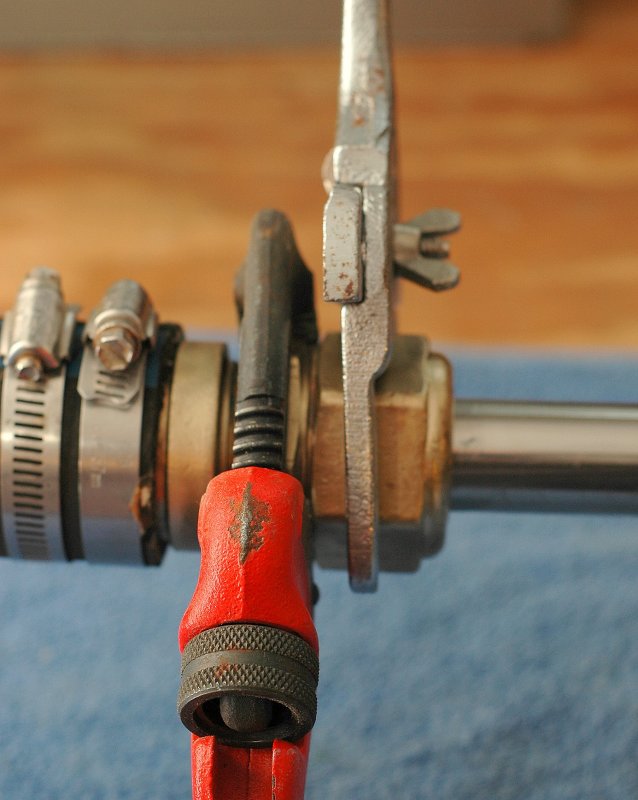
This picture shows two inexpensive wrenches you can use to loosen and tighten a stuffing box. One wrench is a traditional pipe wrench and the other is a spanner wrench designed for a sink drain. Both of these wrenches are available at Home Depot or any hardware store.
I find it easier to use the pipe wrench on the small & thin locking nut and the spanner wrench on the big nut. It’s very important to use wrenches that fit the nuts well. Water pump pliers will, in many cases, not work very well or will not get the nuts tight enough after adjustment. Use good wrenches and not pliers for safety’s sake.
TIP: While I show these wrenches as wrenches you can use I would urge you to purchase as set of proper stuffing box wrenches for your particular box. Buck Algonquin and others sell packing box wrenches and they can be purchased from vendors such as Hamilton Marine.
If you’ve tried the above method and the nuts don’t break apart use a little bit of PB Blaster or Kroil. Products such as WD40 DO NOT WORK WELL AS A PENETRATING OIL. I can’t stress enough how much of a difference there is between a product like PB Blaster or Kroil and lousy penetrating products such as WD40.
Here’s a direct quote from a reader who used this article for directions. Unfortunately after three hours, Liquid Wrench, and a broken tool he gave up and emailed me for advice:
Begin Quote:
“I knew where the cap and the locking nut were, I just couldn’t budge them. I went out and bought some of the PB Blaster you advised me about and sprayed it on. Ten minutes after spraying it broke loose. PBB rules. Thanks”
End Quote:
Tightening & Loosening
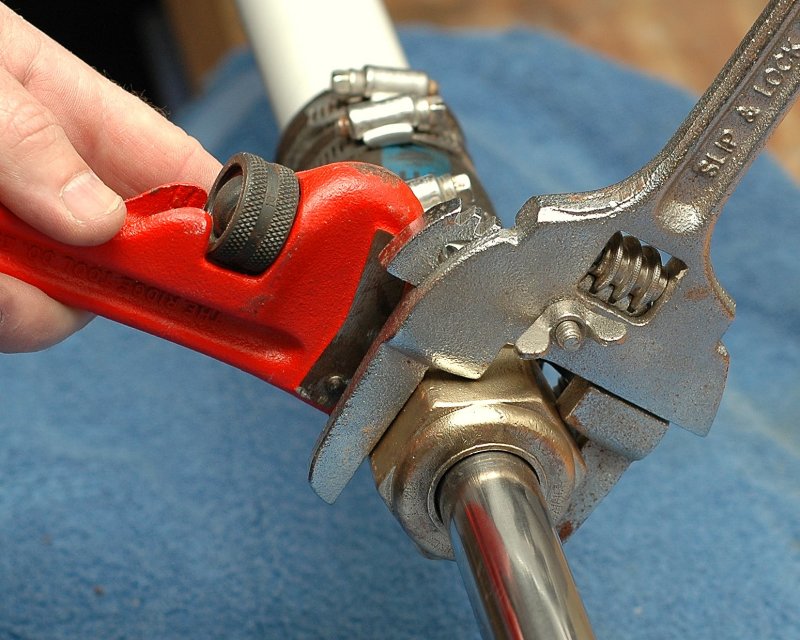
Here’s another view of the wrenches and the process.
*When loosening the nuts the two wrenches are moved towards each other
*When tightening the nuts the wrenches (as shown here) are moved away from each other.
Broken Free
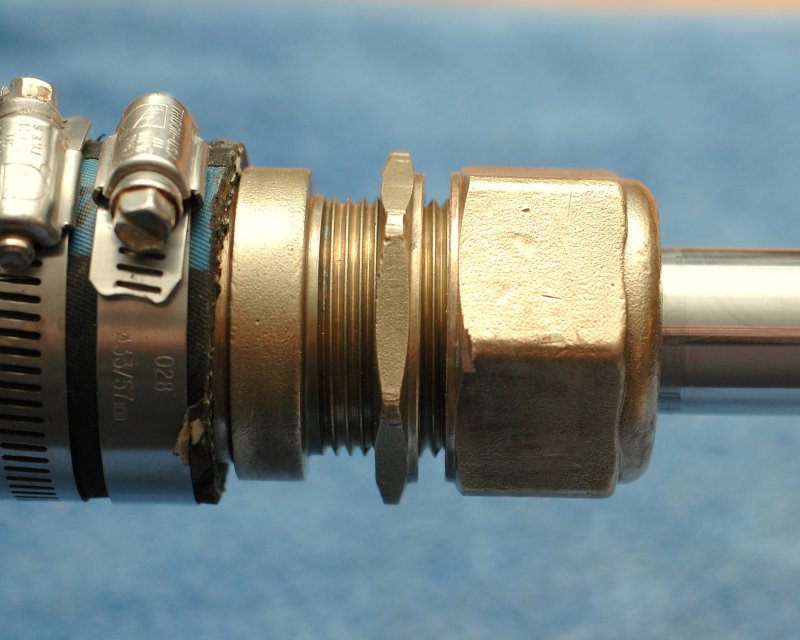
In this photo it’s much easier to see the two distinct nuts. The thin one on the left is the locking nut and the big thick nut on the right is the packing nut.
Nuts Loose
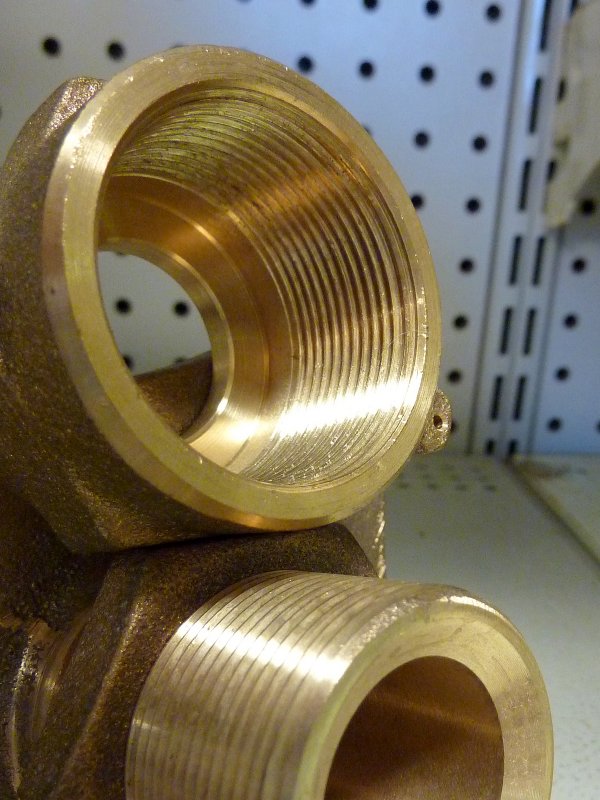
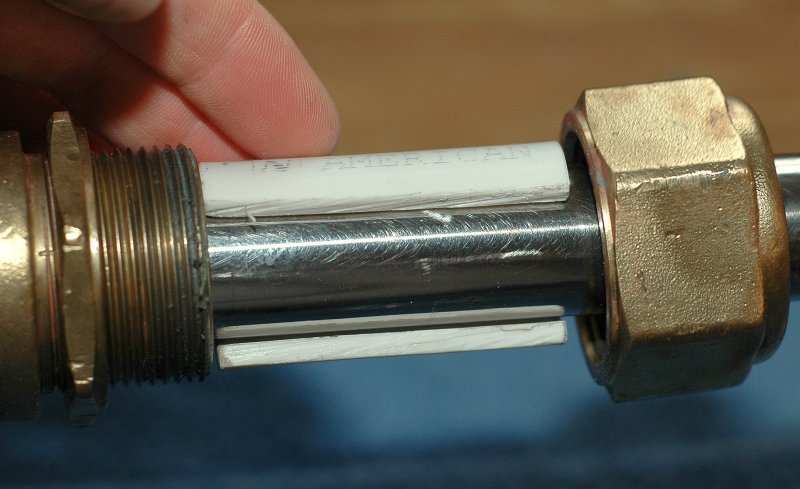
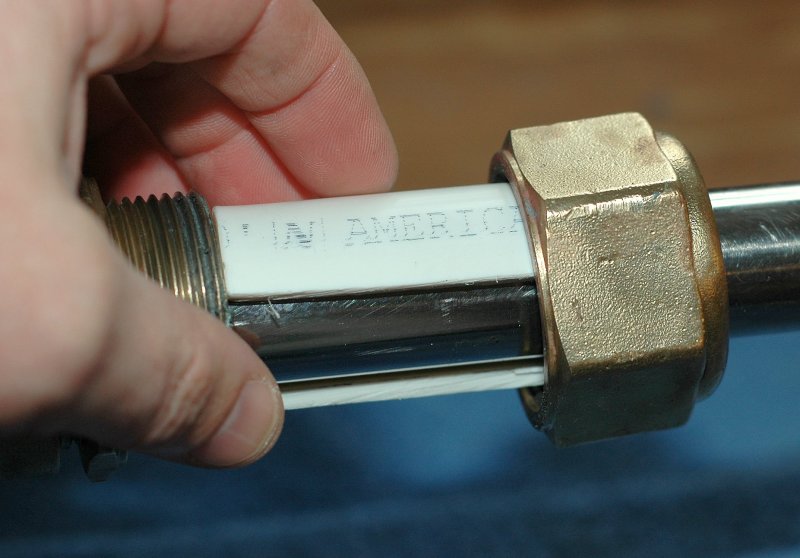
This photo shows the threaded male end of bronze stuffing box and the packing-nut or the female end of the stuffing box separated from the male end. The white PVC pipe on the left is my dummy-mock-up of a vessels fiberglass shaft log.
The rubber hose connects the bronze stuffing box to the boats shaft log and needs to be replaced periodically.
If this rubber hose cracks, deteriorates or starts leaking, it can sink your boat. Most references suggest replacing the rubber stuffing box hose every seven to ten years.
Correct Hose vs. Incorrect Hose
If you happen have your shaft out, this makes for an opportune time to replace your stuffing box hose as well.
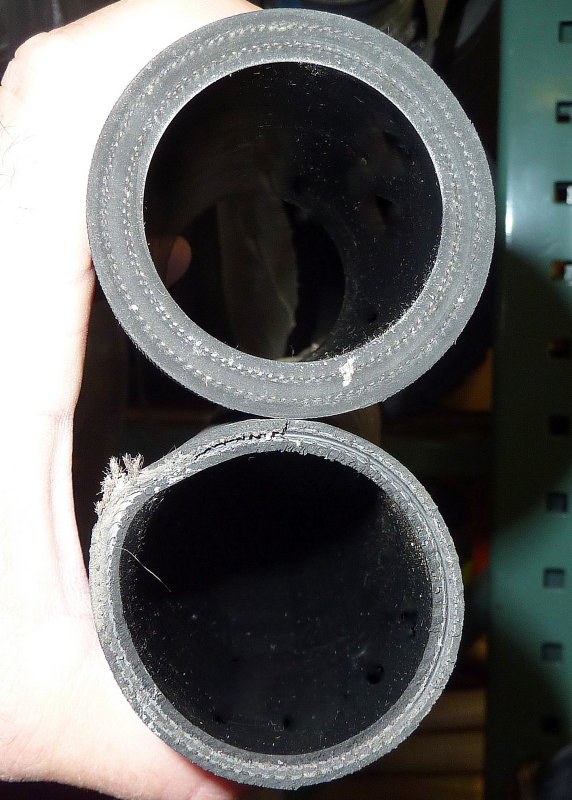
The thicker hose on top is specifically made for stuffing boxes. It’s a robust 6 ply hose, and meant to take the abuses of a drive train installation. The stuffing box hose on top is made by Buck Algonquin. Buck Algonquin a US manufacturer of quality bronze packing boxes and other drive-line components.
This Buck Algonquin hose, sized for a 1 3/4″ shaft log, can be purchased from Hamilton Marine for about $9.00 or less.
IMPORTANT: Please do not use wet exhaust hose, as shown below the Buck Algonquin hose. There is a big difference between actual stuffing box hose and a wet exhaust or plumbing hose. Seek out hose specifically made for stuffing boxes.
If you can’t find Buck Algonquin hose in the size you need you could use a minimum of 4 ply non-wire reinforced hose. Please do not use 2 ply or 2 ply wire reinforced hose. A stuffing box is no place for wire reinforced hose.
WRONG HOSE… D’oh……
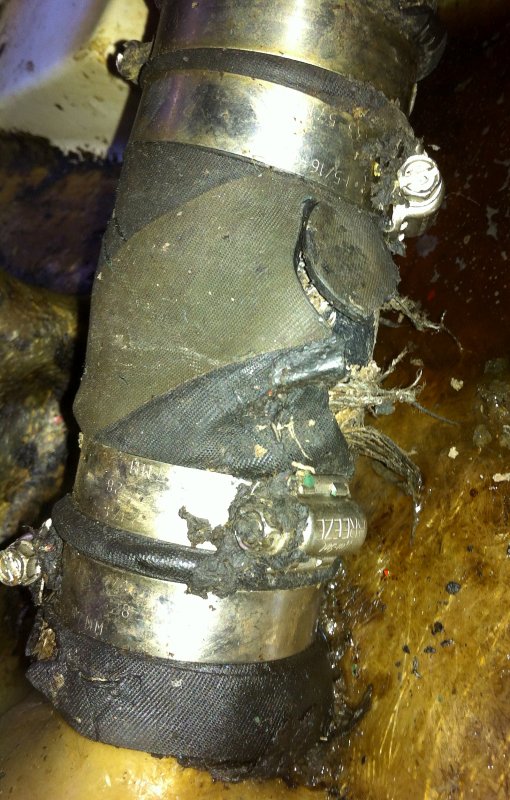
There are vast difference in hoses and most are not at all suitable for a stuffing box application. I take many pictures of bad installations but a reader sent me this one. This one takes the cake.
IMPORTANT:
- Use the right hose
- Replace on a 7-10 year +/- cycle
Please do not use the wrong hose. This boat came darn close to sinking. Use 4 ply minimum, non-wire reinforced hose. The Buck Algonquin product is six-ply.
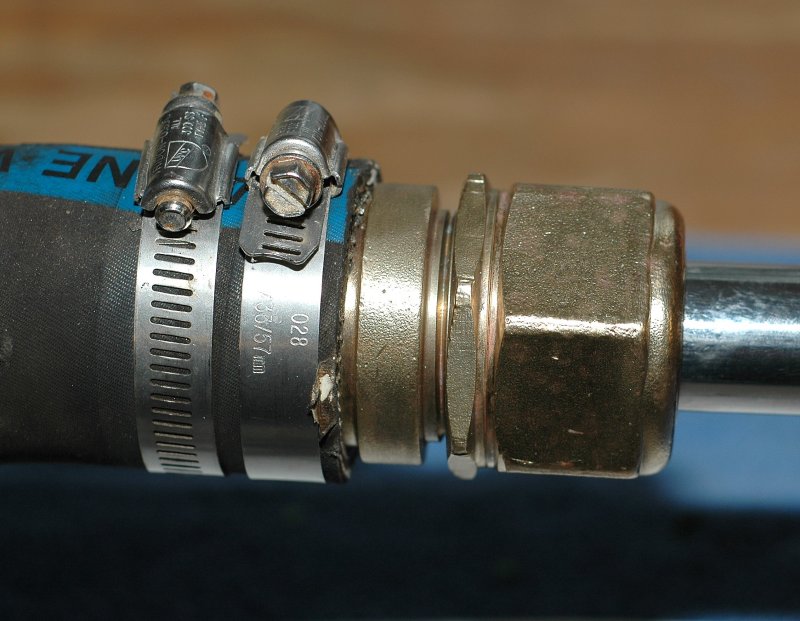
Incorrectly Clamped
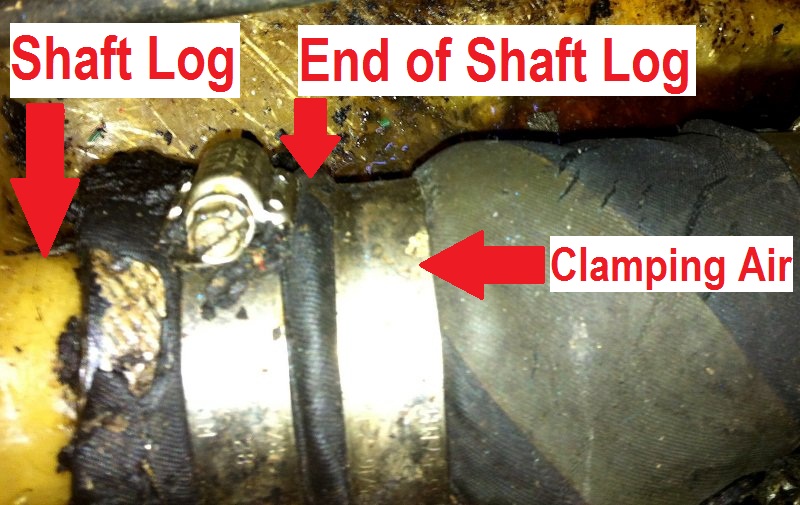
Double hose clamps won’t do any good, and can actually be detrimental, if they are not clamping anything but air. Look at the inner clap on the shaft log. It is not clamping anything but rubber. Oops……
Please be sure your hose clamps are clamping what they are intended to clamp.
Stuffing Nut Shown WIth Old Flax Still In It
When you are replacing your packing you will most likely never see this view unless you remove the transmission coupling and take the nut off. When removing the flax, with a pick, this is what you are trying to dig out! I took this photo to show the female nut with the old flax still in it. You can see the shiny surface where it meets the shaft and the thickness (3/16) of the flax its self.
Today we are lucky to have more availability than the old stand-by antique plant based packing materials such as flax packing. Flax packing is prone to rot, expansion & contraction, which messe with adjustment, and has a higher propensity to score shafting.
Packing Material Types:
Flax Packing – This packing material is derived from flax plants and they require a higher drip rate for lubrication. Most flax packing materials are impregnated with paraffin/wax and animal lard. Some flax packing materials are impregnated with Teflon. Kind of like putting lip-stick on a pig. This type of packing absorbs water, swells/shrinks and is not well suited for vessels that get hauled for winter storage. It is an inexpensive packing but low in performance.
Synthetic Packing – While often called “synthetic packing” the individual yarns the braid is made from are most often made of acrylic. These packing materials absorb less water, are less prone to rot and are quite often impregnated with Teflon, paraffin or lard as a lube. The have a lower temperature performance rating than Teflon yarns and sit in-between flax and Teflon for performance. They require a medium drip-rate for optimal lubrication.
Teflon Packing- This packing material does not swell, does not rot and will stay adjusted longer. This type of packing is optimal for boats that are dry stored yearly and haul / launch usually requires no additional adjustments due to dry-out and re-absorb.. They also are available with added lubrication. These packing products are galvanically inert but are not readily available in the marine market.
Graphite Extruded Teflon – These products usually have the graphite lube physically extruded into the Teflon yarn before it is braided. Extruding the lubricant (graphite), mixed into the yarn, is a far superior process than “impregnating” the product after the extrusion & braiding process. This material offers the best heat transfer due to graphite’s inherent ability to transfer heat rapidly. The addition of graphite, as the performance lubrication, allows for minimal dripping and longer times between adjustments. The down side to graphite impregnated packing’s is that graphite is the most noble element on the galvanic scale. In other words graphite packing materials can cause localized damage to shafting and can increase anode erosion rates. The ABYC and Western Branch Metals (The largest prop shafting manufacturer in the US) specifically disallow the use of graphite packing materials. With the great performance come some cautions and risks.
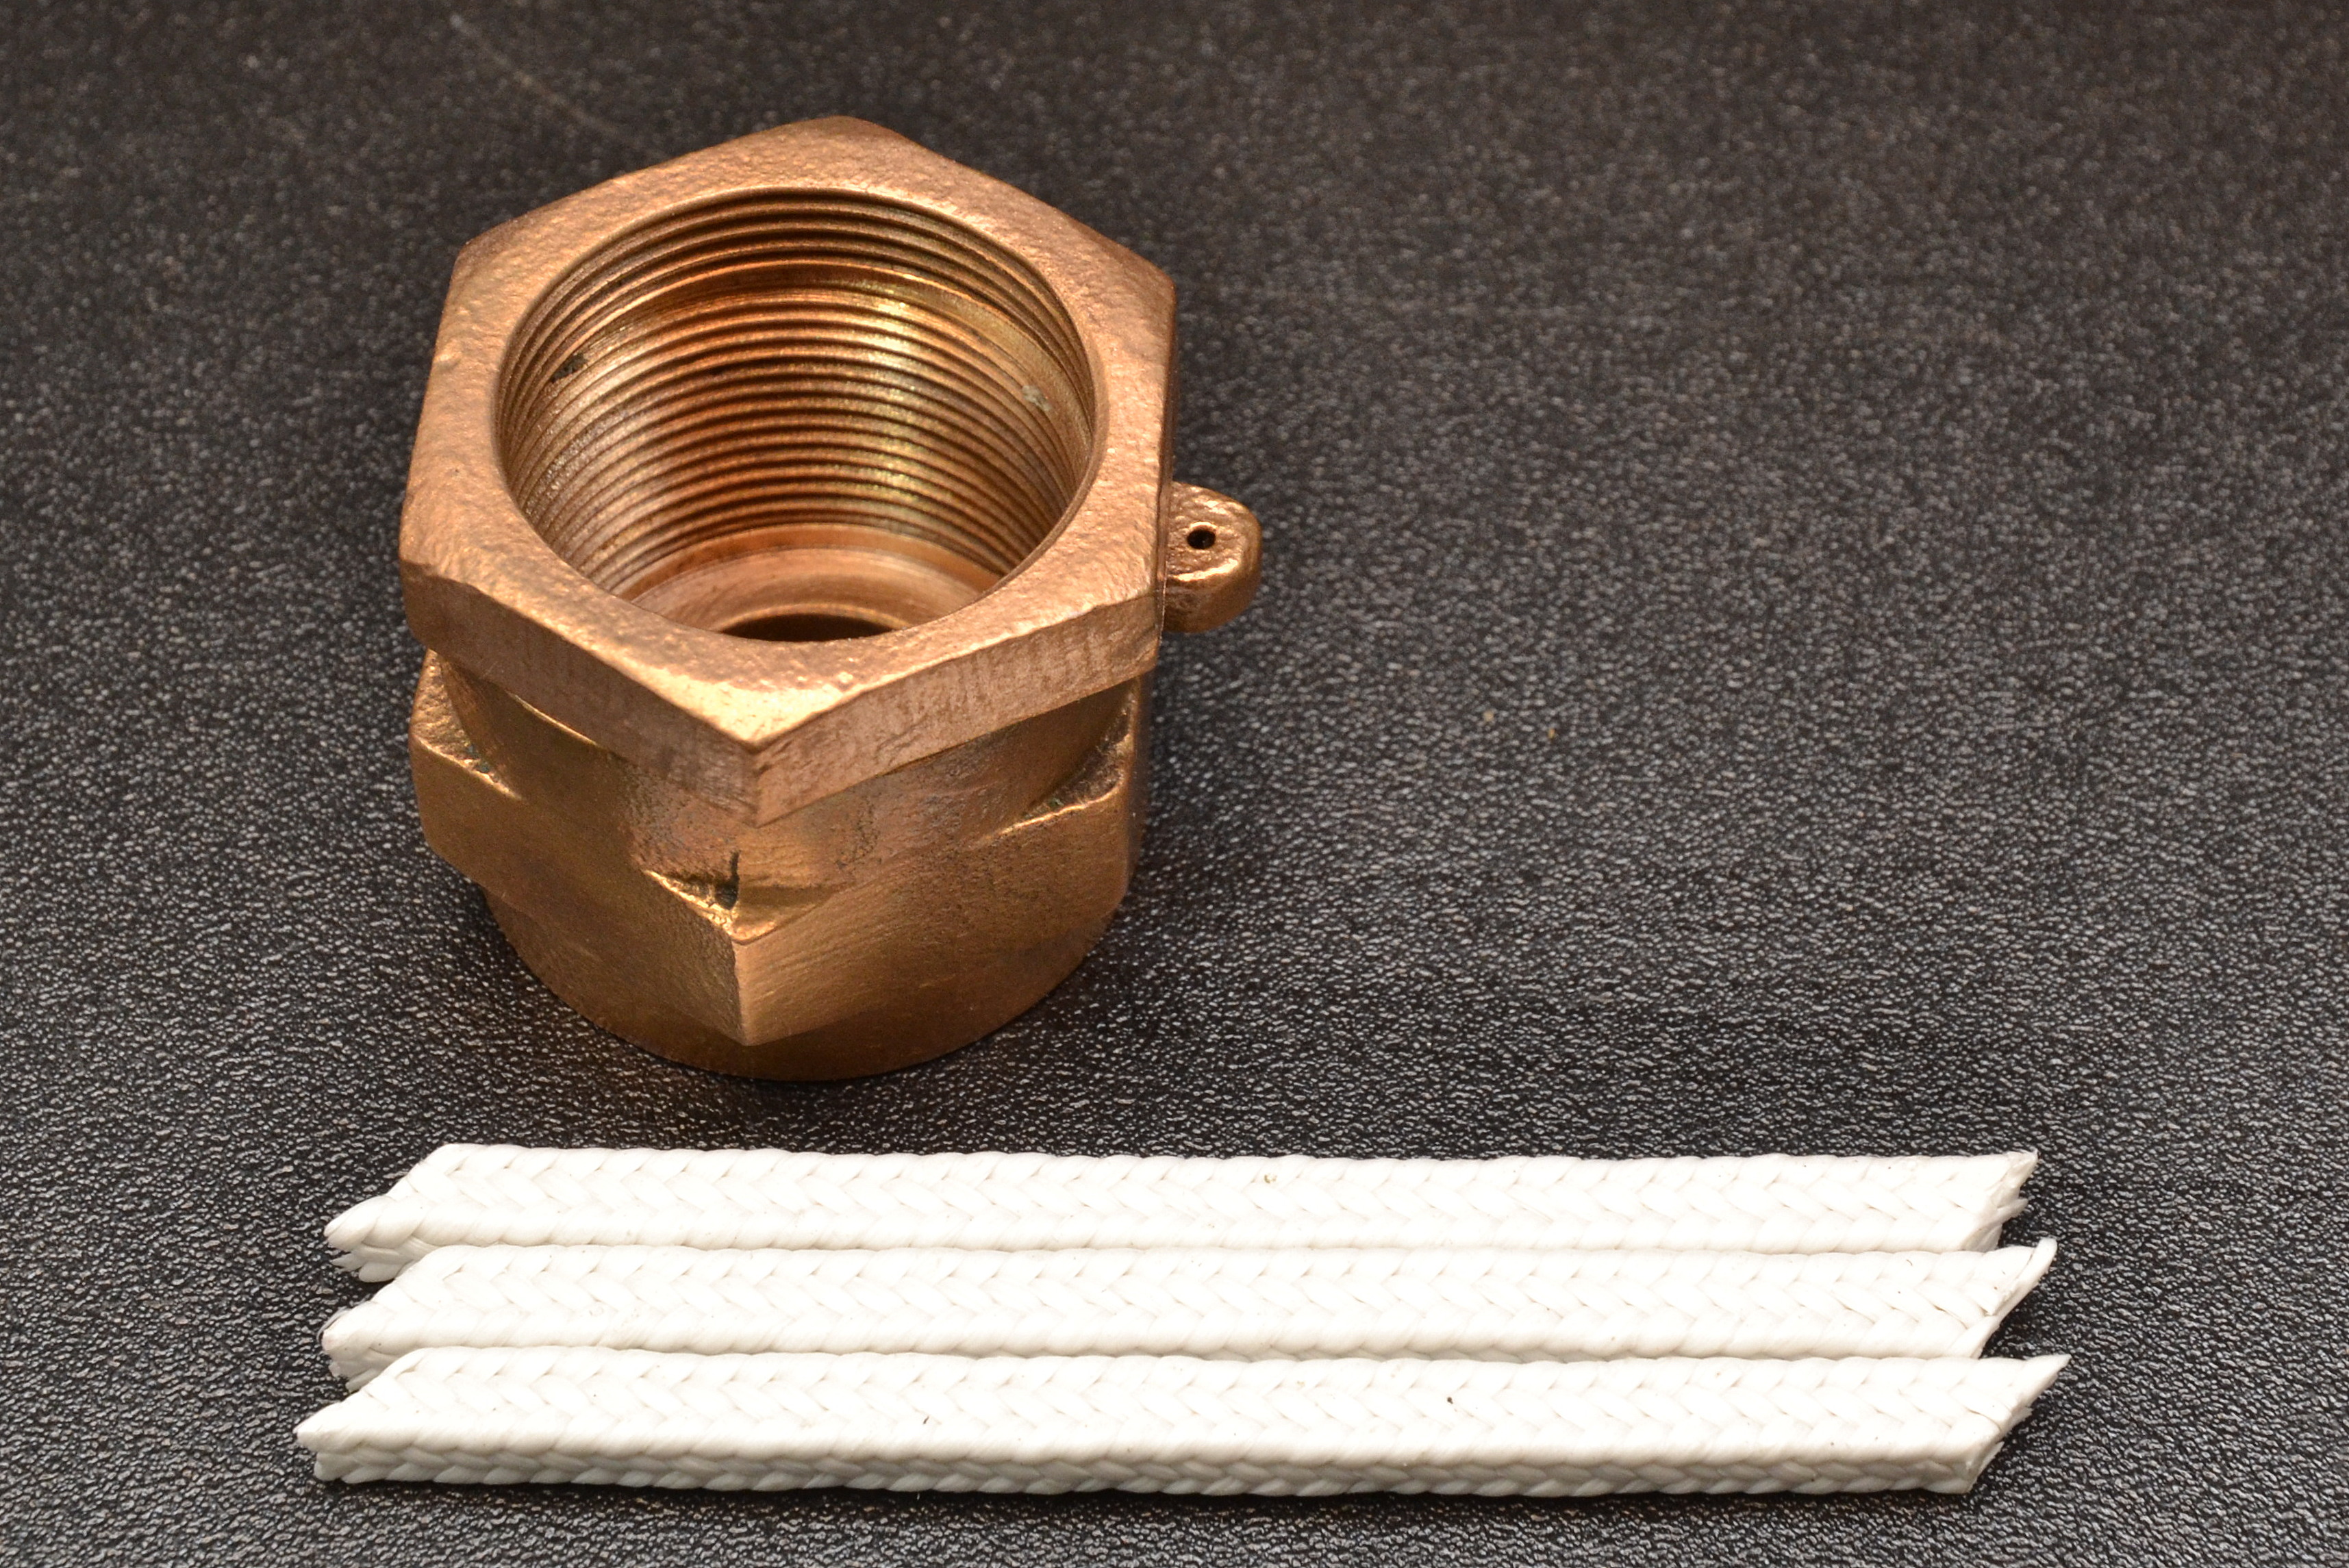
This particular stuffing box is a 1 inch stuffing box and uses three rings 3/16 flax packing. These two surfaces, where the shaft and packing meet, tend to polish each other smooth, and if over tightened, can lead to premature shaft wear or excessive heat.
Over tightening of the packing-nut, and running the stuffing box with no water drips, will eventually wear a grove in the prop shaft and ruin it. It’s very important to allow a few drops of water per minute, when the shaft is spinning, for lubrication. Even the newer synthetic W.L. Gore GFO packing should have a drip or two per minute with the shaft spinning.
Empty Stuffing Box Nut
This is what the female stuffing box nut should look like, after you have removed all the old packing from it.
My Home Made Pick
I can’t remember where I found this pick, perhaps Sears, but it used to be straight and was designed for removing engine seals! I used a blow torch and a bench vice to create my own, custom made, flax removal tool and it works remarkably well. Even a sheet rock screw can be used to remove flax but in tight spaces it’s nice to have a couple of bends in your flax removal tool.

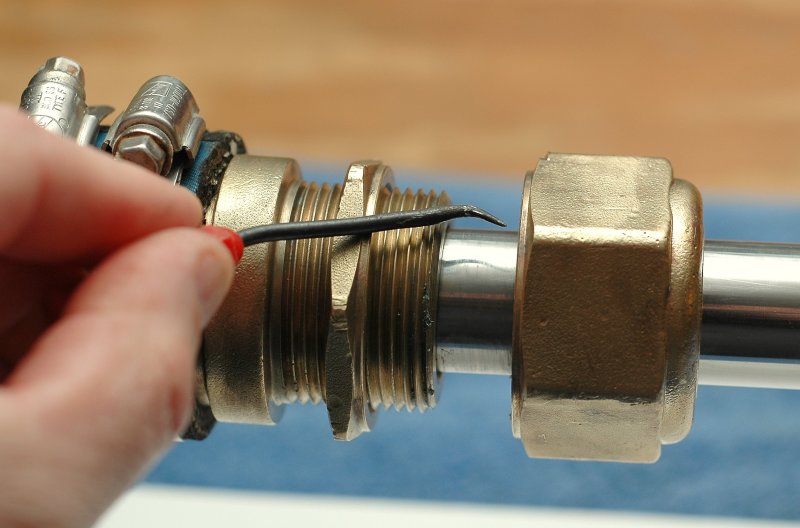
Getting Ready To Dig Out The Old Flax
In this photo I left about an inch between the male end of the stuffing box and the female nut. This is typical of the space you’ll have on many production boats.
WARNING: If you have not attempted this type of DIY job before it’s best to do it with the boat out of the water for obvious reasons. With the female flax nut removed water will flow into the boat from between the male end of the box and the shaft. Please be careful.
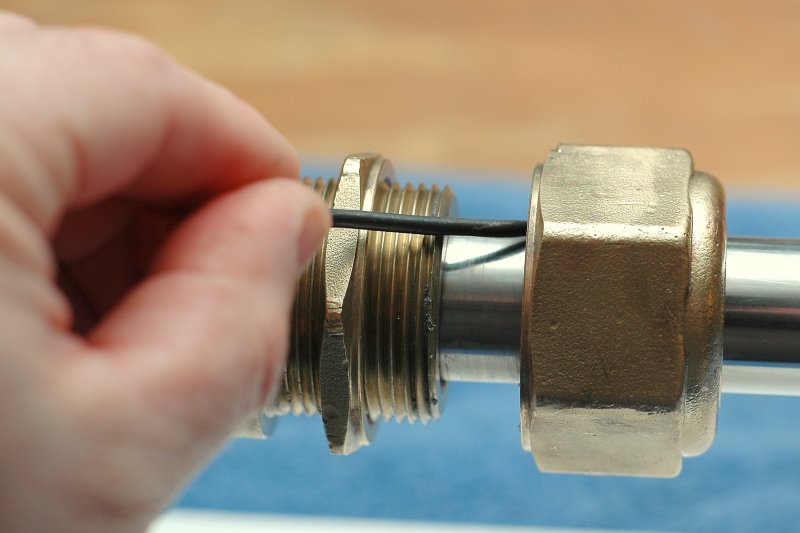
Grabbing The Flax
What you can’t see in this picture is the sharp end of my pick has been firmly embedded into the first flax ring and I’m ready to pull it out of the nut.

Removing Flax With a Pick
Success! The first ring of packing is on its way out..
Packing Nut Off & Old Packing Out
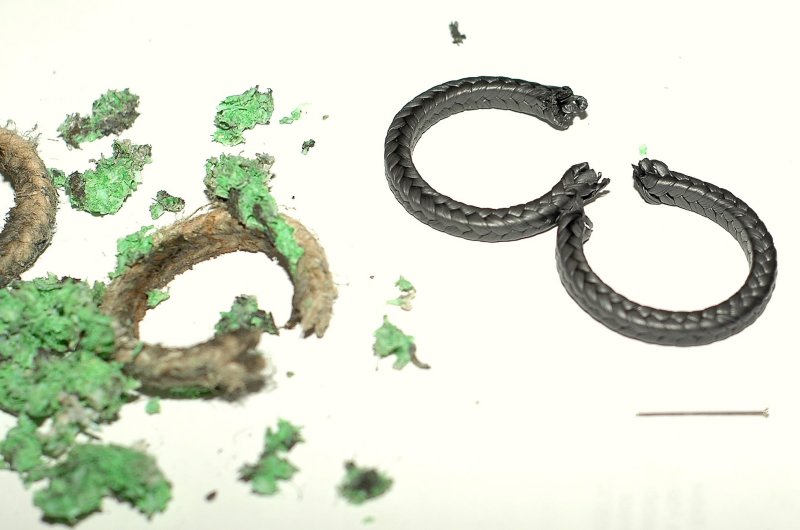
I don’t advise, and can’t with a good conscience, suggest the use of “miracle lubes” such as the moldable packing materials like the; “West Marine Moldable Packing Kit“. While many have claimed good success with these miracle lubes others have not, including myself.
On a boat we had in 2000 I installed the “West Marine Moldable Dripless Stuffing Kit” and it eventually became a nightmare. The green stuff in the image is the “moldable clay” shown with the two rings of packing that came out of the female stuffing nut.
Article Edit: Since writing this article I’ve conducted extensive temperature testing of packing glands with a fixed temp probe mounted directly to a traditional bronze stuffing box. I have measured this now for over 6 years with various products. A digital temp display was mounted in the cockpit. What I have learned is that packing gland temperatures can be anything but static.
Why? What I discovered is that air can become entrapped in the shaft log and with no cooling water, meaning no drips, you can, quite suddenly and without warning, develop a massive temp spike. Some vessels are more prone to this than others. Our old Catalina 36 was quite prone to this issue. Even after converting to a PSS dripless seal, before they introduced the vent, I found that boat needed to be burped, due to entrapped air, multiple times per season.
At one point during testing we had motored for over 3 hours using a graphite impregnated packing set for less than a drip every three to four minutes. The temp stayed at steady at 85-102F for over three hours. We hit some prop wash from a large yacht and within 3-4 minutes the packing gland was pushing 300F. Ouch! This same type of event happened about 14-16 times over a 6 month period using a very low drip rate. My goal in testing was to find the happy medium for the least-drips to the most consistently stable temps. I adjusted the gland for 1 drip per minute and the temp spikes were gone.
This is why stuffing boxes are intended to drip some. When they drip they also displace any entrapped air. Not all boats are prone to entrapped air in the shaft log, but many are. The simple act of backing down on an anchor can force air bubbles up into the shaft log and with no drip there’s no way for the air to escape.
It is my best guess that this is what happened with our “miracle clay” packing…
Packing Nut Showing Syntef & Teflon Flax
The idea behind this green moldable clay is that it will make your traditional stuffing box dripless. To install it you insert the first ring of flax, then pack in the green clay like substance and insert the second ring making, in essence, a green-stuff sandwich.
While the idea of a dripless shaft seal is not new this stuff, in my opinion, is probably not the ideal way to go dripless. Not only is it very, very tough to remove with a pick, and replace once installed, it also did not work as advertised for me. I would also note that since writing this article numerous readers have emailed me & reported similar overheating events.
What Happened?
Remember when I talked about air entrapment in a packing gland causing temp spikes, I suspect this was it. My suspicion is that the box became entrapped with air, the green-stuff then overheated by running totally dry. Running dry melted the green goo and it oozed out and completely plugged the male end of the stuffing box with a thick black sediment. This sediment now kept the stuffing box air entrapped and eventually a burning smell notified me to the problem in the bilge.
This black goo/sediment can only be described as, remnants of the green-goo lubricant. This gray/black goo totally plugged the stuffing box essentially preventing any cooling or lubricating water from getting to the female nut. If left alone for a long enough period it could have ruined the prop shaft or potentially started a fire or damaged the packing hose. When I went to inspect the burning smell I reached out to touch the stuffing box and blistered my finger tips with burns.
Again, many folks claim good success with the miracle-goo so take my advice as cautionary only and do your own research beyond what I’ve said.
Keep in mind that this box had been run in excess of 240 engine hours at the time of the melt down and this does not include the shaft rotation time for the prop free spinning while sailing.. Air entrapment is real, it can happen and does happen and if the box can’t drip, it can entrap air and create problems. Even PSS seals are now plumbed to let air escape from the shaft log.
This Mess Of Green-Goo Really Messed Up This Stuffing Box
If you clicked on this picture to enlarge it you can see the black goo residue on the shaft caused by the green-goo moldable packing that had over heated and was clogging the stuffing box.
IMPORTANT: All traditional stuffing boxes require water for lubrication and this dripless-clay totally plugged the area between the shaft and the male end of the of the stuffing box as seen in the picture.
Even with the female nut totally removed, in the water, I was getting, at best, 4 drips per minute with the nut off! Please be cautious running any traditional stuffing box dripless.
Dripless Vs. Drip-Less
Once again the sleazy marketing mavens have muddied the waters and done their best to mislead the average boater.
Dripless = A stuffing box that has zero drips
Drip-Less = A stuffing box that drips less but still needs to drip some
Dripless is a term that is best forgotten in regards to standard traditional stuffing boxes. The proper term is drip-less or a box that will drip less often.
The green-goo stuffing box actually got so hot, from the lack of water lubrication, that it started to smell and I burned & blistered my fingers when checking on it. This is what eventually can happen when you opt for dripless vs. drips less.
Keep in mind this did not happen instantaneously and took approx 240 hours of run time to accumulate enough Syntef/Clay gunk to clog the stuffing box. It ran at what I thought were normal temps during and after break in as I measured it with an infrared thermometer.
I now know that spot temp checks do not tell the whole story. Temp spikes and excessive heat are likely what caused this stuff to clog my shaft log over time. In my opinion this stuff is not suitable for a “tight” shaft log where you don’t have sufficient clearance between the shaft and the male end of the stuffing box.
How does air get in there? Docking or anchoring with quick blasts of reverse can send air bubbles up into the shaft log. Sailing in rough weather can also lead to air entrapment. If the shaft log is totally sealed or “dripless” the air accumulates until the box has no lubrication.
There is a good reason traditional style stuffing boxes are meant to drip. These newer packing materials should not be considered “dripless” and should be consider to drip less often.
Beyond entrapped air causing lubrication issues, stagnant water in the shaft log can lead to crevice corrosion of a stainless alloy prop shaft, as you’ll see below.

Why It Should Drip Some
Real Tobin Bronze shafting has been long gone for many years now, and as such, alloys in the stainless family, such as Aqumet & Nitronic are now being used it its place. These alloys, like type 304 and 316 SS, can suffer from a phenomenon called crevice corrosion.
Crevice corrosion is worst when a stainless alloy is in contact with seawater, and also oxygen starved. Crevice corrosion can also happen to bolts between wet or leaking decks, chain plates, or in stainless keel bolts where they pass through the keel stub. Most folks are aware of chain plate and keel bolt corrosion but are often unaware that it can also happen to stainless alloy prop shafts. Allowing a packing box to drip helps to keep the water in the shaft log from becoming oxygen depleted.
Over the last 10-15 years there has been a startling rise in crevice corrosion of prop shafting. With the newer packing materials, and misleading advertising, that use phrases like drip-less, the problems have only continue to escalate. The unclear marketing has caused DIY’s & professionals alike to think it means “dripless” not drips less. In light of this muddy marketing owners have been starving the packing box area of oxygen by not allowing any fresh oxygenated water to pass through it.
Going full dripless can potentially lead to the destruction of your prop shafting from the effects of crevice corrosion. While some packing materials such as Gore GFO, Ultra-X or GTU may be able to be adjusted to be mostly dry, and still some what cool to the touch, it’s still a poor idea from a crevice corrosion stand point.
Another pit fall, when a stuffing box is run totally sealed and “dripless“, is that they can trap air up in the shaft log. All it takes is a quick blast of reverse, and the resulting bubbles forced up and in. Sailing in rough weather can also lead to entrapped air in the shaft log. Once enough air becomes trapped up in the shaft log the packing box, you thought was cool to the touch, begins cooking while you least expect it.
If a stuffing box is allowed to drip, even at a slow rate, it allows for excellent cooling, longer shaft life, less opportunity for crevice corrosion and less opportunity for trapped air to run the box in a totally dry state and cook it.
0.05″ Of Shaft Wear
This shaft had roughly 0.05″ of stuffing box wear and was deemed scrap metal by the shafting shop. This owner was using a Teflon impregnated natural flax and thought when the advertising said “drip-less” that it meant it was supposed to be “dripless“. This was an expensive mistake you should aim to not repeat.
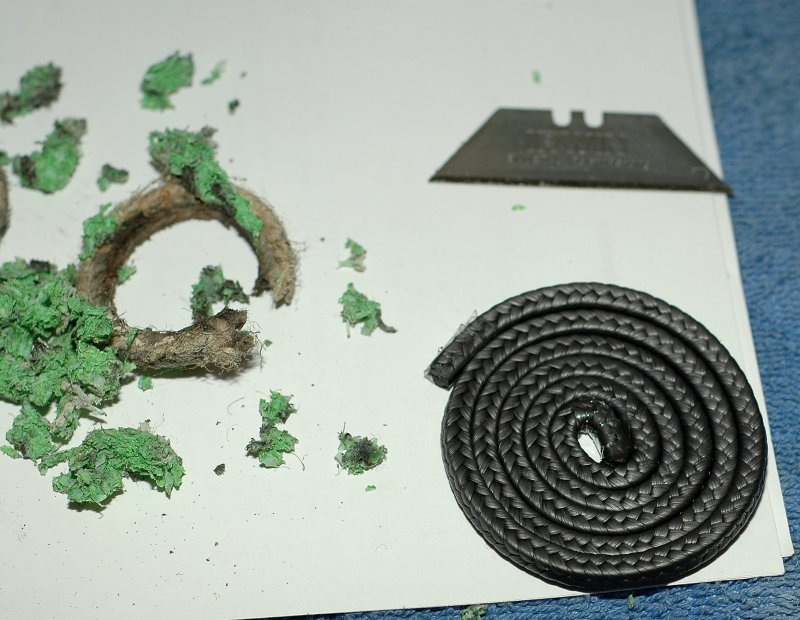
New & Old Packing
This photo shows the old packing with the “miracle clay” and the new GTU packing. GTU is a knock off of Gore GFO, but it frays worse due to the poorer braid design.
The Gore is the one of the best of the flax type packing materials in terms of heat dissipation but it is at the very, very top of the galvanic scale, which can cause other issues.
These packing materials also need a few drips per minute to run cool and not damage the shaft. My one complaint with this GTU packing, made by Western Pacific Trading and sold through West Marine, is that it tends to fray easily and does not make the cleanest cuts even when using a brand new razor blade.
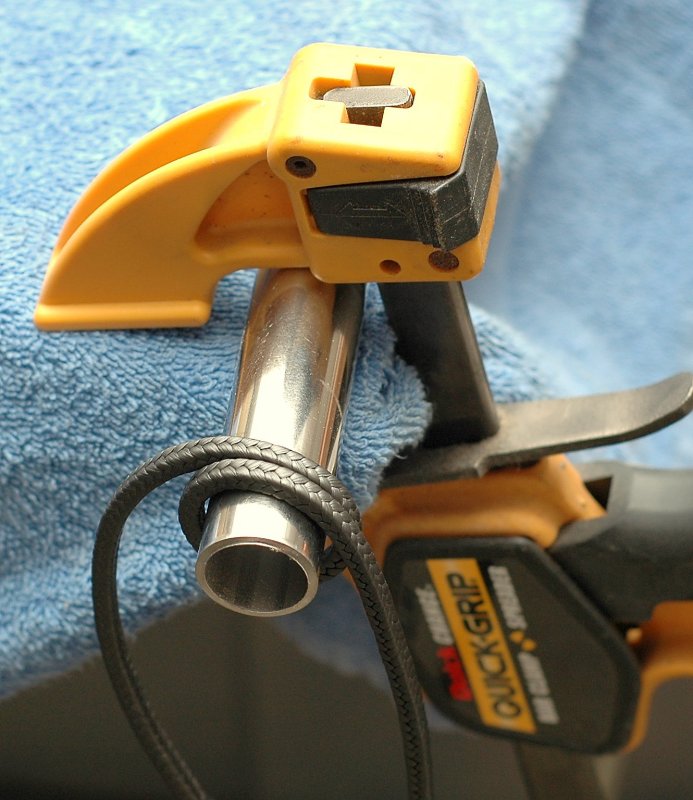
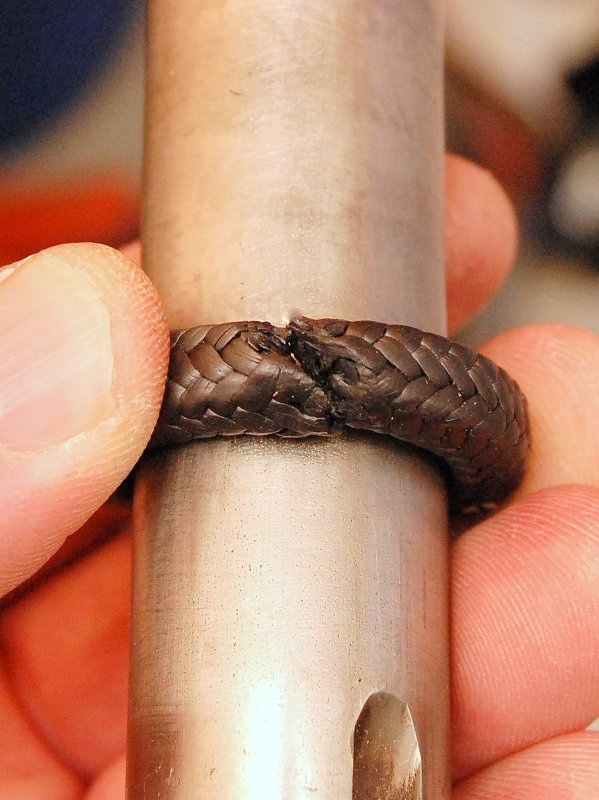
Scrap Tubing As A Cutting Jig
Many sail boats have a 1 1/4″, 1 1/8″, 1″ or 7/8″ inch prop shaft and a piece of scrap dodger tube, in your shaft size, works great as a cutting jig for new packing rings.
Use a set of calipers to make sure your “jig” of choice is the same O.D. as your prop shaft and then cut away. I usually cut the rings in this manner but you could also cut them on the actual prop shaft too.
Please cut the rings on the outside of the boat where the shaft exits the hull between the strut and the hull and not at the stuffing box. If you cut the rings on the shaft, at the stuffing box, you run the risk of scoring the shaft and causing a burr that can damage the new packing and inevitably leak more until the burr gets polished away from the friction. This could take a very long time unless you are in heavily silt laden water…
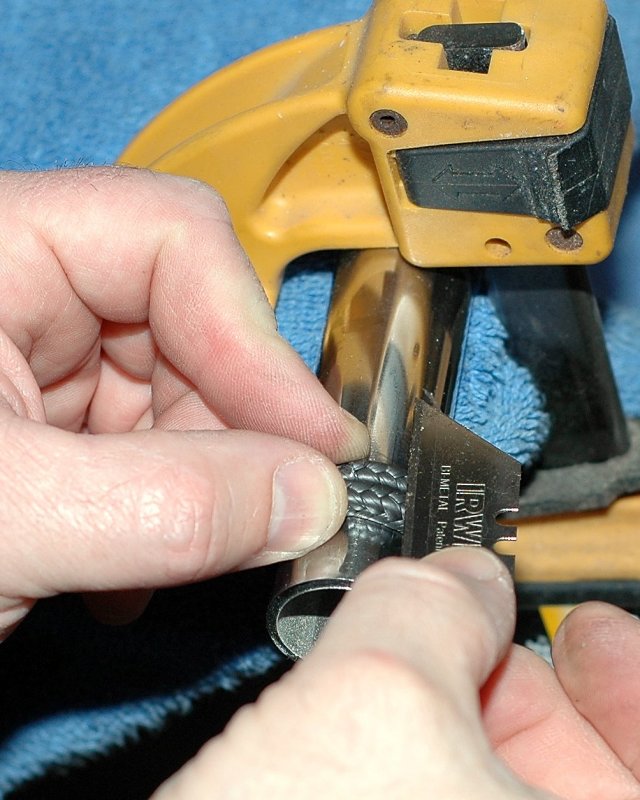
Cutting New Rings – Sub-Optimal
This may get a little confusing but there actually is a optimal way and a sub-optimal way to cut your packing rings.
In this photo I am holding my razor blade at a 45 degree angle parallel to the shaft. Unfortunately if I cut the rings in this manner they do not seal quite as well. Yes, it will work but it is not optimal. Because the shaft nut does not compress the flax on the circumference, like the action created by a hose clamp, cutting it 45 degrees & parallel creates a less than optimal seal.
Cutting New Rings – Optimal Method
In this picture it’s easier to see the 45 degree cut and how the two ends of the packing will join together. The packing nut will actually compress these two ends together and create a better butt-joint than if they were cut vertically for a circumference (think hose clamp) type compression. I told you this was a little confusing.
Once the ring is cut be very, very careful to minimize fraying before installing it. If you’re using impregnated PTFE or traditional flax packing fraying is usually not an issue. With GTU or Gore GFO etc. fraying can be an issue.
IMPORTANT: When you cut rings this way they will not wind up the correct length. Cut it and then shave one end down until you get the correct fit over the shaft where the two ends butt perfectly. A perfect fit is with the rings neither being too large, so as to cause a gap with the ends butted, or too small so the ends won’t quite butt together..

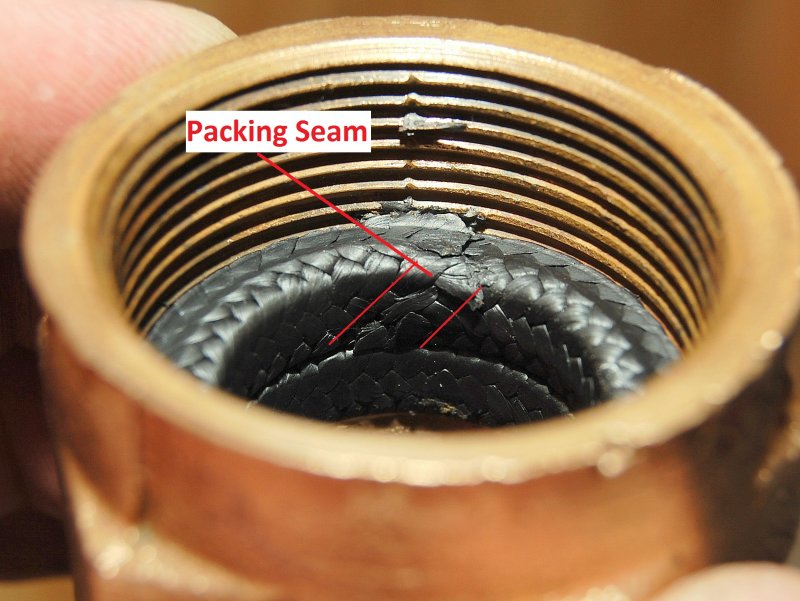
Here’s Why
This is a good illustration of why the cut should be made the way I have shown above. The compression of the packing nut seals the butted ends together nearly perfectly. Little details like this make for an easily adjusted stuffing box with a correct drip to temp ratio.
Three Packing Rings Installed
This photo shows three rings installed. This packing nut fits three rings, some don’t and it’s not a huge deal if one does not fit more than two rings. Three rings is preferred and considered optimal. You can also go to four but beyond that cooling issues can happen.
Thread engagement is critical and my personal preference is for four full thread peaks of engagement between the female nut and male stuffing box threads. This is four thread peaks with three rings installed and seated.

Old Teflon RIngs & Syntef Shown With GTU Rings
Here are two of the new GTU rings and the old stuff. Note the fraying I discussed earlier even though I tried to minimize it. I have discovered that Western Pacific Tradings GTU frays considerably more than Gore GFO or Duramx Ultra-X. GFO and Ultra-X barely fray at all when cut. This is due to the braiding process used.
Perhaps, to prevent fraying with GTU, you could heat up a little wax in a bowl and as soon as you cut the ring dip the ends in the wax like whipping a line. There is actually a fair amount man-handling, of the rings, between the time when they are cut and inserted and some measure of fray prevention should be attempted when using Western Pacific Trading GTU or just use GFO or Ultra-X.
Different Braider
The product I used above for this article was Western Pacific Trading GTU from West Marine. Initially I thought it was some Gore GFO I had lying around but GFO has the words “GFO” embossed right on the packing and after going through the photos carefully I could not find the silk screened GFO logo.
I had never had Gore’s GFO fray but the GTU product does. The photo to the left is Duramax Ultra-X which has a very similar construction, and braid, to Gore’s GFO. It does not fray when cut like GTU does.
Johnson-Duramax Ultra-X can be purchased by the foot from Hamilton Maine and it cuts cleanly.

Duramax Ultra-X Cuts Cleanly
Here’s an image of a 45 degree cut. This one comes up a bit on the short side so be careful in your cutting.
This ring was cut from Duramax Ultra-X. It is important to keep in mind that these graphite impregnated/extruded packing materials can dull a razor blade quickly so rotate in a new blade if the old one is cutting poorly. Razor blades are cheap.
Start With Your Cut Rings Ready
One of the last things you want to do, if changing your packing in the water, is to cut your rings during the project. Please do yourself a favor and pre-cut your rings.
If you’re new at this I would recommend starting with 4-5 rings as you may damage one or two in the installation process.
Edit and Answers:
I’ve received far too many emails asking what this packing material is to ignore them, so here are the details.
This is the packing material I now use. It has been in the development and testing stages since 2013. Unfortunately it is not yet on the market and is still in the testing stages. As a marine electrician and corrosion specialist I have all but stopped using the graphite impregnated packing materials I used when I initially wrote this article back in the early 2000’s. They perform quite well, but as I discovered, can lead to a host of other issues most notably, galvanic incompatibility issues. I discuss this further down in this article.
This high performance non-graphite packing, SynBraid®, is a 100% galvanically inert synthetic high performance packing, not a “PTFE infused” product with acrylic or flax yarns making up the braid. The SynBraid® yarns are actually extruded with the proprietary lubricant in the yarn not “infused” after the yarns are extruded. I expect SynBraid® to be on the market sometime in early 2018.
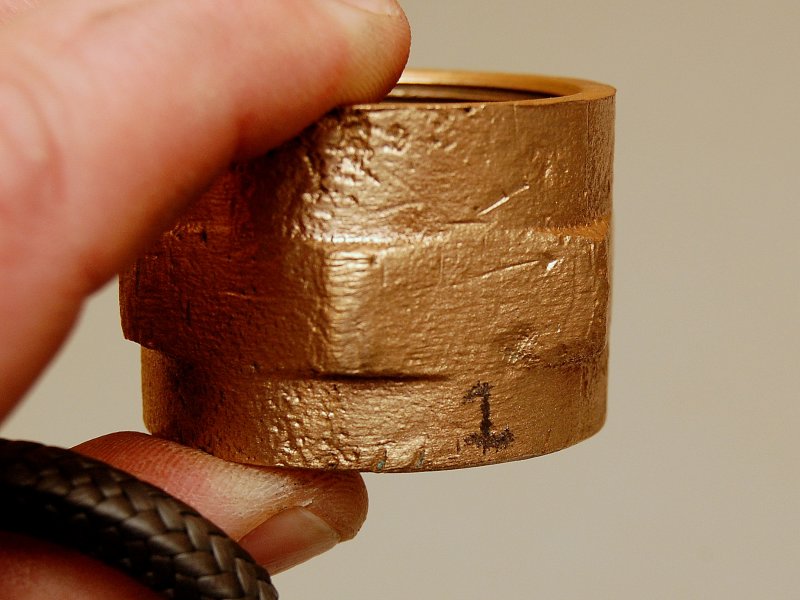
Mark The Nut Where Your Seams Are
When doing this in a boat it is a very good idea to mark the exterior of the nut where each seam is so you can stagger them. Use a packing tool like I show below to compress them into the nut. Only when all rings are in the nut can you then tighten it.
Tightening the nut to seat the packing, especially with the newer more slippery packing braids, can move the seam and you’ll now be blind as to where your seams are and will need a dental mirror to confirm seal position.
You will be best to make yourself a packing seating tool.
New Packing Rings
This is the last step. In this picture I have two of the three rings wrapped around the shaft in a stepped and alternated order.
NOTE: Please ignore the fraying. This was not a real boat and in the process of photographing this I man handled the rings far more than you would. The butt ends of the rings should not look like this.
You’ll want to offset the rings butt-joints 1/3, 1/3, 1/3 for a three ring box or 1/2 & 1/2 or said another way 12 o’clock and 6 o’clock for a two-ring box.
It’s also perfectly fine to wrap one ring at a time and push the nut over it, but without turning it, until you get all three rings into the nut and staggered. It’s best when using this method of stuffing the rings to mark the outside of the nut with a Sharpie marker where the joints are and then when all rings are in the nut, and staggered, you can finally thread the female nut onto the male part of the box.
I custom made my own tool for this & it has a similar thickness to the flax for stuffing the nut (see the tool below). I don’t advise the use of a pick to stuff the flax into the nut as this can cause significant unlaying or twisting of the flax especially with GTU. When ever possible try to get at least three rings of packing in your stuffing box as most are designed for at least three. Some nuts can actually fit four & if so go for it but make sure you still have enough exposed threads to get sufficient thread engagement for the female nut.
IMPORTANT: You really need to use the correct size packing or else you will either have overheating or leaking issues.. Going one size to0 big can eventually wear a groove in the shaft and one size too small will never seal properly. Please use due diligence to determine the proper packing size for your particular stuffing box.
The Home Made Packing Insertion Tool
Many folks have asked me how I insert the packing rings into the female nut. Well, like anything dealing with boating, it’s not always easy but can be done with a little Yankee ingenuity.
I decided that in order to keep my ring joints staggered, and to get them properly seated, I needed a new tool. I wanted a tool that was to be perfectly parallel with the prop shaft when inserting and seating the flax but that did not involve twisting the nut or threading it onto the male end..
You need to seat the packing without causing any twisting and there were no commercially available tools to do this, so I made one. Using a screw driver will not give you the correct angle to seat the flax properly and could potentially mess up the joints or put twists in the flax rings. Seating the packing with no twists is important.

Insertion Tool Clipped On Shaft
Making this tool took less than five minutes but can really save time and headaches. To build this device I decided to use a short piece of 1-1/4 inch PVC pipe with about 1/3 of it cut out so it would fit over a 1″ shaft.
I left just enough material so it could clip itself onto the shaft and stay in place without any hand holding.
For this process I cut the 1-1/4 inch PVC pipe to 2-1/2 inches long. I then inserted this 2-1/2 inch piece into my bench vise and used a hack saw to make two more cuts. These cuts removed just enough of the 1-1/4 inch PVC to create the device.
You’re probably wondering why I used 1 1/4 inch PVC if I had a 1 inch prop shaft? Well.. I used it because it’s all I had on hand and I also own a heat gun so it was very easy to heat the PVC and wrap it around a piece of scrap 1 inch dodger tubing for a perfect heat formed fit. If you don’t own a heat gun dropping PVC into boiling water will soften it enough to mold it to the shaft. Once it cools down it will simply click into place.
Seating The Flax
This photo shows the female nut sliding over the packing insertion tool and seating the packing rings. The tool works very well and unfortunately no one actually makes one. Hey, I bet West Marine could sell one for $85.00… (grin)
GFO, GTU & Ultra-X Warning
WARNING: While I do like the performance of graphite impregnated packing materials such as Duramax Ultra-X, Gore GFO or Western Pacific Tradings GTU they can be potentially dangerous to underwater metals. I have used it on my own vessel but inspect the Aqualoy 22 prop shaft yearly.
“RC, Why the warning then.?”
It’s all about corrosion. Graphite is the most noble element on the galvanic scale.. As such anything in the drive train becomes anodic or sacrifices itself to the packing. Older bronze shafts, really more of a brass because they had high zinc content, can be damaged by these new high tech graphite impregnated packing materials.
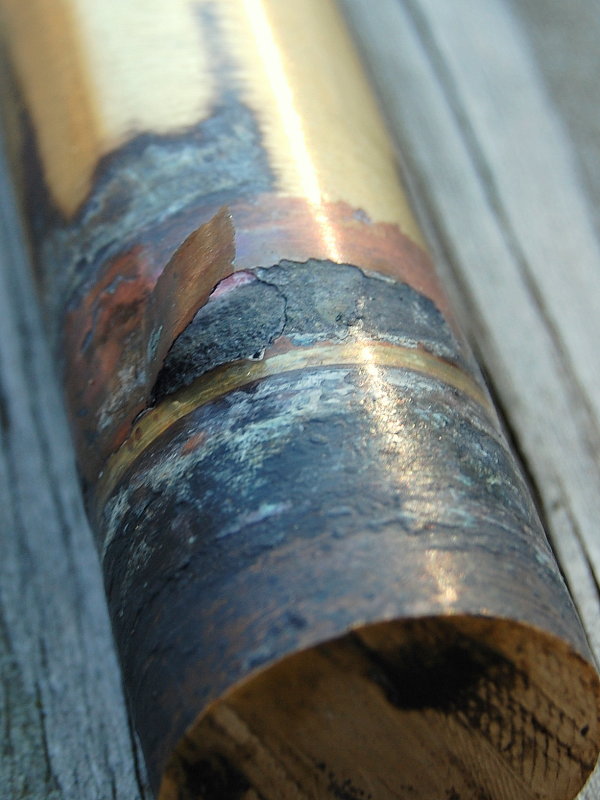
The damage shown in this photo happened in one season and with intact prop shaft anodes. The shaft was in perfectly fine condition when packed, and a year later this is what it looked like.
The packing used on this shaft was Gore GFO a graphite impregnated packing. If you have a bronze shaft please use extreme caution with graphite impregnated packing materials.
I don’t tend to see these issues with Aqualoy 22 shafting but I have seen it with bronze and lower grades of stainless. Please use these packing materials carefully. If you choose them please do check on the shaft periodically.
Also, please be aware that after you install a graphite impregnated packing you will see some accelerated anode erosion rates. No dire need to be alarmed at this but do keep up with them and check them more often until you are familiar with the new erosion rate..
Here is where the ABYC Standards come down on graphite packing:
Begin Quote:
ABYC P-6:
“6.7.4 Graphite impregnated packing material shall not be used because of the possibility of galvanic incompatibility with the shaft material.”
End Quote:
I suspect what we are seeing in this photo is exactly the “galvanic incompatibility” the ABYC warns against.
We now know where the ABYC stands on graphite packing but what about the largest prop shaft manufacturer in the United States, and possibly the world, Western Branch Metals?
Begin Quote:
Western Branch Metals:
“Do not use graphite packing in the stuffing box. Instead, use a packing material that causes the least abrasion after the lubricant wears away. The use of graphite-impregnated packing is not recommended because of the possibility of galvanic corrosion of the shaft material.”
End Quote:
Now we have not only the ABYC but one of the largest prop shafting manufacturers on the planet both saying exactly the same thing. Do not use graphite packing’s. As they say your boat, your choice.
With all that said there are still many happy boaters who have had decent results with these graphite packing’s. Please remember however that they should not be treated as a set it and forget it packing. If using these graphite impregnated packing materials I would strongly suggest checking the shaft at least yearly.
All Done!
Here’s the finished product after installing three new rings of packing material.
When initially installing the rings of packing lightly tighten the nut just until you start to feel some resistance then stop. DO NOT OVER TIGHTEN THE NUT. The final adjustment will be made after running the motor and shaft for a while.
Setting The Drip Rate
Proper adjustment for GFO, GTU or Ultra-X is up to a few drops per minute when the shaft is spinning. You’ll ideally want it adjusted for nothing more than slightly different from the sea or lake water temp, about a 15 – 20 degree differential, or slightly warmer to the touch. Measure these temps after the shaft has spun for a while.
Adjustments should be made in either half a nut-flat or “one nut-flat” (of the nut) at a time. Adjust in small increments only and not more than one full flat of the nut at a time.
W.L. Gore recommends not adjusting the stuffing box until you have run the boat in gear for about two hours of time. This allows the packing to take a set and break in some.
When adjusting other types of flax the stuffing box should be relatively cool/warmish to luke warm, at most. With traditional flax packing it should drip and must drip while the shaft is spinning.
The cooler your stuffing box runs, the longer shaft life you’ll have. With GFO they claim temps up to the 125-130F range are technically safe for the packing. In my opinion & experience monitoring stuffing box temps over a 6+ year period, 125F – 130F generally means there is not enough cooling flow through the box.
Any entrapped air, with normal temps this high, can cause a big spike in box temp. Aim for 15-20 degrees warmer than the ocean or lake temp but a little higher, with GFO, GTU or Ultra-X, should not kill the deal.
Some boxes will even drip when the shaft is not spinning and this can be entirely normal depending on the condition of your shaft. Do not get stressed if you can not make it drip free at rest as not all shafts are in good enough condition for this to always be the case. Ideally they should be but many are not.
Please do not get in the habit of tightening the stuffing box when leaving the boat. Natural flax based packing’s are not elastic and do have a memory, in a sense, and they will not necessarily return to their uncompressed state. Doing this will severely shorten the life of your packing and it will start leaking, continuously, in short order.
I generally don’t like rules-of-thumb for drip rates and really hesitated to even put one on here. My reason for this is that every shaft has differing levels of wear and thus the drip rates are usually slightly different in every installation.
The best rule of thumb I’ve found over the years is this:
Aim for the least amount of drips when the shaft is spinning but before the box develops any heat rise beyond 15-20F, beyond sea or lake temps.
Again, it’s a drip to heat ratio not necessarily just a drip ratio. Little to no heat is the most desirable. Traditional flax packing can drip as little as about 5-10 drops a minute, if adjusted correctly, while running, and this drip rate allows lubrication of the shaft.
Do not make any adjustments to the packing nut, with traditional flax, for at least 24 to 48 hours after launching as the plant based flax packing will absorb moisture and swell. This swelling can cause overheating of the stuffing box, if it’s adjusted too quickly after launch.
Premature tightening of traditional flax packing can result in potential problems. A good and safe practice is to adjust the packing by half-a-flat turns after two hours of use or until you have your drip to heat ratio correct. You can actually use an infrared thermometer, often called a pyrometer, to make this adjustment process easier but usually your hand will suffice as a good gauge.
If you want a totally dry bilge then a dripless type seal such as a PSS or Las-Drop is the way to go. I’ve provided full installation instructions for that type of seal too in another article.
Good luck & happy boating!
I was used to using flax packing and adding a ring every year or few. An old diesel mechanic told me that he never removes the old packing, just adds a new ring. So when I switched to Gore-GFO, I didn’t realize that it would not wear away like the flax did. So every few years I added another ring until no more would fit. Deciding to remove all the old, I was surprised to find all of the rings, maybe 6 in all, intact with no disintegration. However, I found my bronze shaft had suffered some wear, probably due to over tightening. Word to the wise: When using these newer packings, tighten only enough to just stop the drip when not running, yet allowing a slow drip when shaft is turning.