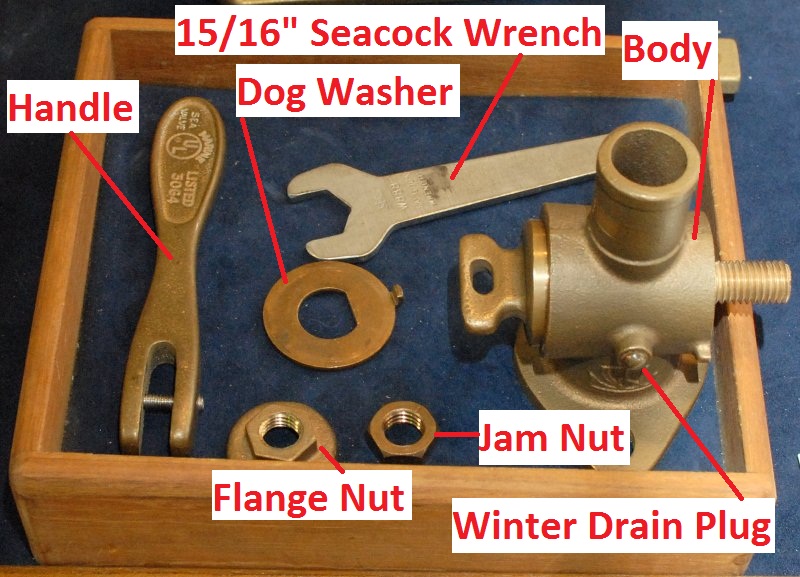
Anatomy of a Tapered Cone Seacock
These are the parts of a Spartan Marine tapered cone or tapered plug seacock. Over the years there were many brands of tapered cone seacocks but only two that I know of remain, Spartan in Maine and Blakes over in Europe.
At one time there were Spartan, Blakes, Groco, Wilcox Crittenden, Buck Algonquin and others that all made this type of seacock.
The Tapered Cone Seacock
In this photo we can see the cone or plug and the taper is evident. The valve body has a corresponding taper in it and the two are lap fit or ground to fit and mate nearly perfectly.
The beautiful thing about these robust bronze seacocks is they are made from the same material, all 85-5-5-5 bronze. Eighty-five-three-five bronze is made up of; 85% Copper, 5% Tin, 5% Lead (for machining ease) and only 5% Zinc. 85-5-5-5 bronze is one of the most corrosion and dezincification resistant forms of bronze used in the marine industry.
In contrast most propellers & prop struts are made of a Manganese Bronze which is anywhere between 26% & 40% Zinc. Which of these bronze materials do you think will last longer in the marine environment? There are no dissimilar materials in most tapered cone/plug seacocks unlike a gate valve or ball valve. Even a Marine UL rated ball valve has dissimilar metals in it..
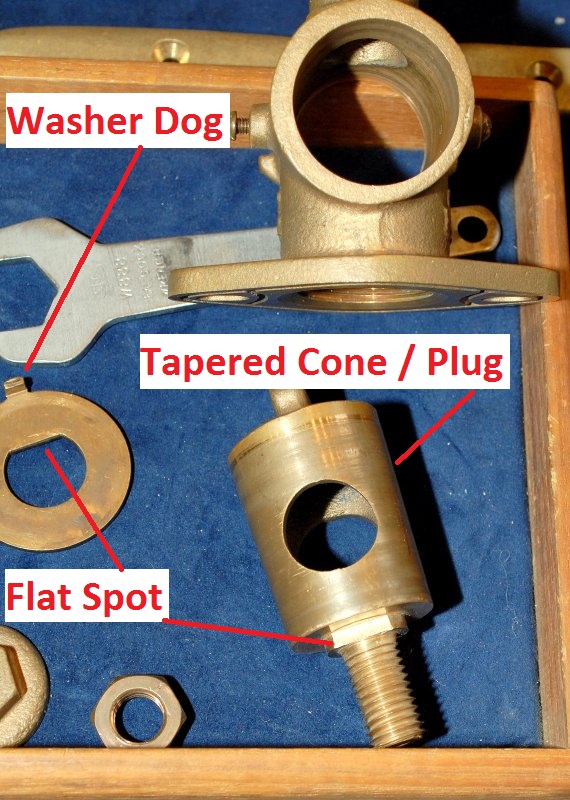
In this photo we can also see the dog washer flat spots. This dog washer rides around the valve body with the cone and the dog creates positive stops on either side. There are matching dogs cast into the body of the valve.
When re-installing the cone the flat spot should be facing up. This allows you to see the actual orientation of the valve hole by looking at the dog. The flat spot is in-line with the cone/plug hole and the valve body dogs are designed for this orientation at 12:00 when open.
If you install the dog upside down at 6:00 you will bend the dog on the valve body dogs as they are only machined flat on top and have a ramp or slope on the bottom that will bend an improperly installed dog washer.
All Spartan seacocks have dog washers and valve body stop dogs. Despite what many Cape Dory owners believe are Spartan seacocks they can often be Wilcox Crittenden seacocks. Cape Dory used WC seacocks when they ran out of Spartans or could not get them in time. If you don’t have dog ear washers your valves are likely not Spartans.

The Tapered Cone Seacock 2
In this photo you can see the machined grooves in the bottom of the valve body. They are machined in to help retain a marine sealant and thus prevent leaks.
You can also see the proper placement of the Jam/Jamb nut and flange nut. I purposely placed the dog washer on backwards to show what not to do. The dog should always face the valve body and with valve open be oriented at 12:00.
UL Marine Label
It should go without saying but when doing below the waterline seacock/sea valve work the parts should be UL Marine labeled.
Groco, Spartan, Forespar/Marelon, Apollo/Conbraco, Buck Algonquin and others all sell UL Marine rated seacocks & valves. If it does not say UL Marine, or come from a legitimate manufacturer, you would be best to purchase other products that do meet the stringent UL Marine testing standards.


Brand New Spartan Seacock
This is a brand new Spartan Seacock. These are wonderful and expensive products that can last well beyond 30+ years. According to Spartan the average life they are seeing is 30 years. Keep in mind though that many of the valves, in this average, have not been routinely or well maintained.
Tapered cone seacocks if cleaned & greased yearly, and lapped when needed, can likely out last you. Sadly many don’t service them regularly and they then need replacement sooner than they should.
These seacocks were installed by many reputable builders such as Sabre, Pearson, Tartan, C&C, Cape Dory, Bristol, Hinckley, Morris, Shannon Yachts and others. Today very few builders other than Robinhood/Cape Dory and Shannon still use them though there are a few Down East Maine builders who will still use nothing but. With price competition the way it is builders have moved to less expensive, though not necessarily better, alternatives.
Wrenches
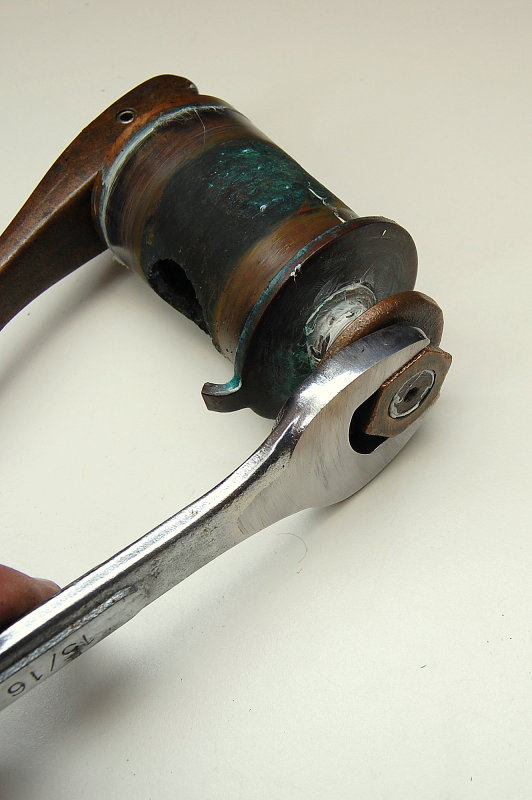
If servicing Spartan seacocks you’ll need two 15/16″ wrenches or a 15/16″ wrench and a smaller 3/4″ wrench for the smaller size jam nuts on the 3/4″ valves.
It’s important to note that you will need a thin spanner type wrench as the flange nut is thinner than most 15/16″ wrenches. The Wilcox Crittenden valves will take a full thickness 15/16″ wrench on the flange nut but the Spartans will not.
What I did is simply grind down a Harbor Freight quality 15/16″ wrench on my bench grinder to fit the Spartan flange nut. If your wrench is too thick you won’t be able to effectively lock the two nuts together and they may work loose.
If you click on this picture, to make it larger, you can see where I ground this wrench thinner to fit the jam nut. This took about 5 minutes on a bench grinder and I think I paid about $3.00 for the wrench.
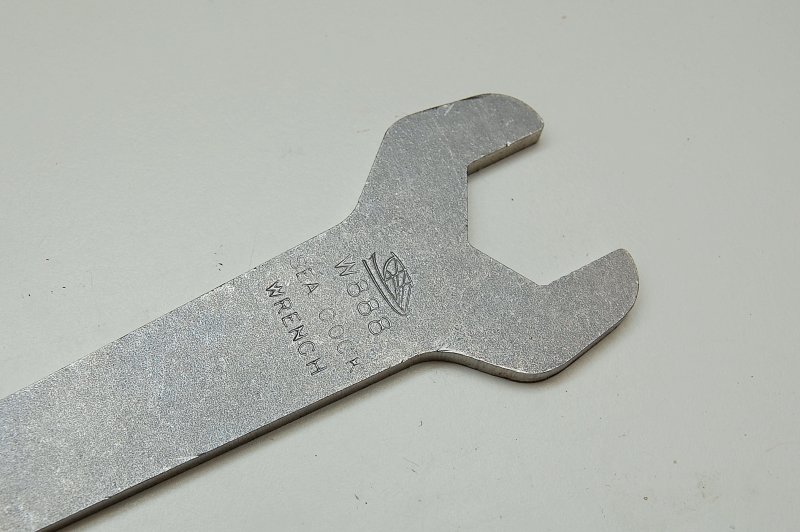
Spartan Wrench
Of course if you’re lucky enough to own a vessel with Spartan seacocks then you might want to spring for their 316 stainless steel seacock wrench. I own one and it’s worth it as the length is just right.
It also has a hole in the end for a lanyard so you don’t drop it into the black hole that is your bilge!
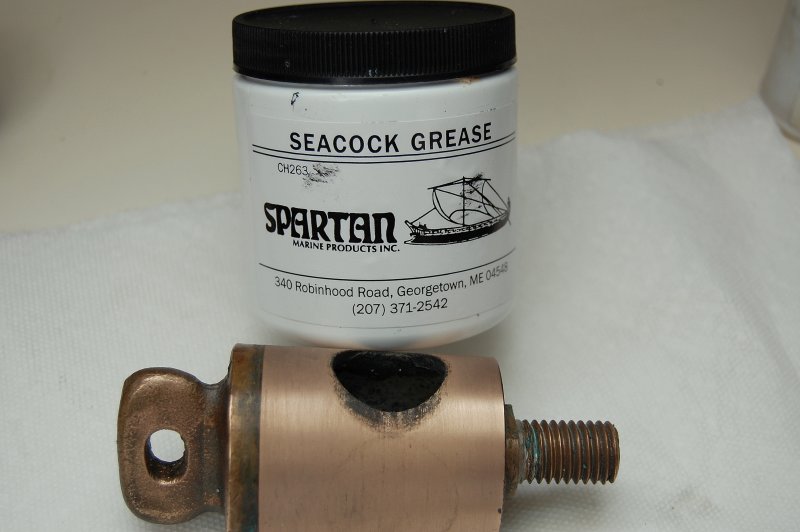
Seacock Grease
Grease is grease right? Well, no, it’s not. Over the years, when I have been out of the Spartan Seacock grease, I have tried everything from standard white lithium grease to expensive synthetic grease like Morey’s Red or Amsoil waterproof synthetic grease. None of these wonder greases has worked nearly as well, or lasted as long, as the grease sold by Spartan Marine.
This Spartan lithium based grease is THICK because it can be. Picture cold peanut butter and you’ll have the consistency about right. Spartan has added some proprietary and top secret Tony the Tiger like ingredients that actually do work. Trailer bearing grease is thinner, because it has to be. These valves only ever turn up and down maybe 60 times per year, they are not spinning at 70MPH while driving 100 miles to a boat launch ramp. Because these valves rotate less than a full revolution the grease can be significantly thicker & considerably more viscous, for the application, and it just works.
Spartan is fairly adamant that you not use a synthetic grease and I can concur with their suggestion. Many Cape Dorian’s swear by Morey’s Red but I still find the Spartan grease to out perform it fairly handily. I find synthetics get hard, turn gummy and have less film thickness between the cone and body. As a result the valves leak sooner and become hard to turn sooner than when I use genuine Spartan seacock grease.
The grease is about $12.00 for a tub that will last many years.
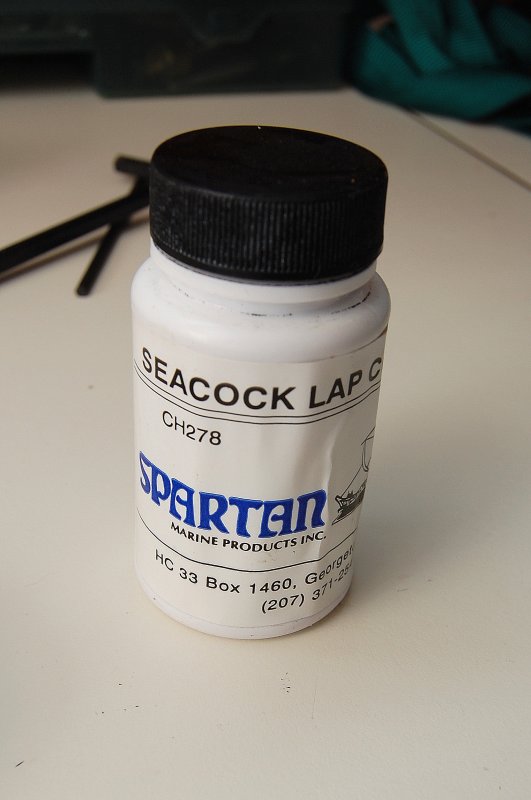
Lapping Compound
Every so often the tapered cones/plugs need to be lap fit to the valve body with a lapping compound or basically liquid sandpaper. The Spartan Lap Compound is a 320 grit silicon carbide in an oil/grease base. It works very well and is specifically made by Spartan for their seacocks.
You can also buy lapping compound made by Loctite called Clover Compound. It comes in a 320 grit formula but it’s actually more expensive than the Spartan lapping compound.
My only complaint with the Spartan compound is that the oil and silicon carbide separate and it needs to be stirred well with each use. Not a real big deal..
Getting Started
1- First use the two wrenches to loosen the jam nut from the flange nut.
2- Remove jam nut, flange nut and dog washer from the cone/plug shaft and set aside. Some brands like the old Wilcox Crittenden seacocks did not have “dogs” on the washer. Many a tapered cone owner, myself included, have dropped jam nuts, flange nuts or the dog washer into the bilge during removal or re-installation. A wise man once suggested that I wrap a towel around the base of the seacock when removing the pieces. It works! The towel prevents the old bounce & slide disappearing act. On some boats if you drop a part they are gone forever…
3- Use the handle to move the valve and the cone/plug should pop out.
4- If the valve was stuck a light tap on the nut end, with a hardwood mallet, will almost always free the cone from the valve body. If you don’t have a hardwood mallet just leave the jam nut 90% on and tap on the nut. This will prevent you from damaging the threads on the tapered cones shaft. Do not beat on it.
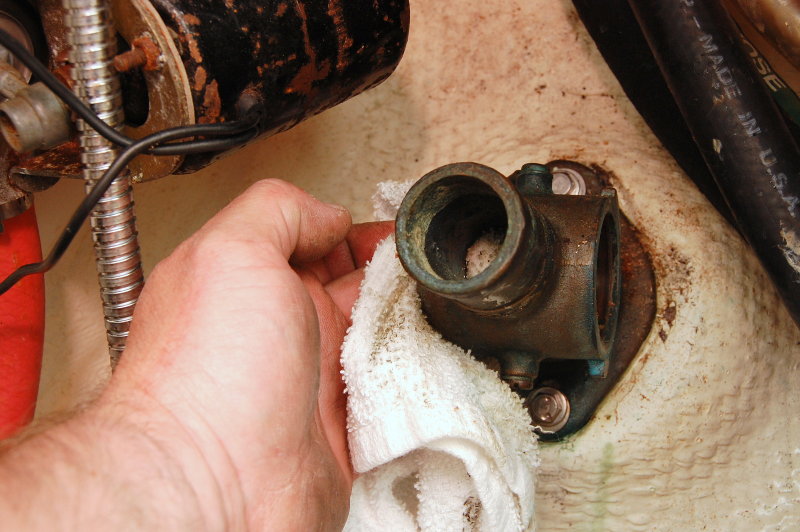
5- Clean the valve body and cone using a good grease cutting solvent. I like odorless mineral spirits, to thoroughly clean the inside of the valve body but three are many products that will work.

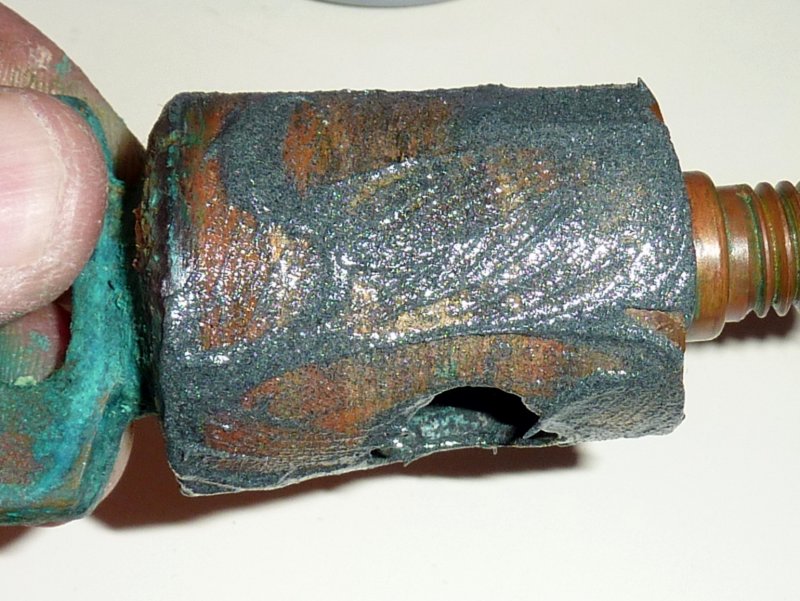
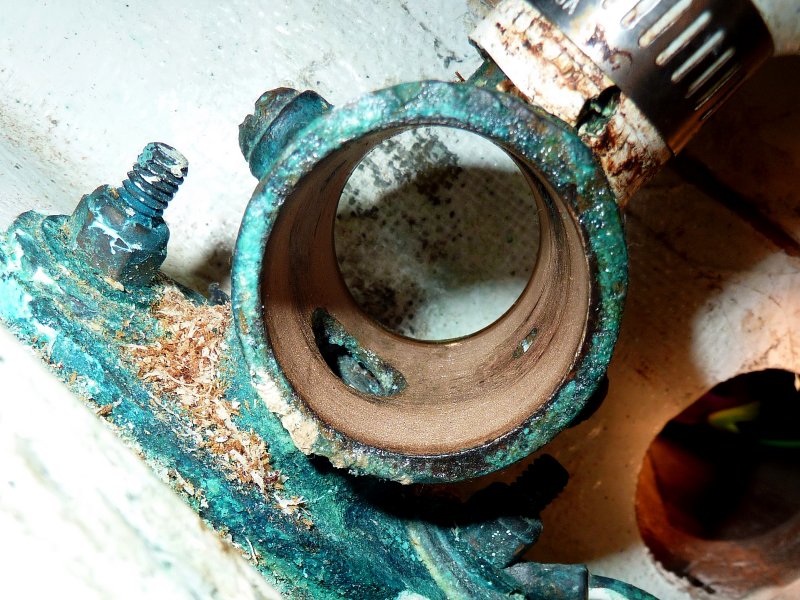
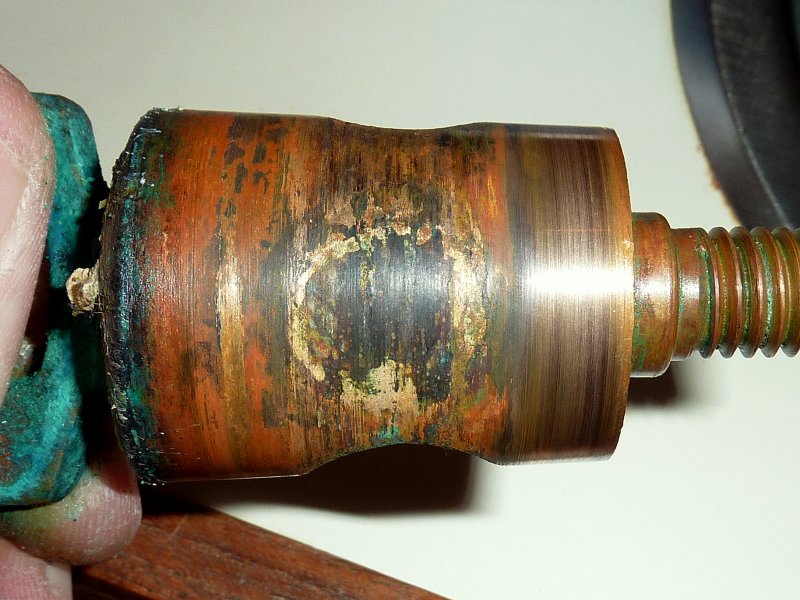
Nasty Cone/Plug
Ideally you want the most contact area you can get. I aim for about 80-90% minimum contact area between the valve body and the cone/plug but on some old, poorly maintained or worn cones that may not be doable.
Here we have what looks to be less than 30% contact and the valve had been leaking. Even a thorough cleaning and greasing may have only stopped the leaking for a short while. This valve body and cone needed to be lap fit. Keep in mind the main goal here is simply no weeping when open or closed. If 60% contact area, in the right spots does it, then you’re good to go.
It should be noted that this Spartan Seacock was 32 years old when I took these photos. Show me even one 32 year old ball valve in the marine environment still working and I’d be very surprised. This is why I like Groco’s flanged adapter so much. Ball valves just do not last like a true tapered cone seacock does because they are not easily serviceable.
In-frequent servicing leads to sea-crud build up in the spot on the cone when it is in the closed position. When you then move the valve, it carries this abrasive crud into the valve body thus wearing it down or scoring it. If you grease annually, and open your valves properly, as in 100% open, not just partially open, you can minimize this wear and prolong the time between lap fitting.
Apply Lapping Compound
With the grease removed from inside the valve body and on the cone/plug you can mix the lapping compound and apply it to the cone. It does not need to be pretty as you may do this three plus times per cone in order to check your progress.

Re-Insert Cone & Lap Fit
For Lap Fitting:
- Remove handle from cone/plug by removing the set screw.
- Find an Allen wrench or other device that will allow you to spin the cone rotationally 360 degrees. I am using an Allen wrench here as the “L” end works great for this.
- Insert cone/plug and install the dog washer BACKWARDS with the dog facing away from the valve body.
- Install flange nut and tighten so you can still turn the cone/plug with the Allen wrench.
- Rotate the cone fully in a 360 degree fashion roughly ten times in the same direction.
- Loosen flange nut, remove cone, wipe clean and check lapping progress.
- If more fitting is needed re-apply a light layer of lapping compound and rotate the opposite direction approximately ten times and check again.
IMPORTANT: The instructions from Spartan are very misleading for lap fitting. Folks often assume they want you to use the handle in a simple back and forth motion to lap fit. This is not the case and can result in ridges and uneven lapping. Spartan is aware that they need to change their instructions to be more clear and Paul had asked me to override their instructions here for anyone who might read them.
Lap fitting should always be done in a full 360 degree circular fashion and not a 180 degree back and forth manner…
10 Turns
This is the nasty cone after 10 full rotations. It still needs some work.


20 Turns
This is how it looked after 20 turns. The second set of ten rotations I do, is in the opposite direction. I find that I rarely need to go beyond 40 turns even on really poorly maintianed cones. Somewhere around 30 rotations often seems to be the magic number.
IMPORTANT: Do not try to get any of the deeper corrosion spots out of the circular area left from the valve being closed. You would need to remove a lot more bronze than is necessary to accomplish this.
You are looking to get the most contact area you can without over grinding. Just enough to keep the valve from weeping in either the open or closed position
20 Turns Inside a 3/4″ Valve
This valve was in very rough shape at 32 years old but it cleaned up well and performs perfectly going on it’s 33rd season.
This photo also represents one reason why I dislike white PVC sanitation hose when used below the waterline. That crack was in an area only really visible to the camera. Ouch!!
Just say no to PVC hose for below waterline use..

Incomplete Valve Opening
This wear and low spot was caused by repeated incomplete openings of the seacock. This wear or low spot can be avoided if you follow the cone ear and not the handle. On Spartans you can simply look at the dog on the washer as your guide. When it is at 12:00 the cone/plug hole is perfectly centered in the hole.
Valve Not Correctly Opened
As can be seen in this image the handle feels and may look like it’s open but unless you look carefully at the ear on the cone/plug you can’t tell that it is not fully open yet.
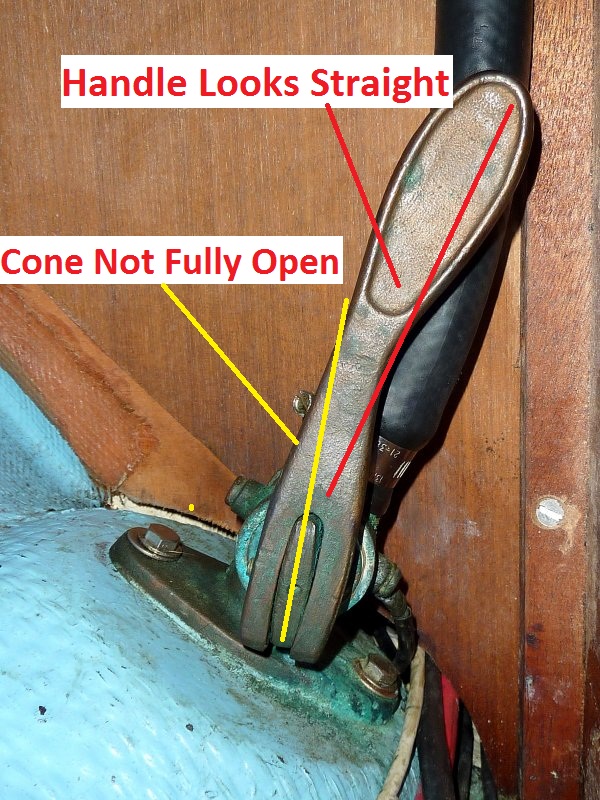
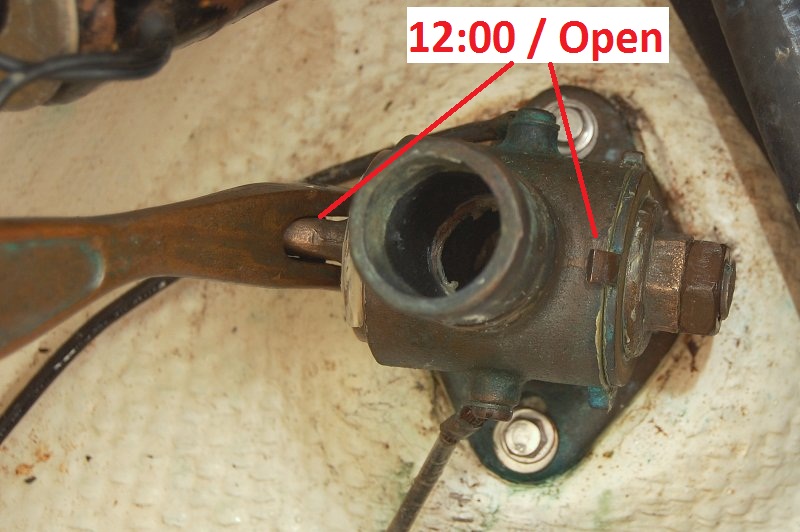
Properly Opened
As you can see the dog is at 12:00 as is the tapered cone/plug ear. The handle makes it look like it is not open but it really is. Don’t go by the handle go by the dog, if it has one, or the cone/plug ear that the handle mounts to.
Proper opening can save some wear and tear on these valves.
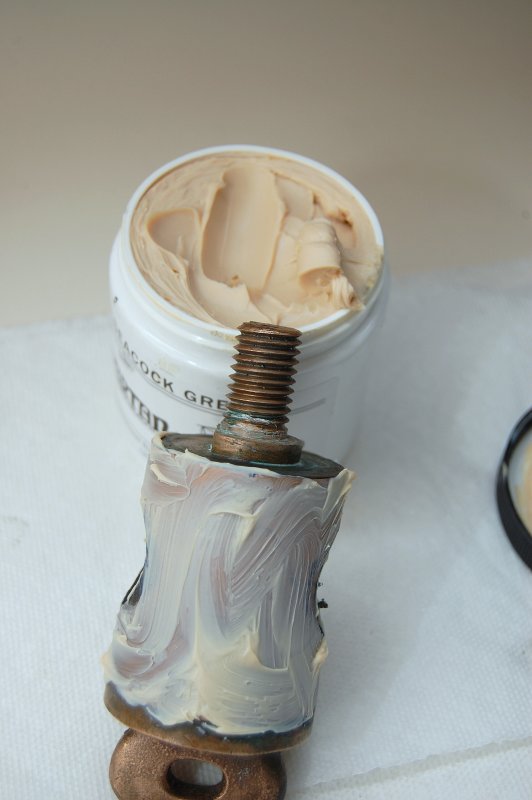
Final Step
This is the final step. What you see here is way too much grease. Smear it on then wipe much of it back off. It is best to coat both the inside of the valve and the cone with grease before assembly.
WARNING: The cone and valve MUST be free and clear of ALL lapping compound before re-assembly. I find that denatured alcohol and microfiber rags work best for this but terry cloth works too. Reach your finger into the inlet and outlet and wipe them too or the lapping compound will be re-deposited onto the cone. You’ll want to clean the valve body and cone three to four times with a fresh rag each cleaning. The lapping compound has a tendency to play hide and seek and you really need to seek it out. If the lapping compound is not completely removed after lapping it can destroy a seacock.
1- After cleaning, grease the valve body and the cone/plug.
2- Insert the cone and line up the flat spot on the cone with the flat spot on the large washer. If it has a dog be sure the flat spot is facing up so the dog lands at 12:00 when open.
3- Install the flange nut and then the jam nut.
4- Adjust the valve slowly while working the grease in by moving the cone around.
5- Re-Install the handle and make final adjustment.
6- Adjust the tension so the handle needs some pressure to turn it but not so loose that it falls down on its own. This will leave room for any future adjustment that may be needed. DO NOT OVER TIGHTEN.
7- If it weeps on launch take very small turns on the flange nut until it stops weeping then lock the jam nut against the flange nut.
Before
This is just a visual of what can be done with very old tapered cone seacocks. This one was nasty and leaking badly.
After
About five minutes later it looked like this. I then cleaned it, greased it and put it back into service and it works flawlessly. This seacock had not been serviced or touched in over eight years.


Wiring Warning
This was an actual situation I found under a head sink and these were live 12V DC wires. One wire had been pinched by the dog ear and the jacket opened up. Please keep any 12V DC or 120V AC wiring away from seacocks. Wire ties are your friend..
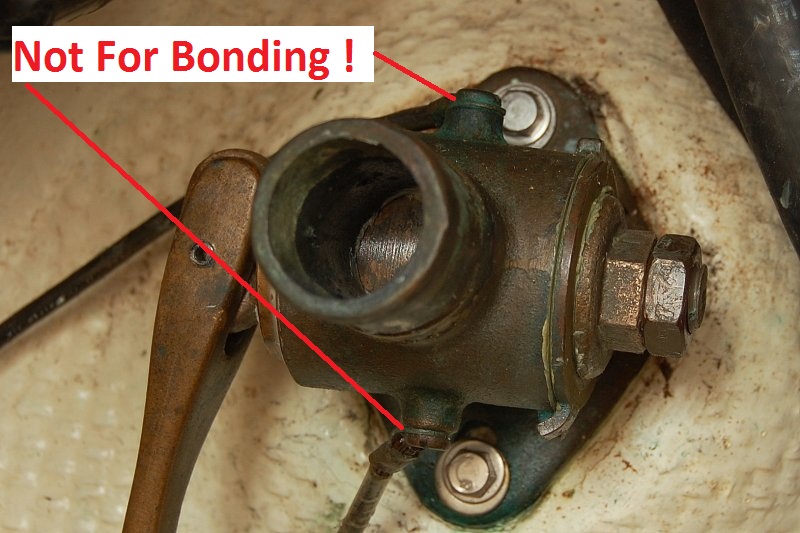
A Bonding No, No..!
These screws are for winter draining of the seacocks for boats stored in-water. They should not be used for tying bonding wires to. These are an odd size machine screw in a special bronze that are nearly impossible to get, even from Spartan.
IMPORTANT: Bonding should be tied to the flange bolts only, not the drain plugs. Just because a couple of major builders did it incorrectly does not mean you need to as well.
If you have 30 year old drain screws, that are used for bonding, I would leave well enough alone as the threads often fail when trying to get them out.
Good luck & happy boating!!
Let’s Keep This Site Running!
Like what you saw or read? Would you like to see more articles like this? Is so feel free to donate, support the site and keep it growing. I am trying my hardest to keep this information FREE. If you liked it, learned from it or I saved you some money feel free to make a small donation, that’s all I ask.