
The Electrophysics CT-33 Moisture Meter
I’ve always been a big proponent of boat owners, and more importantly boat buyers, owning a moisture meter. I don’t suggest this because I want every DIY boater to think they are a surveyor, or to try and circumvent the surveying process, that is not my point at all. I suggest it because in all seriousness the meter above paid for its self the first time I used it to rule out just one boat. Essentially, a survey for 30+ footer can run $600.00 or more these days and whether or not the boat passes you pay the surveyor the $600.00+.
More often than not you find a boat and it looks great on paper and on Yachtworld.com. You then meet the broker, bring your spouse and you both get an extreme case of boat buyers lust. “She’s just perfect!” Your heart gets racing and you begin to imagine how much fun it will be to own her. But wait a minute, she looks great on the surface but what’s underneath? Is she in need of hidden big $$$ repairs?
Any good and reputable broker should offer to bring along a moisture meter, if not just ask. Sadly though many less helpful or thorough brokers claim they don’t have one or don’t know how to use one. More often than not they don’t actually own one. This to me is like going to a family practice doc who does not own a stethoscope. If this is the case … well.. your choice? I know many good brokers, who have meters, and who go over the deck and cored hull before even listing a boat. Ask all the questions! If you don’t ask them, you won’t get any answers.
So what can you do to protect your self from paying for surveys on boats with saturated decks or hull core? Buy an Electrophysics CT-33, or its sister meter the J.R. Overseas GRP-33, read this blog and the manual, do a Google search of “moisture meters for fiberglass” and then go for it.
When we bought our current boat I looked at over 50 boats, meter in hand. It did not take me long to rule many of them out due to severe moisture issues. Many times I would not even involve the broker and instead would do a drive by, find a ladder, and at least circle the chain plates and deck fittings near the rail. I don’t suggest boarding any boat without a broker, I didn’t just leaned the ladder up and did some cursory checking, I have been able to rule out many boats this way without wasting a brokers time. Heck on many “drive by’s” I never even had to get out of the car! I saw some nice boats and some basket cases but unfortunately some had some really hidden deck problems even though they were in good cosmetic condition.
The CT-33 is sold by Electrophysics in Canada currently sells for $160.00 and you’ll need a calibration block for another $10.00. The US distributor, J.R. Overseas, has an exclusive deal for all US sales and they sell a meter that is slightly altered, has different scale graphics but that is essentially a very similar meter. The J.R. Overseas GRP-33 sells for $325.00. The CT-33 sells for less.
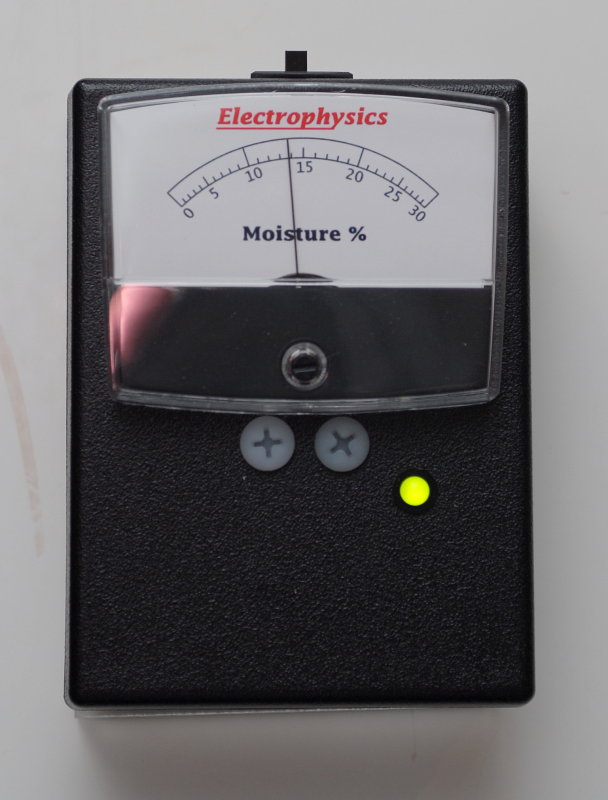
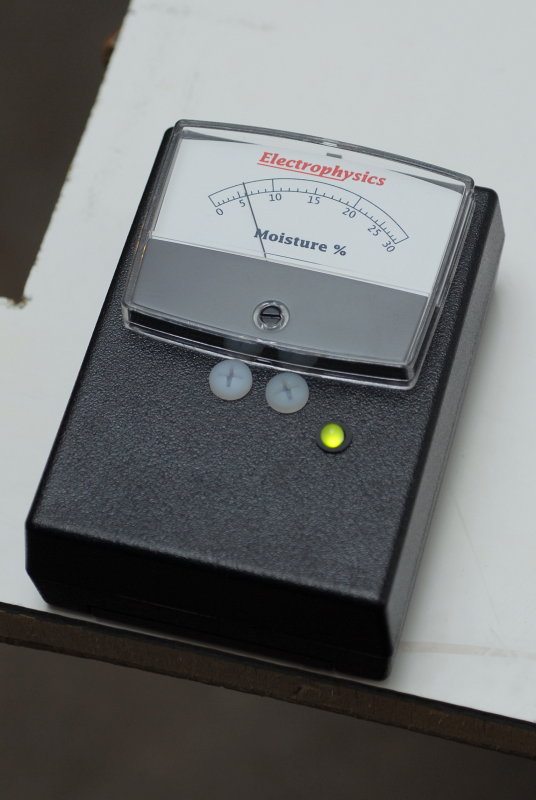
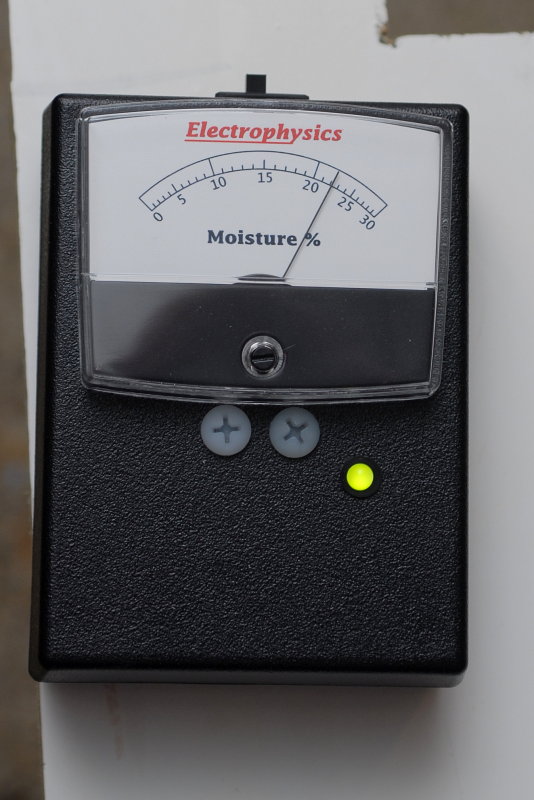
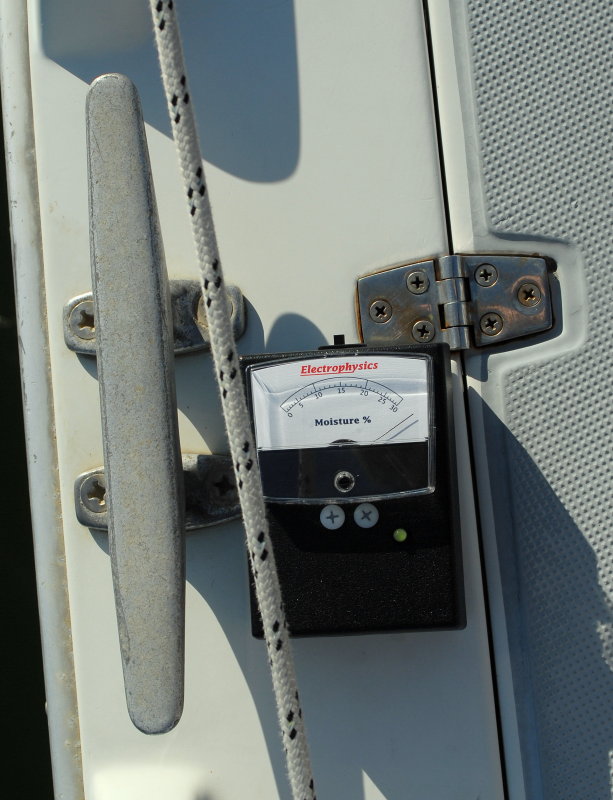
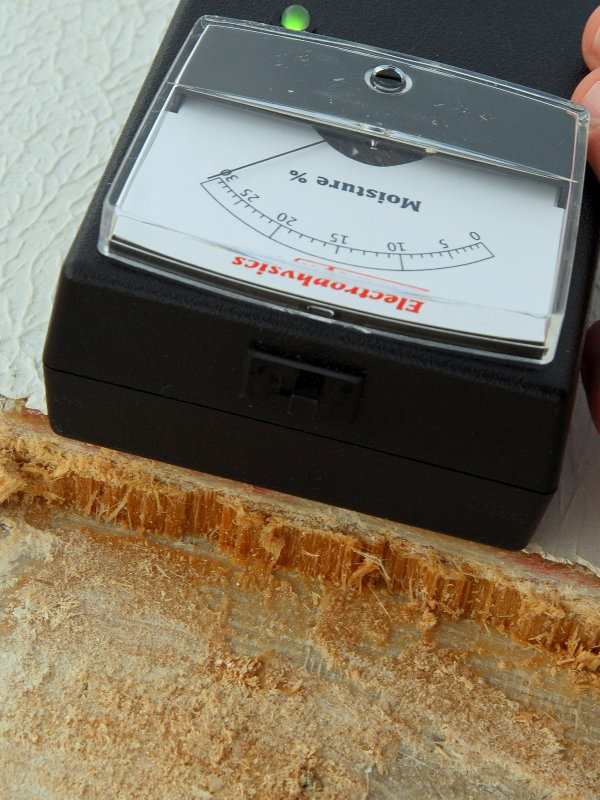
This photo shows the first thing to do when you turn it on. Simply flip it on and hold it vertically in mid air. The needle should read zero. This is an initial calibrations check.
Please DO NOT buy a moisture meter if your intent is to circumvent the survey process. To master the use of one takes time and should be used with soundings, something many DIY’s don’t have the ear for and other measures to cross check the moisture meters findings.. Using one to rule in boats that may be a good candidate for a survey or to rule out boats that have a pegged meter all over is fine and can save you money.
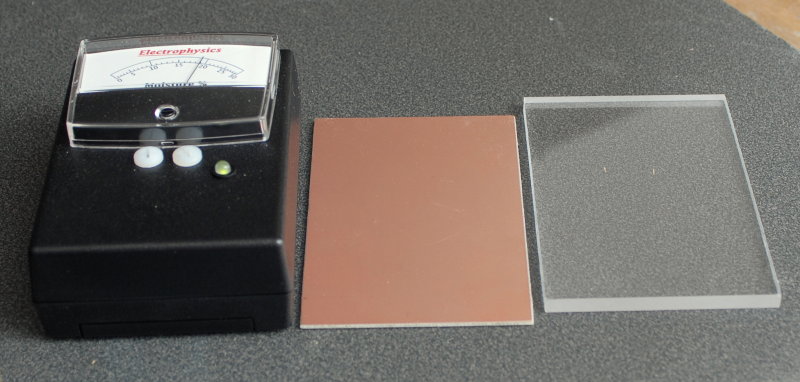
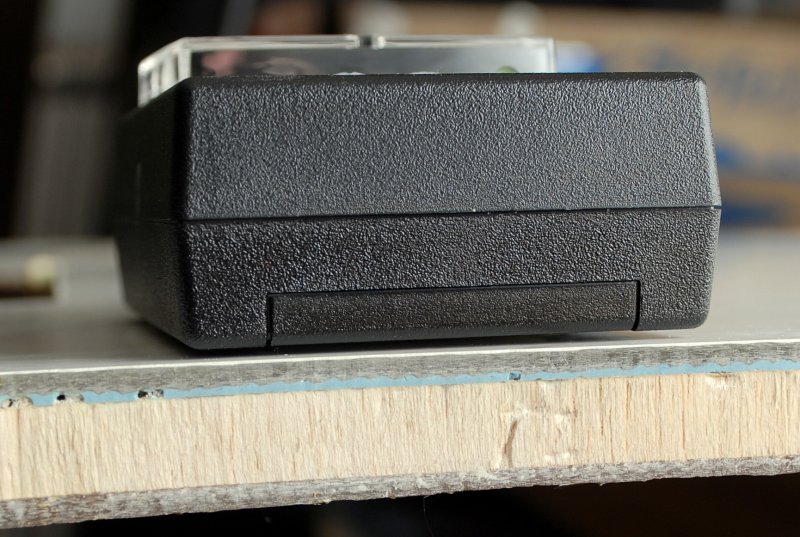
CT-33, Copper Plated Calibration Block & Acrylic Spacer
In this photo you can see the meter the copper faced calibration block and the acrylic spacer. These two items are used to calibrate the device. Though you will likely never need to calibrate it, the check takes just a few seconds to confirm the calibration is within spec.
Copper Calibration Block
In this photo the calibration block is laying with the copper face down and away from the meter. This face down orientation is what you use when checking the calibration
Calibration Plate & Spacer
Next the acrylic spacer is placed over the calibration block and it’s ready for you to set the meter on. The meter can’t see beyond the copper so it does not really matter where you set it to check the calibration. You can even set it on a saturated deck if you wish..
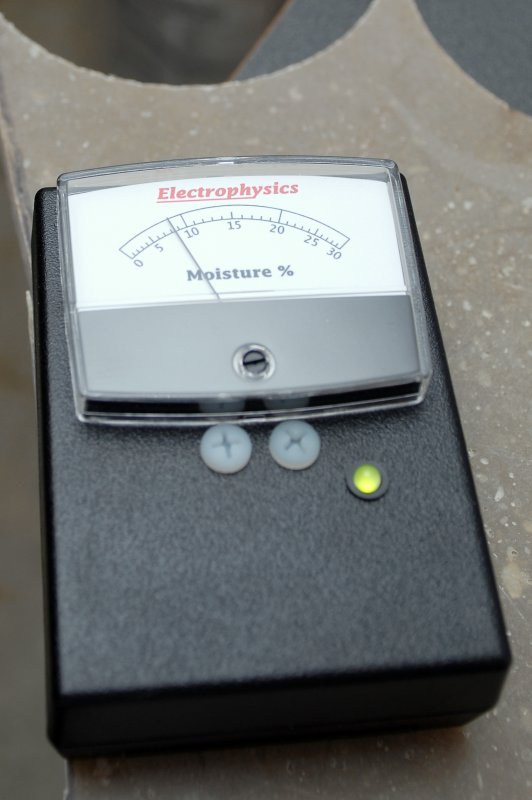
Testing The Calibration
When the meter is placed atop the spacer and copper faced calibration block the meter should read exactly 14%. My camera was slightly off center but the meter does read spot on when you are directly over it.
So if the meter reads zero when holding it in mid air and 14% when placed atop the calibration block and spacer it’s ready to use and in perfect calibration.
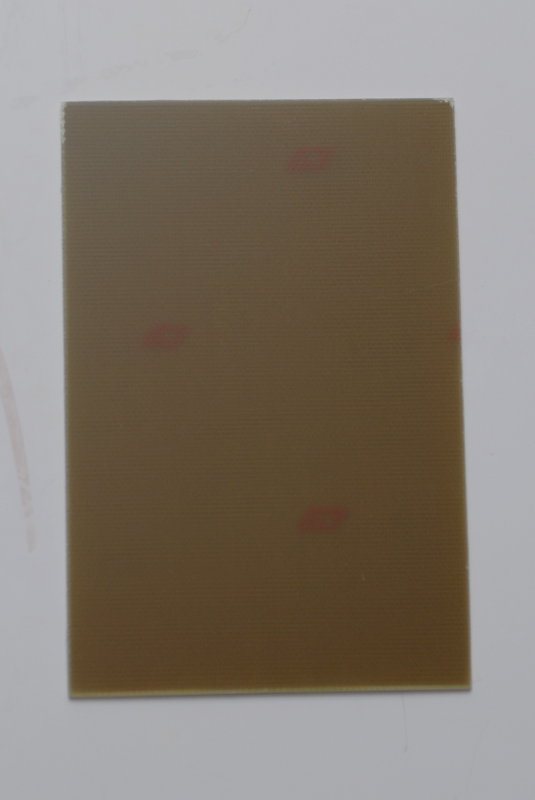
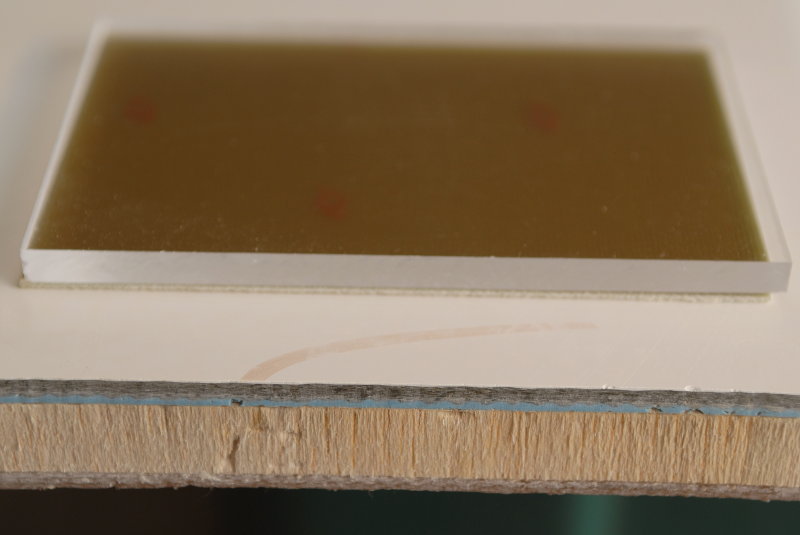
Test Panel & Meter
In order to display how the meter works I chose to use a known dry chunk of deck skin I had lying around. The deck skin is made of sandwiched balsa and is quite typical of most hull and or deck construction. This piece actually came off of a Maine built Downeast style boat but sandwiched balsa is fairly straight forward stuff.
Meter Reading of Dry Test Panel
Now I know what you’re probably thinking “it’s already wet”? If you thought that you’d be wrong. This 6% reading is actually about as bone dry as you’ll ever get on either solid or cored fiberglass using the CT-33. Using this meter any reading between 0% & 15% is considered dry on fiberglass.
Remember this meter is primarily designed for the many different species of wood. It may also be used on man made materials such as fiberglass. You’ll need to reference the scale found at the end of this page for fiberglass interpretations/translations.
Contrary to popular belief moisture meters don’t actually read moisture. They actually read capacitance. This capacitance reading is then transposed, onto the analog display, into a relative moisture reading.
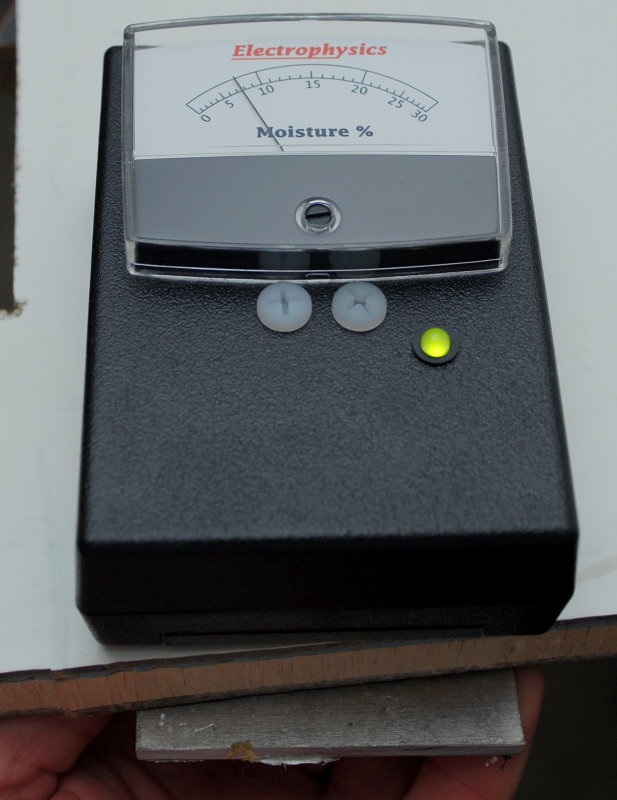
Meters Read Metals !
In this picture I am holding a piece of metal up against the underside of the simulated deck/hull. As you can see the reading has gone from 6% up to 7.5%. This cored deck piece is a little over 3/4″ thick and still the meter picked up the metal. If the deck were thinner the reading would have been higher.
It is very, very important to know what is under the deck before taking a reading and the approximate thickness. Some new boats, from builders like Catalina & Hunter, utilize aluminum plates glassed into the deck beneath winches, stanchions and other deck hardware. These aluminum insertions will cause wet looking readings as they are only about 1/4″ deep at best. Large backing plates can also throw off readings so please do your best to look inside and to be sure your not reading metals through the deck.
This meter is designed to read approximately .5″ deep but as you can see it will still, just barely, see a piece of metal at 3/4″ depth. This is a good thing especially on cored hulls. Why? Well for one meters will read the copper in bottom paint as moisture so you can’t use one over bottom paint.
Secondarily any hull that has recently been hauled will have rather high moisture readings. If the hull is cored, and close to 3/4 of an inch thick, the exterior paint won’t throw off the meter by much and you’ll be able to take moisture readings from inside. This is why it is best to go around thru-hulls from the inside not outside. On solid glass hulls I would not bother metering and would suggest focusing your efforts on the deck and bulkheads. If everything else checks out, namely deck and bulkheads, bring in your surveyor to do a full bottom examination.
One other area for potential high misreading could be a gelcoat with a high metals content. Some gelcoat manufacturers use titanium dioxide as a coloring/pigment agent and in some cases it can throw the meter off. If you get consistently high readings on a gelcoat find a known dry area and take a baseline reading to compare against.
Reading 5/8″ Solid Fiberglass
Here is a piece of 5/8″ solid fiberglass I laid up to cut thru-hull backing plates from. It is bone dry and has never left my shop or been wet other than atmospheric moisture. As you can see it reads a little over 8%.
Different materials can have different readings. This piece of known dry 5/8″ solid glass actually reads slightly higher than a dry sandwiched balsa core. Both of these chunks have been sitting in my shop for well over two years, stored right next to each other, so the environmental controls were identical. No need to worry though as any reading on fiberglass between 0% & 15% is considered dry with the CT-33..
Water Mist Sprayed Onto Surface
I wanted to illustrate just how sensitive these meter are and to impress upon potential meter owners why the deck surface must be bone dry before using a moisture meter.
I simply used a misting bottle of water and sprayed the surface of the cored deck chunk to simulate dew or rain. I then used a terry cloth towel in an attempt to dry the surface before taking a reading. It was clearly insufficient.
Water Mist Sprayed Onto Surface
I wanted to illustrate just how sensitive these meter are and to impress upon potential meter owners why the deck surface MUST be BONE dry before using a moisture meter.
I simply used a misting bottle of water and sprayed the surface of the cored deck chunk to simulate dew or rain. I then used a terry cloth towel in an attempt to dry the surface before taking a reading.

Residual Deck Surface Moisture
As you can see, even after wiping it with a towel, the reading was drastically higher and certainly in the high moist range.
Please do not use a meter on any deck or interior hull sections that have dew, condensation or where it has recently rained. If you must take a reading after a rain or dew use a rag dampened with either Acetone or Denatured Alcohol to ensure the surface is bone dry before taking a reading. I still suggest waiting if at all possible. I only suggest Acetone with the utmost caution. Please do not use Acetone on a boat you don’t yet own. This is especially true if you have even the slightest concern it is a painted finish. Never use Acetone on a painted surface.
Acetone drys surface moisture faster than Denatured Alcohol but both work. I suggest the latter and a little more patience as it is much safer.
Again, you can not take a reading with even the slightest amount of surface moisture.

The CT-33 Scale For Fiberglass
This is the scale for translating meter data. It’s is fairly straight forward. The scale on the left is for reading wood, or a wood cored laminate and the scale on the right is for reading solid fiberglass. As you’ll notice a 30% moisture saturation in wood or a cored section is only equal to 3% total absorbed moisture on a solid fiberglass with no core.
Core rot, degradation and the physical failure of the core can begin at about a 20% reading on the CT-33, sometimes sooner, which is in the high moist range. A pegged meter is indicating a moisture content in the core of about 35% or more!! If boats were made out of water this would be one thing but a core, with even close to 35% water content is not a good sign.
Some other important things to remember:
Moisture meters read metals and display it as moisture. If you want to take reading bellow the waterline you’ll need to scrape away bottom paint in order to get an accurate reading. This is a bad idea and best left to your surveyor. If you want to check for core moisture bellow the waterline do it from inside the hull on areas around seacocks etc.. I do not suggest that you use your meter for bellow water applications, with a solid un-cored hull, as these readings can be very misleading and are best left to a pro to interpret.
Moisture meters can not read frozen water. There is no benefit in even bringing your meter to a boat in the dead of winter. Along those same lines if a surveyor says he can survey a boat for you at 20 degrees F and get moisture readings walk away. Temps should be well above freezing, for a while, before even considering moisture readings.
Always find the lowest reading you can on the boat to use as a baseline. Many times on sailboats you’ll find some dry core right above the wind speed & depth gauges if they are mounted on the cabin.
Look for differences in deck moisture readings. Diminishing changes in readings as you move away from a deck fitting are good indicators that the deck is wet around the fitting and that it is leaking or has leaked.
Most every boat has some deck moisture so don;’t be too alarmed at some “moist” readings. Readings in the moist range are certainly areas of concern but I would suggest bringing in a surveyor if you like the boat. If on the other hand the meter is pegged in multiple areas sch as mast bases, chain plates, genny tracks, bulkheads and other high load areas this is a boat that is probably safe to walk away from and continue looking.
Remember this is not for you to become an expert just to prevent you from spending $600.00 needlessly on a basket case boat. A few years ago I knew of a boat that had been surveyed almost ten times in two years on the market. She had wet decks, a saturated rudder and hull core moisture around the thru-hull penetrations. Each time the potential buyer either paid a discounted rate to “buy” the previous survey usually half price but it varies or to have a new one performed. A simple CT-33 purchase for under $200.00 would have saved these buyers some serious money. Each buyer could have ruled this boat out rather quickly with a little knowledge.
If you don’t feel comfortable buying and using a moisture meter by all means please don’t. A little common sense goes a long way and is all that’s necessary. Buying a meter when buying a boat will get you well on your way to saving money on unnecessary surveys.
If the $179.00 price tag (varies with exchange rate) is still killing you it is very easy to sell it when your done by listing it on any of the sailing forums.
How many times do you need to fork over $600.00+ when looking for a boat before you invest in a moisture meter. Don’t laugh I know some who have coughed up close to 2k in the search for a new vessel and the surveyors loved every penny of it.
WARNING: Use of a moisture meter, by a DIY, should only be done to determine if the boat is worthy of continuing on with a full survey or to track changes in your own vessels decks or hull. This article is not, and was not written, nor intended, as a means for you to replace or circumvent a professional survey. This article is intended to help you use a moisture meter to potentially uncover boats which are clear lemons and separate them from vessels that are worthy of pursuing further.
Bone Dry
This is an example of a bone dry core on a J Boat. Refer to the previous chart for translation.
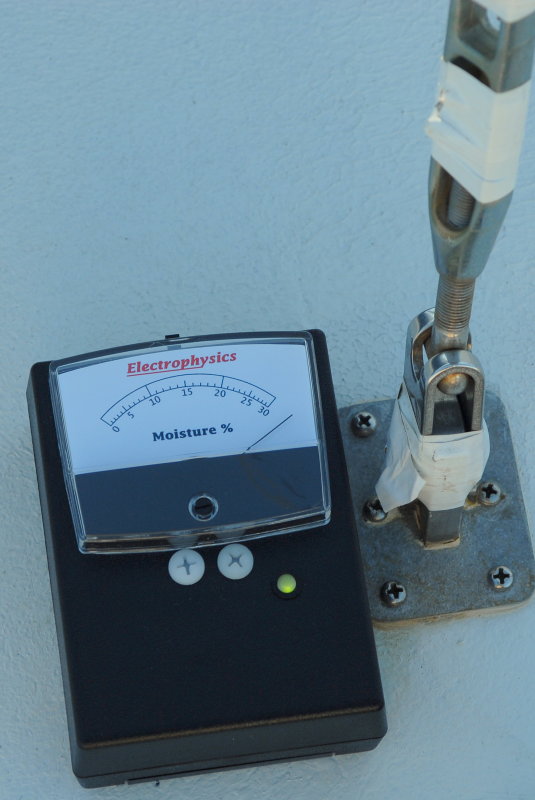
High Moist
This is an example of a high moist range reading on an O’Day. This deck is not yet destroyed but any further leaking needs to be curtailed asap or it will be ruined shortly. Because of the critical location, next to a chain plate, this should be attended to and the core removed and repaired sooner rather than later. There are some ares of a boat that you certainly don’t want wet or even high moist.
High Wet
This is an example of a high wet reading on a Tartan 37. This port light has likely been leaking into the decks core. While this moisture is not in an extremely critical location, the genny track is only a few inches away and was reading in the high moist range and that is a critical zone.
A high reading bellow the port light and a moist reading near the genny track leads one to believe the port light is the likely culprit as the moisture diminished the further away you got from the port light. The moisture had traveled a good 7-8″ towards the genny track through capillary action and had even migrated about 12″ fore and aft.
Utterly Saturated Reading
This is a very bad example of exactly what you don’t want to see, a totally saturated core. This boat lives on a mooring and this is one of the primary mooring cleats. Most would assume there is likely some serious delamination going on and a degrading or degraded core.
When this core was dug into by the owner it was found to be less damaged than would have been expected based on the reading. It was only dug into after spot soundings indicated some delamination. Meters can read metals and in this case a backing plate so this reading was not as accurate as one would like it to be. This is a prime example of why you need to practice with the meter and confirm what lies beneath.
Remember the degradation and physical rotting of the core begins at around 20% on the CT-33. The longer it has been above 20% the more likely are the odds for a total failure and delamination of the skins but this can still take a very long while. I have seen decks with 25% readings going back 10+ years be taken apart only to find that they were damp, but still very, very structurally sound. Always incorporate spot soundings and core samples before digging into a deck.
Totally Saturated
Here’s is another example of total saturation this time on a C&C. This is a must do fix and this boat is not one I would like to set out to sea on. Remember, the chain plates hold up the mast and the deck is an integral part of the support system for the chain plates. In this case the leak that caused the wet decks had also caused rotting of the bulkhead the chain plate was physically attached to.
This particular boat had moisture in lots of critical places though she looked very presentable. Unfortunately without a meter you’d likely hire a surveyor, based on cosmetics alone, and pay them $600.00 to find this.. Save yourself $400.00 and buy a meter.
If you still don’t feel comfortable using a moisture meter, even after reading this, please do not buy one. If on the other hand you are competent with a wrench, have common sense, enjoy DIY, have the desire to read beyond these pages and do your home work the moisture meter will be a great addition to your boat tool arsenal.
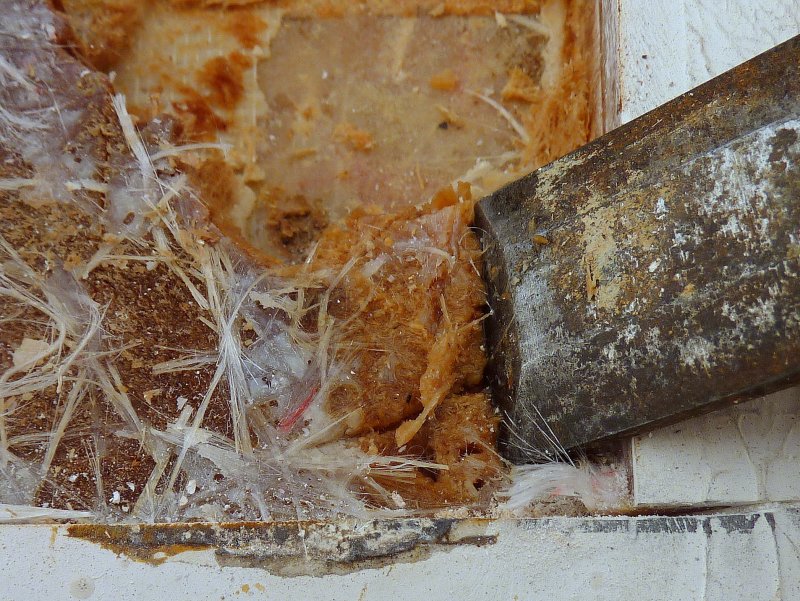
Saturated Core
This is an example of what a saturated core looks like during the rotting process. If you look ahead of the chisel you can see how the balsa just turns to mush when you touch it with the chisel. This was a deck penetration under a teak hand rail that leaked due to improper bedding.
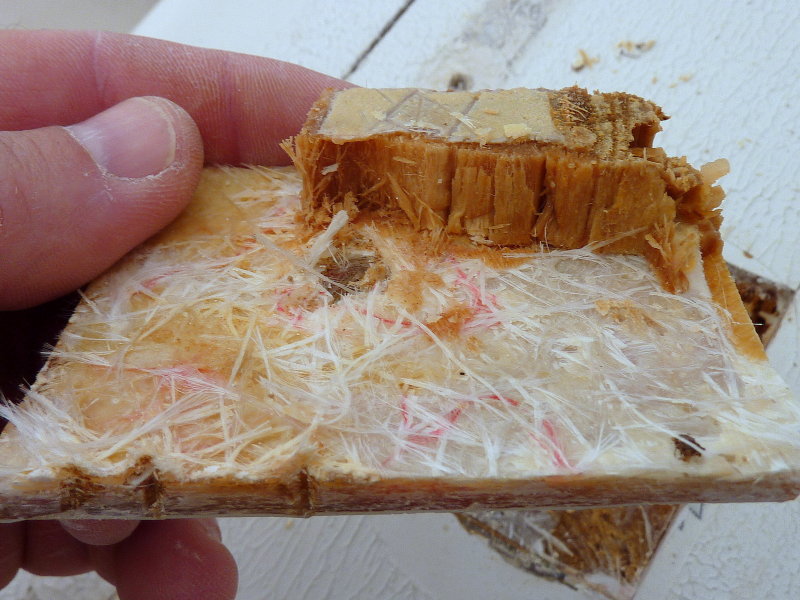
Saturated Core 2
Here’s another view of a saturated balsa core. As you can see the balsa actually looks wet and you can physically see the moisture.
Please note that this balsa, even in the present condition, still adhered quite well to both the top and bottom deck skins and required a screw driver to pry this square from the rest of the deck. At some point this would have failed but had not yet. Even this wet, the deck was still sounding out with minimal differences in tone. To the untrained ear, without a moisture meter and only a hammer, one might assume this deck was in A1 condition. Soundings & moisture meter can help each other out.
This is a good example of why spot soundings and moisture readings should accompany one another.
30% Wet Core Reading
This is the adjoining deck section to the photo above with the chisel. As you can see the color of the balsa is telling you how wet it is. If you scrape out this core and compress it between your fingers it drips water like a sponge would.
At this stage of rot (early) the core is still tightly bonded to the skins. If this moisture were allowed to continue the color of the balsa would continue to darken and literally rot away leaving no structural strength.