If You Don’t Know How to Solder…..
If you really don’t know how to solder a VHF PL259 connector there are other options as you’ll see below.
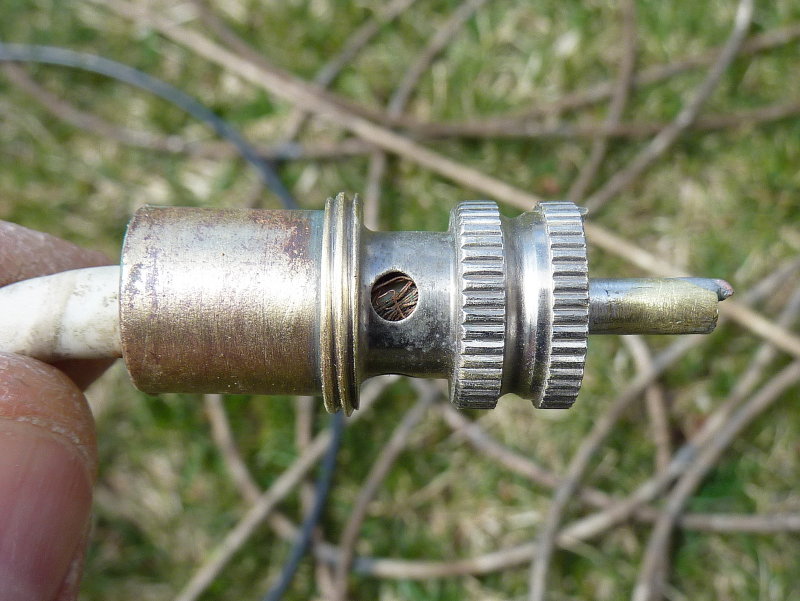
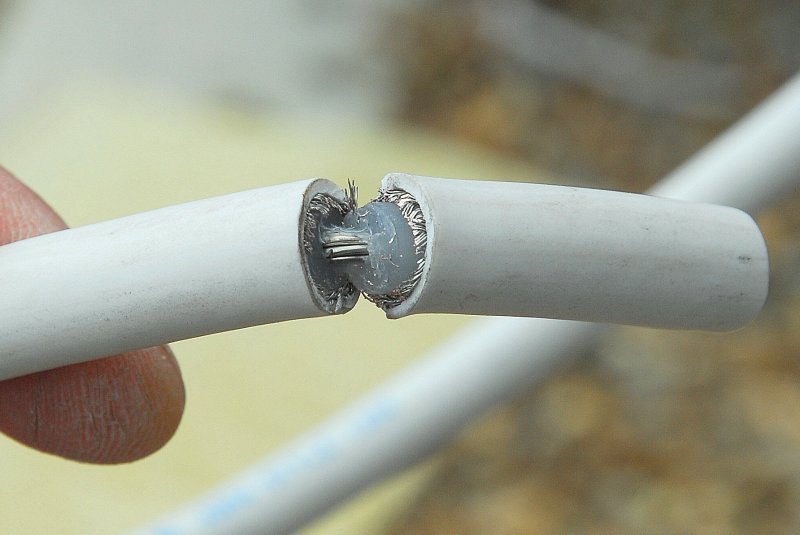
This one is laughable, except that when this owner needed his VHF it was no joke or laughing matter that it failed to transmit.
The previous owner or perhaps even a boat yard employee decided that solder on the shield for the VHF cable was optional. It worked for a short while, rather weakly, and then failed all together. Those holes are where the solder would go to contact the shield or braided portion of the coax cable.
MHT Recommended Products
I know It’s Tempting
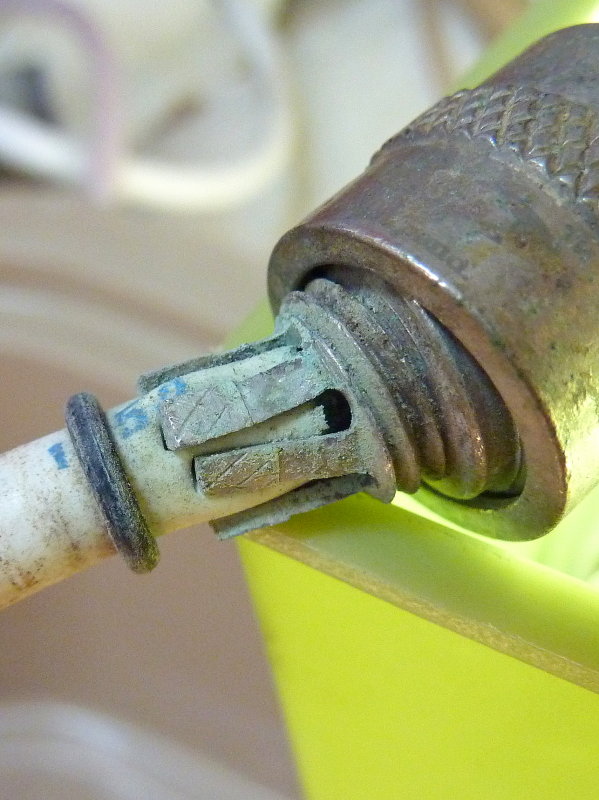
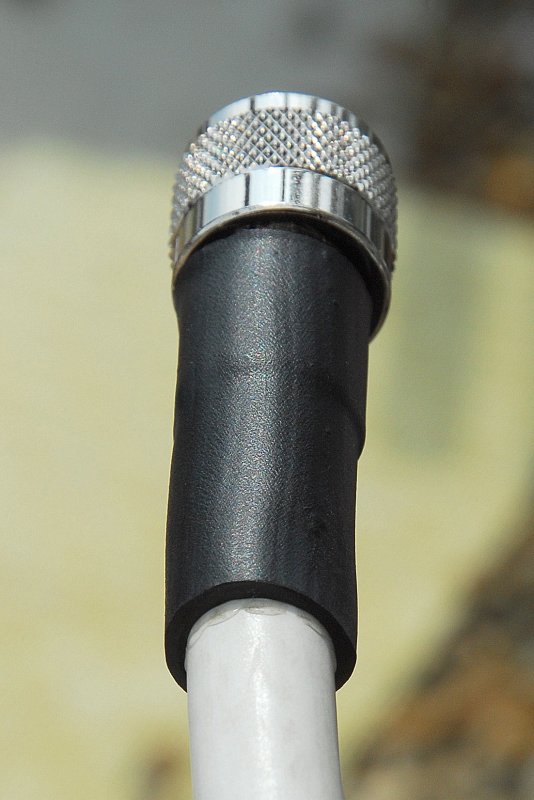
I know it is tempting to buy the marketing hype and try the “easy” VHF PL259 connectors sold by companies such as Shakespeare, but please consider the consequences of a failed VHF connection. Your VHF is a critical piece of safety equipment!
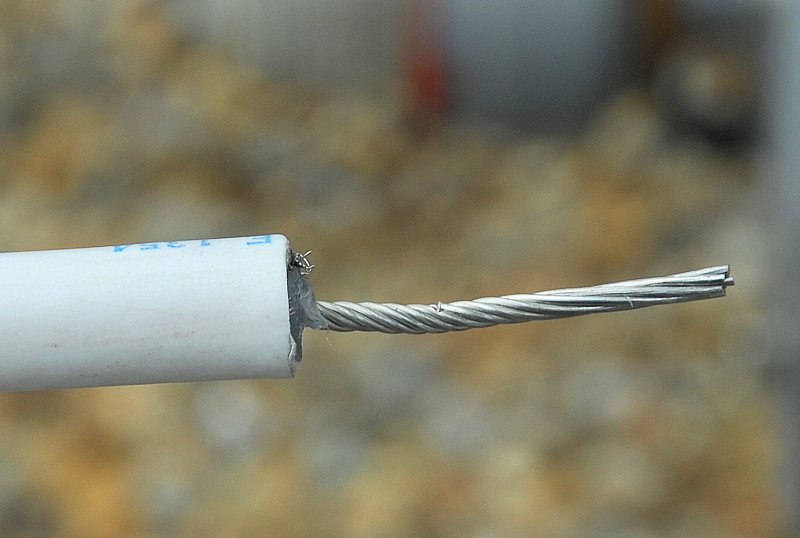
The Shakespeare center-pin PL-259 pictured was passing zero signal in just two years. It did a horrible job of keeping moisture out and also contacting the shield via the “piercings” through the VHF cable jacket. Other than poor solder jobs on PL-259’s this is by far and away the number one type of PL-259 I see failed in the marine environment.
The VHF radio, is your vessel is so equipped, is a safety device and also a federal requirement to monitor when underway. Cutting corners like this on your VHF connections can be a costly, or even potentially deadly mistake.
This Was Just 9 Weeks Old
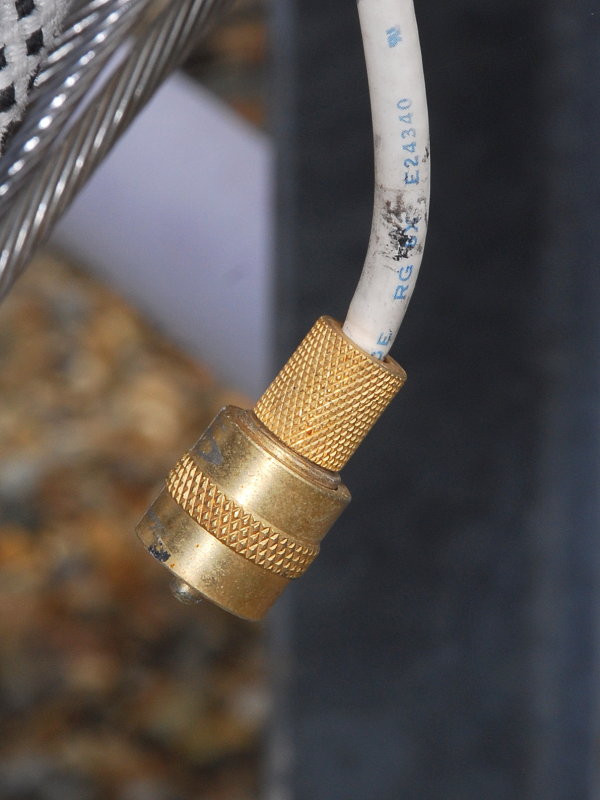
As I mentioned, I know it is tempting given all the marketing hype about these “piercing” connectors, but the reality is they can be flat out dangerous.
This was was just 9 weeks into its life when it failed to work. The owner claimed it was installed precisely & exactly to the instructions and in taking it apart it appeared to be as well installed as could be expected.
WARNING: Use extreme caution when using or choosing this type of connector.
RG-213 vs. RG-58U
With many things bigger is not always better but with VHF coax bigger usually is better
This is a visual comparison of Ancor Marine RG-213 and RG-58U. The signal loss for RG-213 at 100′ is -2.7dB and for RG-58U it is -6.1 dB.
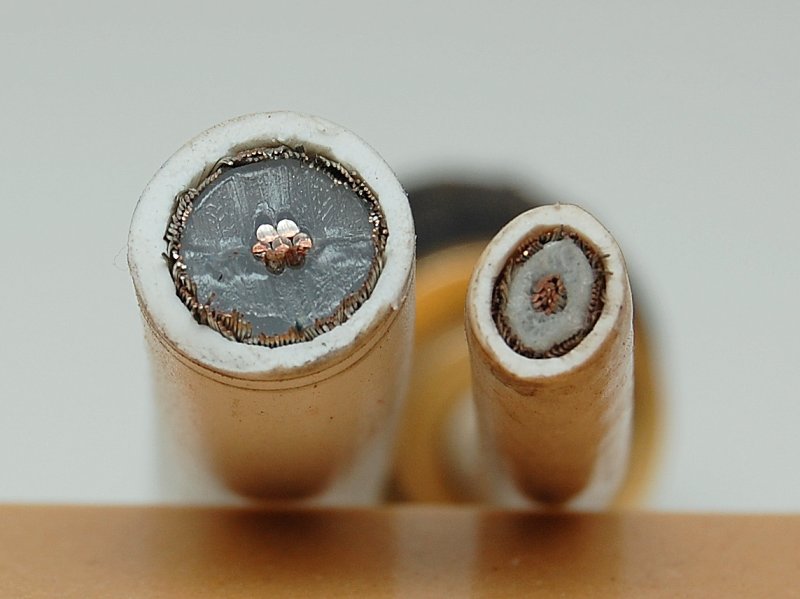
If you want a truly great VHF coax cable stay away from Ancor or the other “marine” coax cables and instead look towards Times Microwave LMR 400 Ultraflex or the high quality Belden cables.
The LMR 400 Ultraflex offers a -1.5 dB loss which is outstanding. Many of the hard core Ham radio guys swear by Times LMR and Belden coax. I got this Ancor RG-213 for free, so I used it. Would it be my first choice? No, but if you get a good deal on any RG-8 or RG-213 you might as well use it.
Over the years I have learned a lot from my ham radio friends but am sure I will be schooled after writing this.
This article is written for the DIY boater who does not want to know more than they absolutely need to about coax or terminations. The die hard ham’s will debate for hours on solder vs. crimp terminations but I think, for boaters, I have found a solution that bridges the best of both worlds with a solder and a crimp. It is easy, and quick, and a lot more reliable than those Shakespeare quick connect terminals.
NOTE: When ever I can I still use solder/solder PL-259’s but the key words here are “when I can“…
Strip Wire
I won’t get too technical here as I want this to be simple for the average DIY boater. I used my razor knife to gently cut the wire jacket, shielding and dielectric. Be very careful to not score the center conductor. Once you’ve cut through everything pull the stripped part from the wire. I simply strip it about 3/4 to 1″.
You can use a dedicated coax stripping tool if you want to, but I find my razor knife just as effective.
Remove the Dielectric
The shield and jacket will usually slide off the dielectric then you simply pull the dielectric off the end too.

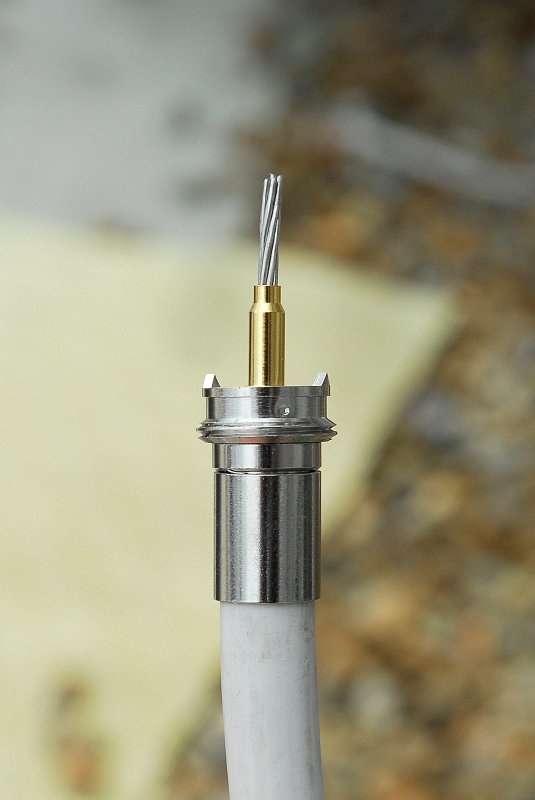
Stripped End
This is what it will look like when stripped.
PL-259 Crimp/Solder Connector
This is the Pan Pacific UHF 7606 crimp & solder connector. These are decent connectors and came highly recommended by a ham friend. This Pan-Pacific product is reportedly the same terminal sold under the Amphenol-Connex brand part #182102 and is made in the same factory (inside sources). Amphenol-Connex is one of Amphenol’s brands. We have included these Amphenol terminals in the MHT Amazon store links well as some others.

I buy my VHF terminals from HR Distributors in Portland, ME. They are located on 101 Hanover Street and they can be reached at (207) 773-2552. They will ship where ever you want and their prices are excellent.
This terminal works well with standard RG-213 but it will not fit on the Times LMR-400 UF coax. The guys at HR Distributors can tell you that part number.
Normally I use the Amphenol 83-1SP crimp solder terminal. For this article all I had on hand that day was a Pan-Pacific. The Amphenol 83-1SP is another very good quality PL-259…
PL-259 Crimp End
The area on top, with the cross-hatching, is where the shield will get crimped onto. The cross hatches help hold the shield in place and provide good strength & grip.
You will want to measure this area then strip the jacket of the wire back about 1/16″ – 1/8″ longer than the measurement to make up for the thickness of the barrel. If you strip it longer no worries because you can just trim the shield shorter as necessary.

Slide on The Components
After stripping the jacket back you’ll want to slide on some adhesive lined heat shrink, the crimp band and the threaded nut. That shield looked much better before I dropped the wire end into the gravel at the mast rack.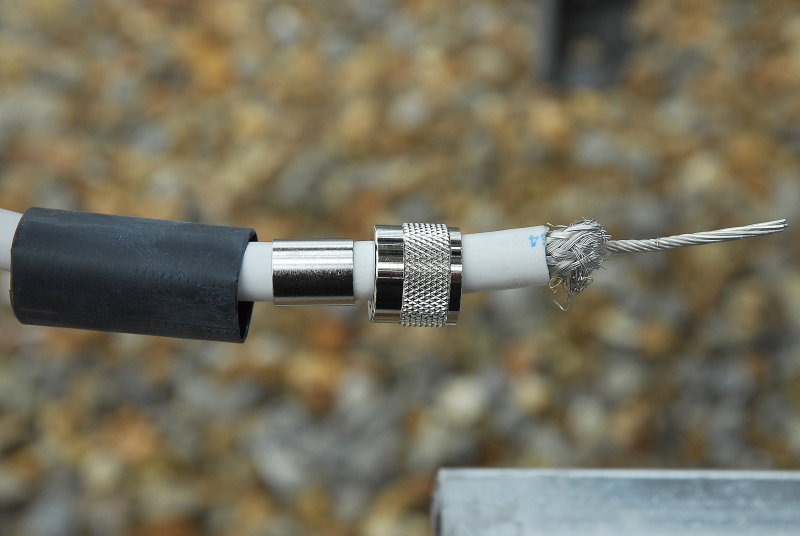
Carefully Flare Out the Shield
Carefully flare out the shield so you can slide the connector up and over the dielectric. Ideally one would use a coax stripper for cleaner cuts but I try to write these articles with the minimal amount of tool investment to get the job done.
You’ll already need a .429″ crimper to use this method anyway. If you want to spring for a coax stripper, it is a good investment, as you can usually use them on other types of coax too.

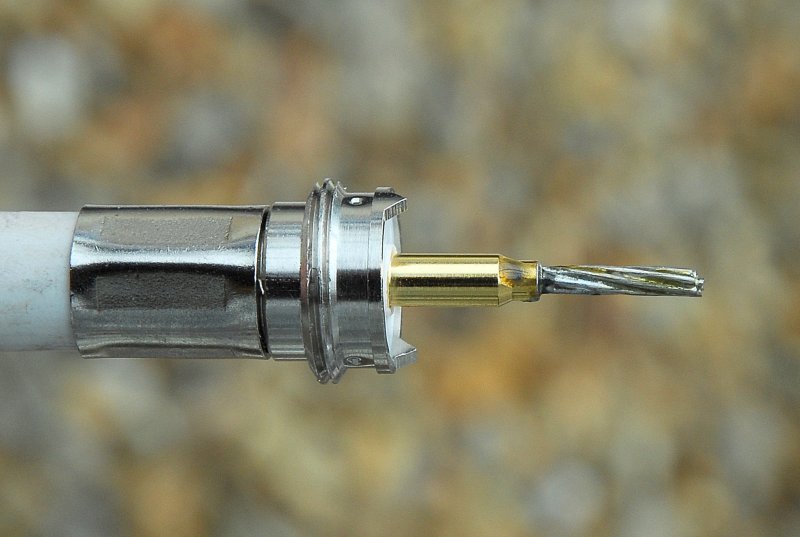
Slide on The PL-259 Connector
In this picture the shield is actually a little bit to short. If this happens you’ll want to strip the jacket back a little further. Ideally you want the shield to go up to the lip on the connector, but not beyond it.
Slide The Crimp Band Up
In this photo I slid the crimp band into place over the shielding. As you can see (click the image) there is an errant piece of shielding wire that needs to be removed. Make sure you get a good fit with no shield strands hanging out the top.
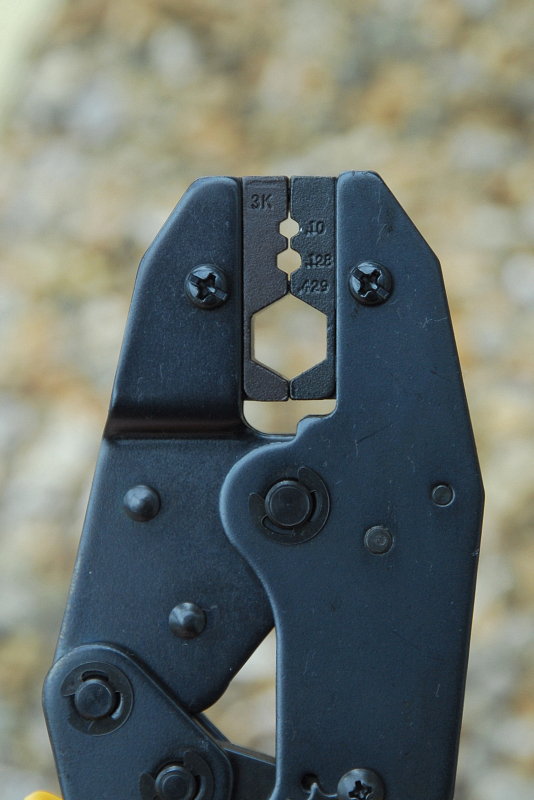
Crimp Tool
This is my Klein VDV200-010 crimp frame. With this die set itdoes .100″, .128″ & .429″.
The critical die for RG-8 or RG-213 or LMR 400 is the .429 nest. This tool is intended for use on RG-8, RG-213 & LMR 400.
Every tool mentioned in this article can be found in the Link Below, including the tool & die set I am using here.
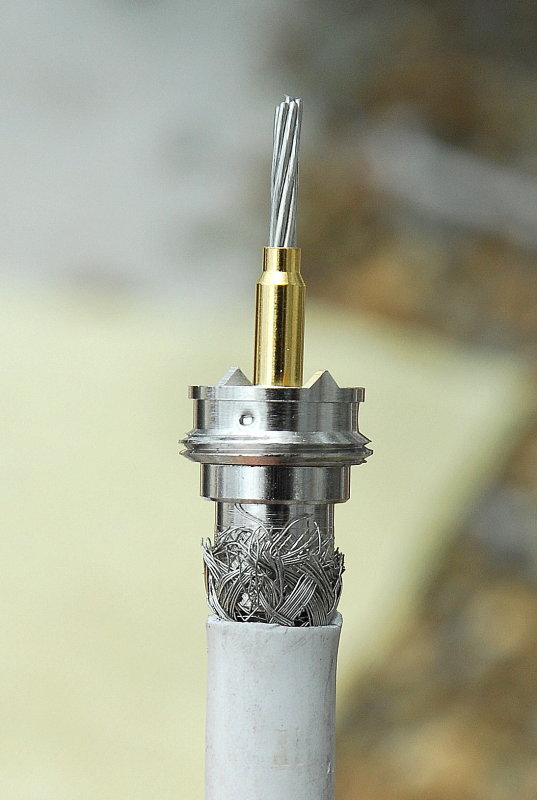
Crimp Made, Ready To Solder
In this picture the shield crimp has been executed. You’ll want to make sure to crimp in the middle of the crimp band. Doing this leaves a smooth strain relief transition and no hard edges to impinge on the jacket.
For the soldering I’ll often use a mini-butane torch. A true ham radio guy might cringe but when working out side, at a mast rack, in a boat yard, or 40′ in the air in a bosuns chair, a soldering iron just won’t always cut it, especially with 15 knot winds.
I have done more bosuns chair soldering than I would ever like to. It is darn near impossible in the wind and being 40-60′ in the air swinging around wildly, as Sea Ray’s blast through no wake zone, makes it even harder….

Soldered
Heat the wire and tip just enough to allow the solder to flow. Do not use an acid flux solder always use a high quality rosin core solder intended for soldering electronics. Wipe off any residue after you’re done then trim the wire end with a wire-snip.
Screw on the Nut
Slide the nut up the cable and thread it onto the PL-259. Now follow that up with the adhesive lined heat shrink.
I leave about a 1/16″ gap so I can easily twist the nut but also effectively seal the crimp band with adhesive and heat shrink.
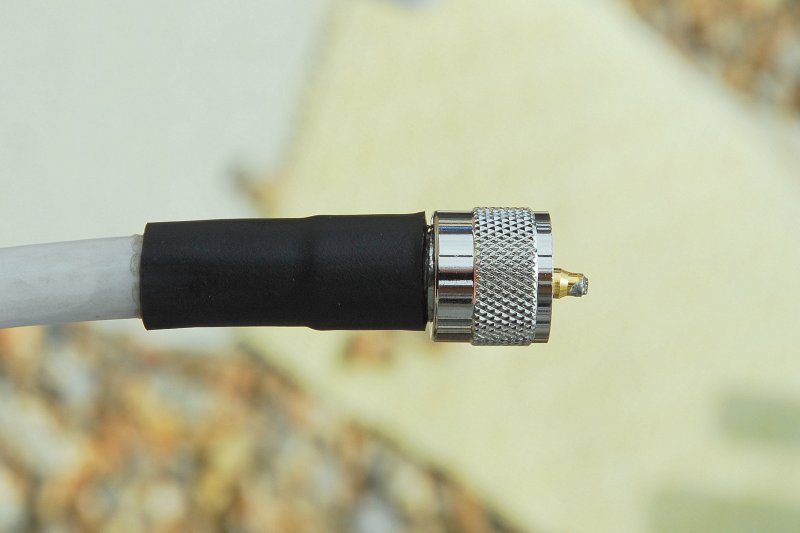
Melt the Heat Shrink
Always use a quality dual-wall adhesive lined heat shrink for this part. You’ll want to use a heat gun for the melting as it does a much better job than a flame will.
You want to heat it evenly until adhesive oozes out the ends. Blow up the photo and you can see the adhesive. A dual-wall heat shrink is lined with a heat activated sealant that melts and glues the heat shrink to the wire and terminal as well as seals it.
Once you connect this to the VHF antenna use a self amalgamating tape to seal the entire connector.
There are many methods to install a PL-259. Get on the net, research them and use what you feel comfortable with, you will get many opinions on this. Over the years I have tried most all of the methods and finally settled on this method for many of my PL-259 terminations in the marine environment.My personal preference is still an Amphenol solder/solder PL-259 but this method has proven very reliable.
TIP: When you can, and it works for your boat, try and leave a long enough tail of VHF cable to make it all the way to the VHF radio. This avoids a mast base splice and reduces losses.
When swinging from a bosun’s chair 40-60 + feet up in the air with a 10 knot breeze I can assure you that getting a good solder joint for the braid is nearly impossible, no matter how good you are at soldering. The tip is easy, with a mini butane torch but the shield, not so much, this a crimp solder connector works very well.
Unless you are very skilled at this, which most won’t be, you may ruin a few connectors trying the solder/solder method and may still wind up with a cold solder joint and a failed connection.
The crimp solder method has held up very well for me in the marine environment.
Even with this method I advise buying a couple of extra PL-259’s and practicing first.
Good luck & happy boating!
[…] page that was my savior is Easy VHF Terminations and it had everything I needed to know about fixing my crimp-on ends. In fact, RC has examples of […]
great article. need to replace my antenna cable thru the mast.