Originally published December 2003
*Moved & Edited September 2017
Bedding With Bed-It Tape
5/20/2022 IMPORTANT UPDATE
BED-IT TAPE IS BACK
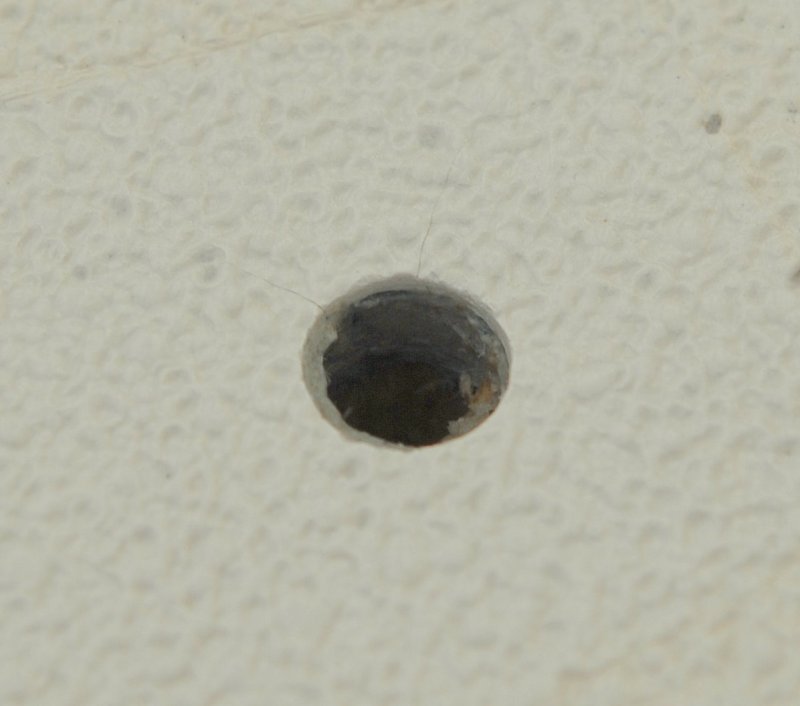
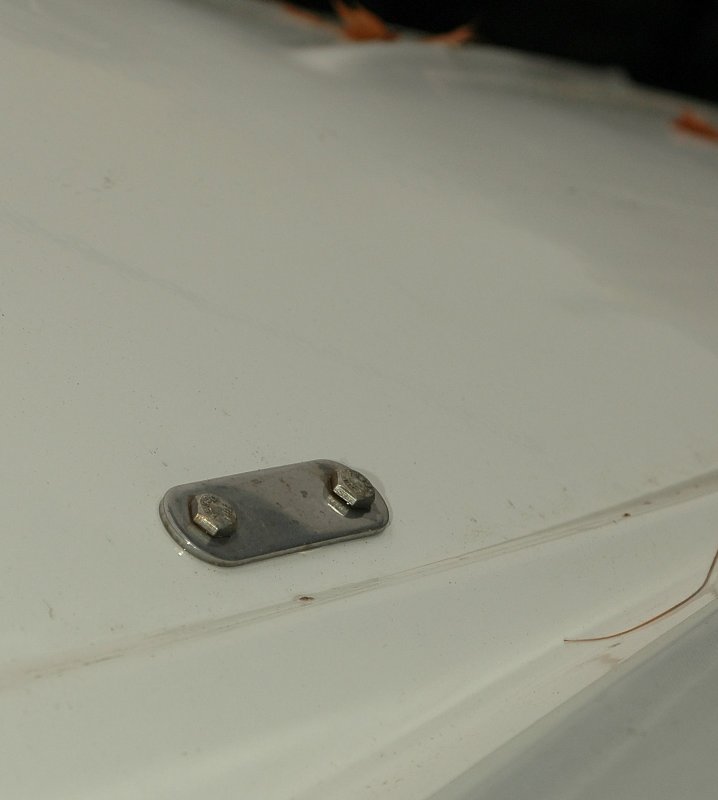
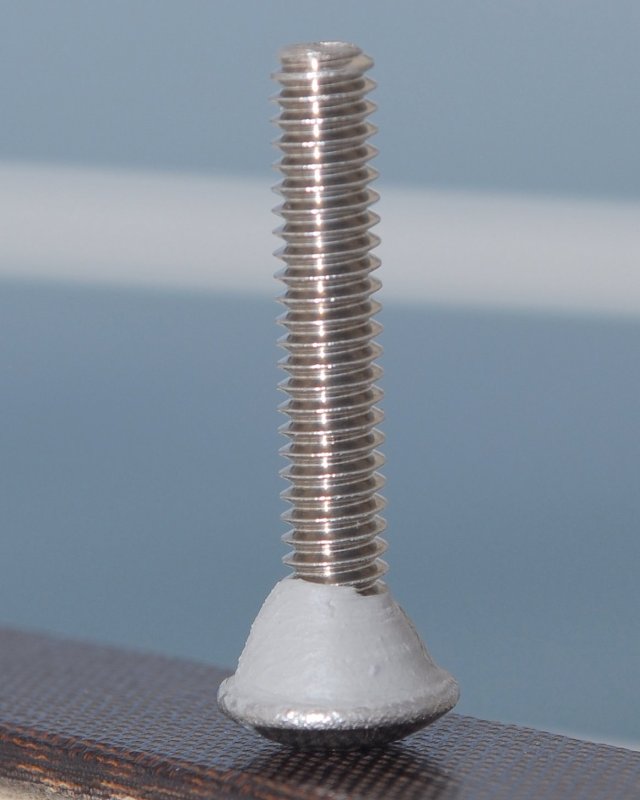
Countersunk/Beveled Hole
Over the years, especially in the last few weeks via PM’s/emails, I have been asked how I bed deck hardware with Bed-It Tape. Late one night I was in the barn staring at a cleat, and a small scrap of clear Lexan, hmmmm…… A drill, counter sink, some Bed-It Tape ( butyl based hybrid elastomer that does not cure, harden or crack), my camera and a few minutes later I had the pics I needed. Sorry it took so long, it just needed to “click” the way I wanted to present it..
Here’s how to bed deck hardware with Bed-It Tape:
Step 1 – Countersink the deck holes slightly and then clean everything with Acetone or a similar fast evaporating solvent. Be sure your cleaning solvent is compatible with your decks finish.
SITE PLUG: After this article was published, we were forced to develop a marine specific hybrid elastomeric sealant. Bed-It Tape was specifically formulated and tested for marine use. Bed-It Tape can be found at; Sailboatowners.com. Please understand that despite our occasionaluse of the word “butyl” Bed-It Tape is not a s”butyl-tape”. Bed-It Tape is a hybrid product utilizing Compass Marine Inc. own proprietary formulation.
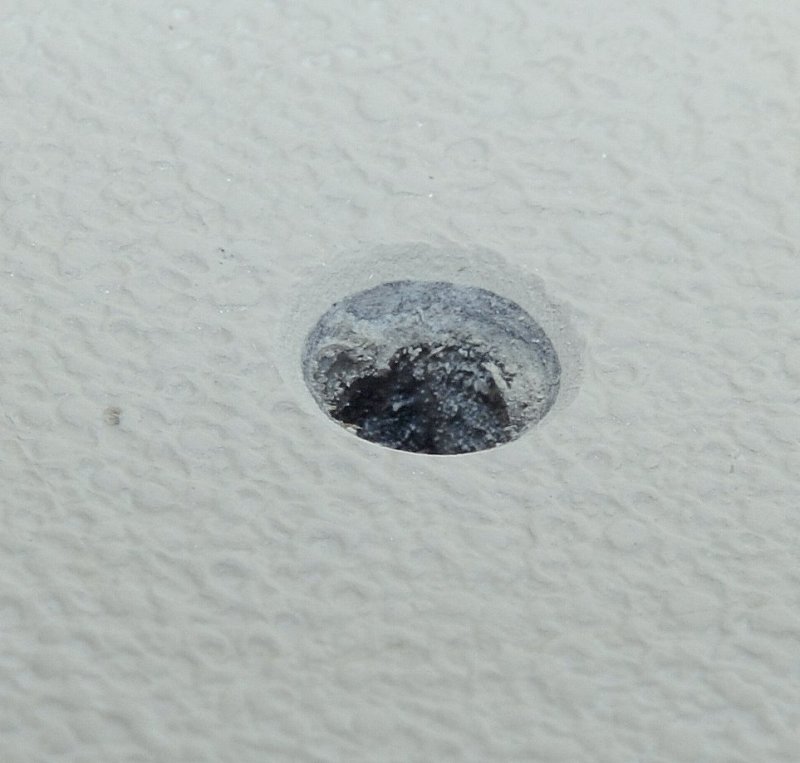
Spyder Crazing Due To Lack of Beveled Edge
ILook close & you will see two spider cracks radiating out from the drilled hole in the deck. If this hole had been beveled/countersunk this would likely not have happened. The experienced high quality builders learned this trick a long time ago.
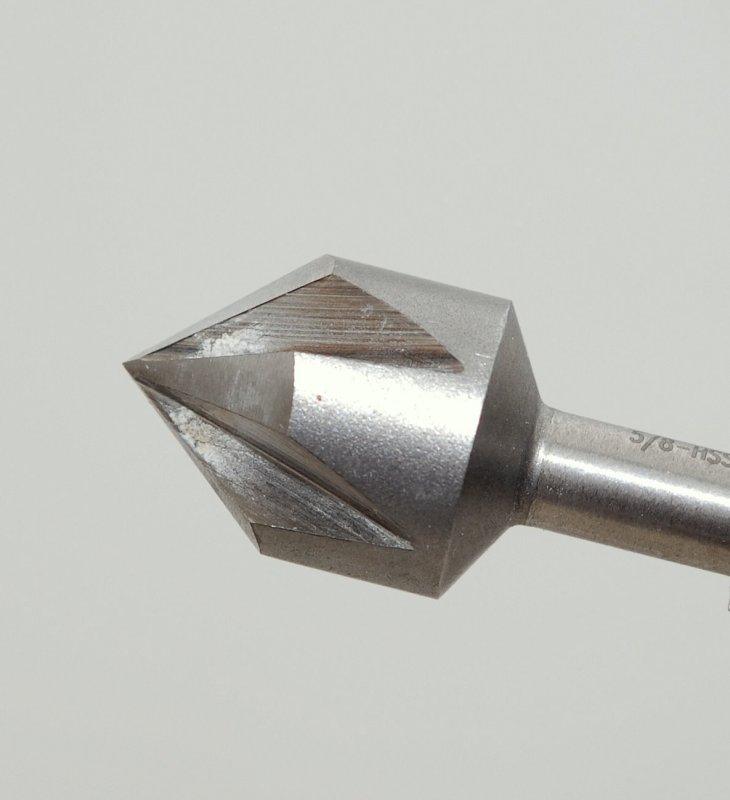
5/8″ Countersink Bit
Why do I countersink/chamfer the deck side of the skins?
#1 This practice does a lot to prevent gelcoat crazing. By feathering the edge of the gelcoat, through the use of countersink bit, you are now a lot less likely to start a crack or craze mark in the gelcoat. Gelcoat is an un-reinforced product and because of this its prone to cracking. Sharp right angle holes are a good place for these cracks to begin when you tighten the deck hardware and potentially flex the substrate. Beveling the edge of the hole or feathering it limits the ability of the crack to begin or start. This is why you often see holes drilled into plate glass that will have beveled or rounded edges too.
#2 By creating a bevel or countersunk recess in the surface of the deck the Bed-It tape has a cavity to fill. Without a bevel the hardware would compress the sealant to about 1/64th of an inch thick after the fasteners are tightened. Marine sealants do have some flexibility but not as much as you would guess. Follow me for a moment; Let’s say you have a marine sealant that has a rating of 400% elongation before break on a 1/64″ thick joint. Simple math shows you that 400% of 1/64″ is only 1/16″ of total allowable joint movement before a joint failure or leak starts. In the case of a stamped stainless steel stanchion base, 1/16″ is not much allowable movement before failure.
#3 By countersinking around the bolt holes you increase the maximum thickness of the sealant, at the bevel, to roughly a 3/32″ depth at it’s deepest point. Using the same math as above 3/32″ X 400% gives you a total joint movement before failure of 3/8″. If a mechanically fastened joint is moving 3/8″ you have more problems than just a deck leak! So 1/16″ allowable movement before failure at 400% without countersinking or 3/8″ allowable movement at 400% before failure with countersinking. Even a small bevel will drastically increase max allowable movement before failure. Countersinking to a mere 1/16″ depth will give you 1/4″ total movement around the bolt before failure. You don’t need a deep bevel to make a large difference between a failure and a seal.
#4 Countersinking is a super easy task and has many many benefits. For instance, you can install the fitting and tighten it down now with no waiting and you can seal deck hardware alone.
I am going to inject some strong opinion here so please move on to the next photo if you don’t want to hear it.
I have a high level of disdain the Don Casey “two step“, “wait to tighten until cure and form a gasket” method of bedding deck hardware. Believe it or not but I’m not a conspiracy theorist. I do however feel as if Don Casey wrote that technique to guarantee boatyards future revenue. (grin & wink)
This is NOT to say that it can’t work though. It certainly can and does work.
“So what’s with the angst RC?”
The problem with the two step method & using a marine sealant is this;
Can the average DIY or yard employee get repeatable results that are reliable and consistent?
The answer to that is very often a big fat NO!
This is not about the idea of forming a layer of sealant between the fitting and deck being a bad idea, but rather about the EXECUTION, which can be very difficult to perfect and get repeatable & reliable results, being the bad part of the idea..
Think about it like this;
- If the sealant cures, to form a “gasket”, and you then move the bolt while tightening it down on the “second step”…. It can break the seal and leak…
- If you create a gasket too thick, and then can’t get the mechanically fastened hardware tight enough against the deck, because of compression resistance in the new gasket, the hardware will move, and the sealant will eventually fail and leak.
- If you don’t let the sealant kick/cure just right, which is very difficult, it can all squeeze out and again it can leak. Why is this so difficult with a sealant? Because most commonly used marine sealants are temp and environment cured. This means that humidity & temperature change the duration & rate of cure so it is not easily repeatable.
Honestly, I mean no disrespect to Mr. Casey, he writes excellent, excellent stuff and I am a huge fan. Unfortunately this method for bedding deck hardware is perhaps some of the most difficult to execute advic to achieve in the real world.
I have witnessed far too many cases of core rot due to both DIY & professional “two step” bedding procedures than I would have liked to.
“But RC what makes it so hard?”
The biggest problem is that most marine sealants are moisture cured and you really have no way to know what state of cure they are in. The edges of a fitting may be at the right state but the middle of the fitting still wet & unchanged. Moisture cured sealants change states in a very unpredictable manner.
With a quality marine grade butyl it is more of a “one step” procedure because the consistency of the product is not changing states and all your doing it tightening slowly or over time to let it “displace” out from under the fitting to the point where it stops oozing out.
So where did I lean this countersinking method?
I learned this from a worker at Hinckley Yachts back in the 80’s.. Morris, Sabre and other top quality builders have known this secret for years but many of the big production builders are still either too cheap, or just don’t know about it. This extra step takes all of about 30 seconds per stanchion but apparently it’s too much “extra” work for most builders.
OK I’m done with my rant…for now…
Marine Sealant Failure
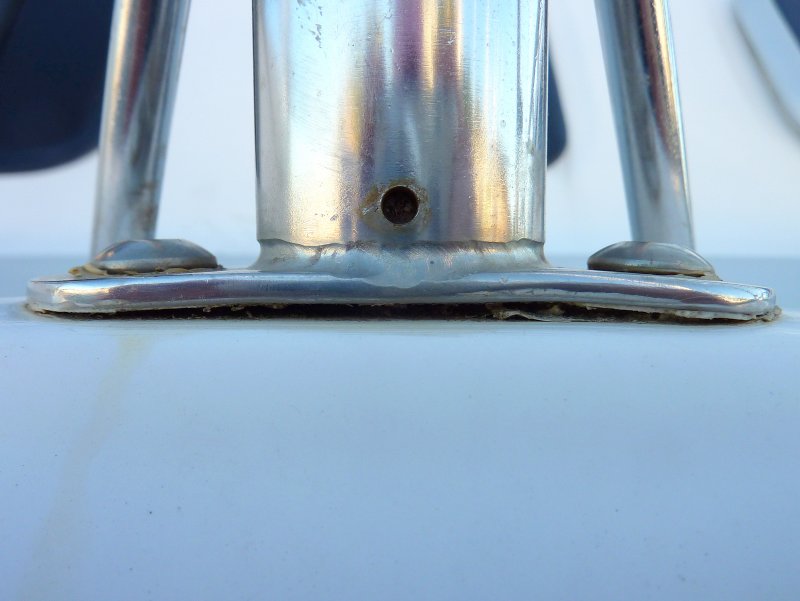
Here’s a prime example of where the 1/16″ of movement might make a difference. This is a stanchion base on a major production sailboat that was only two years old. The factory marine sealant, made by 3M, has failed and caused a void when the stainless plate flexed and bent.
This is another reason I prefer cast stainless or aluminum stanchion bases as they do not flex like plate stainless does. On top of the stanchion base bending this manufacturer also does not countersink the deck holes, which in this case resulted in wet deck core in under two years! Had the deck penetrations been properly countersunk there is a very high probability that this leak never would have occurred despite the cheesy quality of the stanchion base..
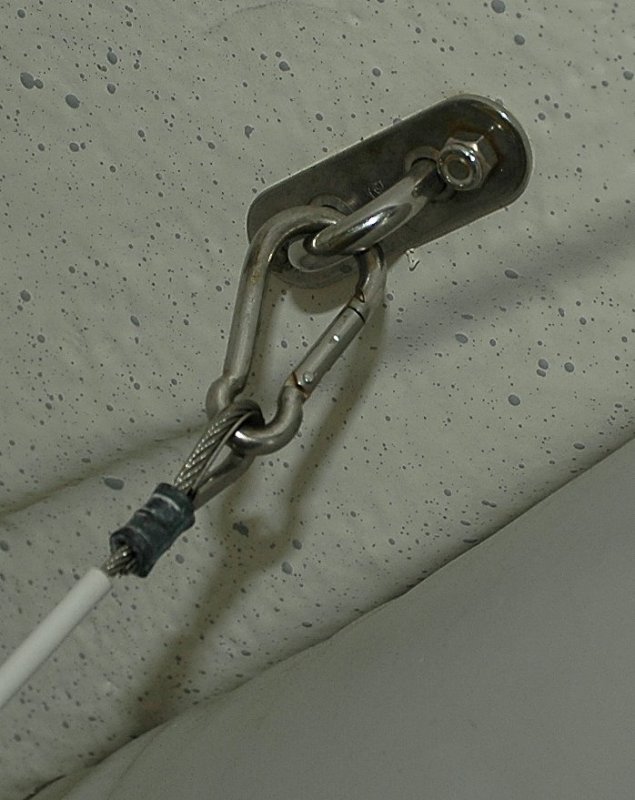
Lifting Eye Backing Plate
If by chance you’re reading this, and are still not convinced about countersinking, this is a lifting eye I installed in 2002 for an inflatable RIB dinghy. To do this install all I did was bevel the outer hull with a countersink bit, clean the surface with acetone, install the fitting with 3M 101 polysulfide and tighten it down once. I then cleaned up the goop that squished out and called it a day.
This fitting has been bone dry now for fifteen years and resides below water, as in completely submerged, when the dinghy is floating.
EDITED: 2/4/2023: This lifting pad eye us still bone dry and not leaking a single drop, at 21 years, in a fully submerged application. The process you use is a huge part of the success or failure rate.
Lifting Eye (inside the boat)
If you’re still not convinced in the utility of countersinking the holes in your deck this photo was taken at year 8 of these pad eye’s being installed. Even at year 21 they still exhibited zero leaks and are still 100% bone dry.This AB Hypalon RIB is still going strong.
While you probably could use marine grade butyl below water, I don’t. I still use marine sealants instead such as Sikaflex 291 or a Polysulfide. 3M 101 has been discontinued by 3Mmso you are left with Boat life Life-Calk as the sole marine grade polysulfide. I never liked Life-Calk as much as 3M 101 but it’s still better than Satan’s glue, AKA 3M 5200. (wink)
Morris Yachts Countersinking
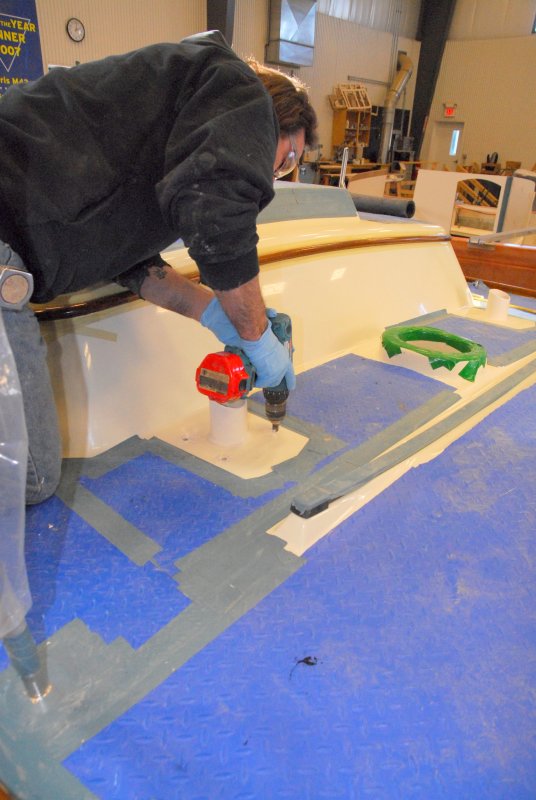
Okay, okay still not convinced? Here’s how one of the finest boat builders in the world does it. I took this photo at Morris Yachts of a brand new Morris during the deck hardware installation. These four holes are for the Dorade box on an M-36.
It is reprehensible to me, in this day and age, that the production builders are so hell bent on saving 2¢ that they won’t take the extra 30 seconds needed to properly install deck hardware.
It took this Morris Yachts craftsman less than 30 seconds to bevel these holes, including installing the countersink bit into the drills chuck. 30 seconds!
How many Pearson, Catalina, Hunter, Beneteau or other mass produced boats do we see or survey annually with wet decks? LOTS!!! How many Morris, Hinckley or other top builders, using proper installation methods, do we see with wet decks. Hardly any.. Hundreds of thousands of boats with wet core over 30 extra seconds per fitting, if that. Ridiculous really…
Close Up
I Also Beveled The Lexan
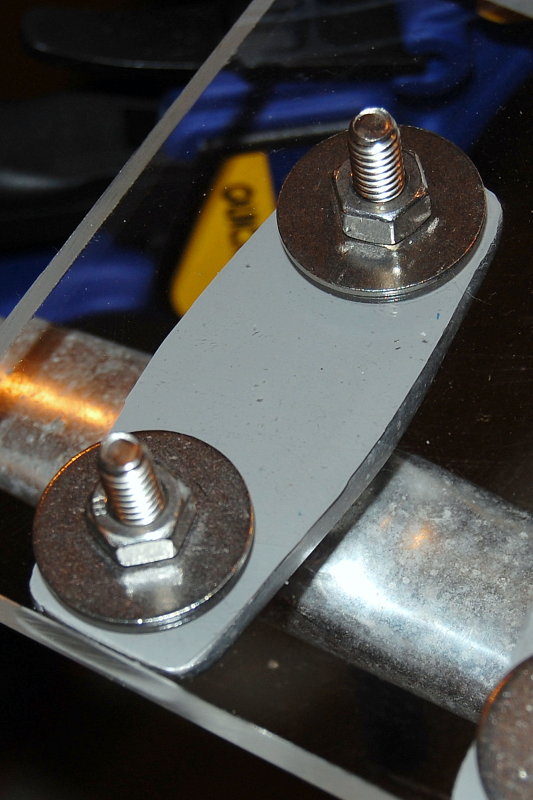
Wrap Heads With Bed-It
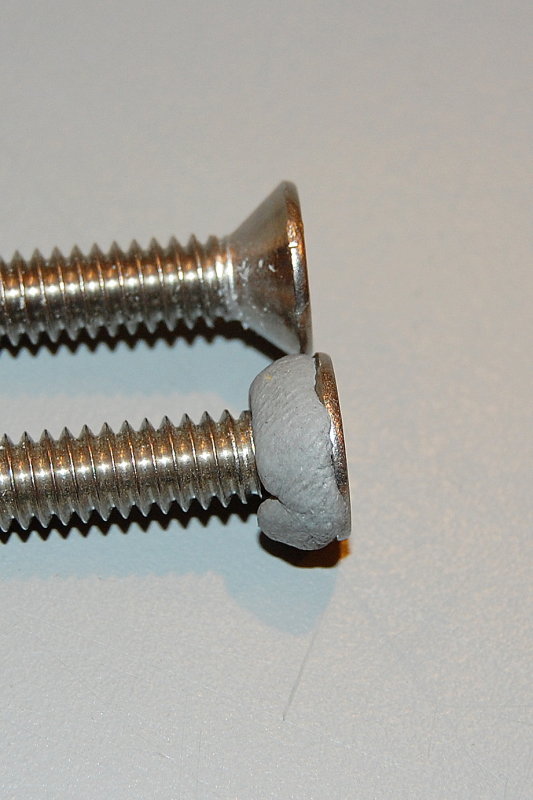
Press Into Deck Hardware

Step 3 – Press the through bolts into deck hardware with some good pressure.
First though make sure the hardware is clean, Acetone works well, but if Silicone was previously used you’ll really want abrasives as Acetone won’t touch dry silicone contamination.
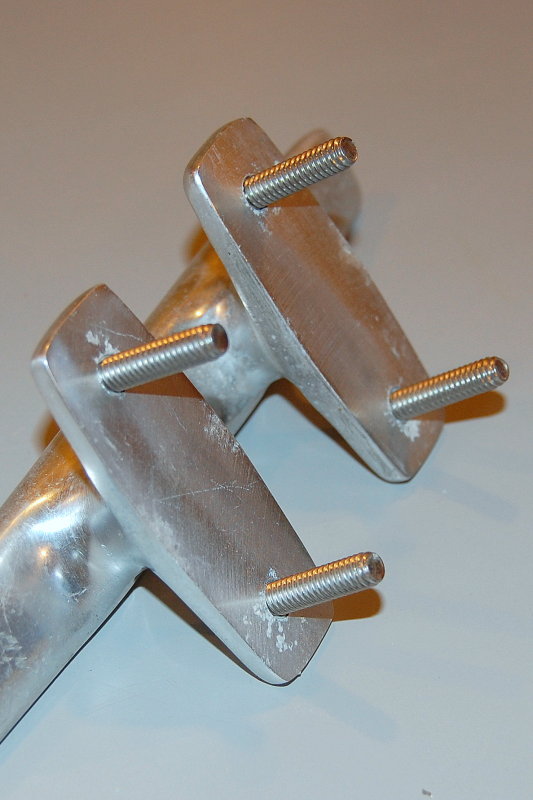
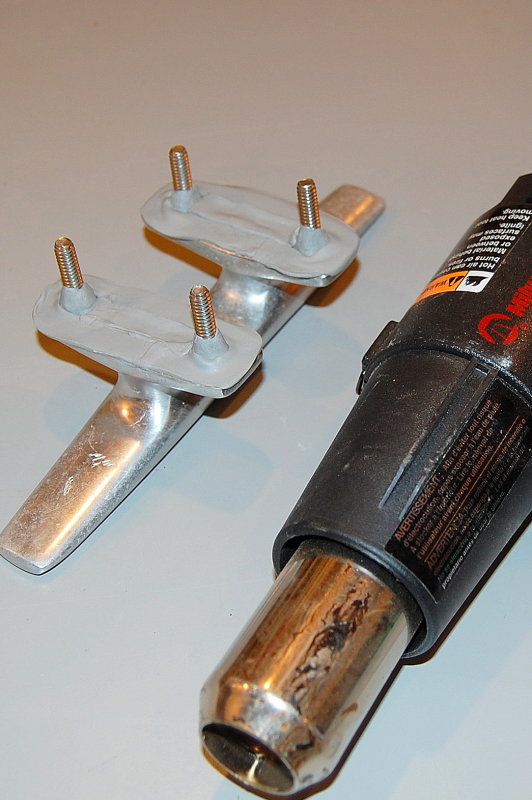
Flip Deck Hardware
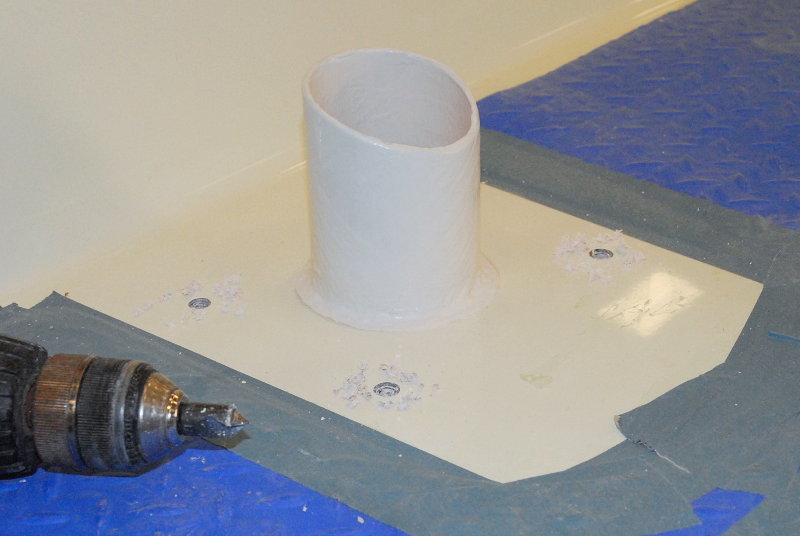
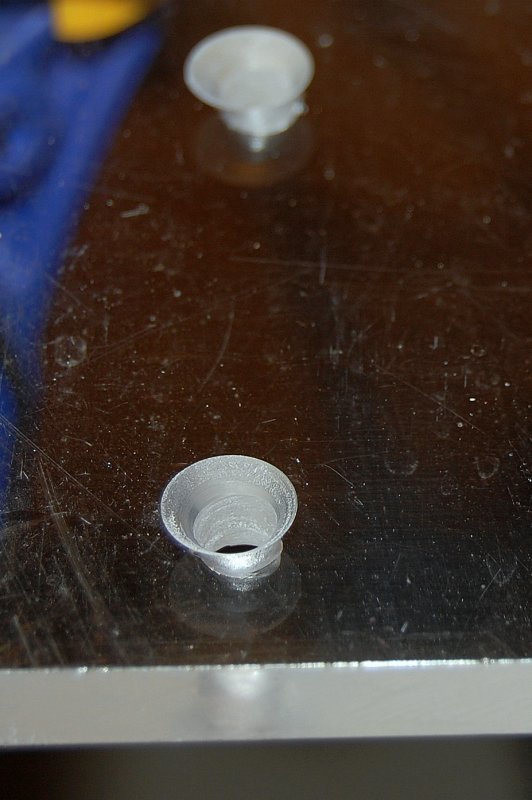
Install Bed-It Cones

Apply Bed-It To Hardware Base
Press Hardware Onto Deck

Step 6- In colder climates you may want to warm the Bed-It Tape to soften it some. After warming, with heat gun on the warm setting, or a heat lamp, line up the bolts with the holes and press the hardware firmly onto the deck. I will often stand on the fitting, if possible, to partially displace and seat the Bed-It Tape.
For illustrative purposes clear polycarbonate was used in place of a boatdeck.
Apply Backing Plates & Tighten

Step 7 – Install the backing plates, in this case I just used fender washers, and begin to tighten the fitting.
Please use suitable backing plates. These fender washers would not be the best choice in a stanchion or deck cleat as they are far to thin and a little on the small side, diameter wise, for a cored deck.
You will be best to have two people or a good way to keep the bolt from moving. Ideally you do not want the machine screw or bolt to spin, but if you absolutely have to, you can slightly soften the Bed-It with a q-tip and some mineral spirits and go for it. If the bolt does spin slightly, with Bed-It, this is not the end of the world and you will still likely get a water tight seal. If you can minimize both twisting that is great if not do your best to minimize it.
WARNING:
* Tighten a the bolts a little bit at a time as the Bed-It will ooze out slowly. It needs time to do this. The consistency of like Bed-It Tape is quite dense, by design.
* Tighten > let it sit > tighten > let it sit > tighten > let it sit etc. etc..
* When little to no more Bed-It squishes out between deck and hardware & the bolt & nut become tight, you can stop torquing.
* This can take numerous small tightening events. You can even go days or weeks between them if you want to spread it out. Bed-It does not cure so you do not need rush it.
If you have a wood deck core DO NOT crush it by over tightening, better yet bore out some core and pot the hole with thickened epoxy. Unlike the “two step” method you are not waiting for the Bed-It to cure or change consistency but you do need to allow it to slowly displace out from under the fitting. This compression & squeezing forces the Bed-It into every nook and cranny and makes for an excellent seal..
Use Proper Backing Plates

As I mentioned in the last photo, please use properly sized backing plates!
This is a prime example of DIY boat work gone bad. Ouch!! This stanchion base had NO sealant of any type installed. No polysulfide, no 420, no 5200 and not even the dreaded silicone.
Bed-It Will Squeeze Out

Clean Up displaced Bed-It Tape
Step 8 – Peel away excess ooze and clean with Meguiars cleaner wax, or a rag slightly dampened with mineral spirits. Do not saturate the rag with mineral spirits as it can creep under the fitting, just damp.
I find a ball of already “peeled” Bed-It works well at pulling away excess using a stab & pull motion. Stab the ball into the joint and pull away. The Bed-It will stick to the ball first and usually peel away from the joint. Alternatively you can use plastic razor blades or scrapers.
Contrary to popular myths about bedding all the Bed-It Tape does not squeeze out from between the surfaces even after the fitting is fully tight. This is the magic of Bed-It Tape, but it does take multiple small tightening events, ideally without letting the bolt spin, to get the vast majority of the Bed-It to squeeze out. You will get to a point where it stops oozing but Bed-It remains under the fitting keeping a water tight seal.
If you do spin a bolt a little bit don’t fret about it. Bed-It does not harden or change consistency, like in the two step process with a marine sealant, and can take some twisting without causing a leak. Still the less spinning the better.
WARNING:
II may sound like a broken record but folks keep emailing us about this. Please TIGHTEN SLOWLY.
DO NOT try and tighten the hardware to fully tight right away. Bed-It Tape, relies on a slow compression to do it’s job and seal properly. It takes time for it to compress, displace and move into every nook and cranny. The larger the deck fitting the more time it takes for this process to take place. Because of the density of Bed-It, it takes time for it to get displaced and squished out the edges of the fitting. When it stops oozing you can stop making small tightening adjustments.
Bed-It Tape is pretty dense, it was formulated to be, and is the perfect consistency for bedding marine deck hardware.?You just need to be patient when tightening the hardware.
Remember you’re not waiting for the Bed-It to change consistency, harden or cure so these tightening adjustments are not time constrained at all. If you can’t get back to it for a month, just pick up where you left off.
I sometimes take about two to three days of small tightening events to bed the hardware. Yes this is more labor intensive but the finished product, when done correctly, can still be bone dry beyond 30 years as it has been on over 80% of our own boat. Yes, over 80% of the deck hardware on our boat is still un-rebedded at 40 years old and still not leaking.
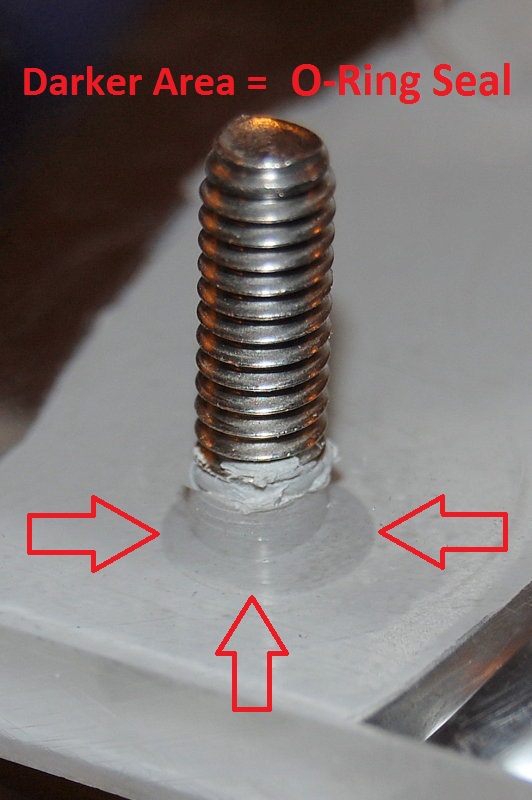
View of Bed-It O-Ring-/ Seal After Tightening
Bed-It Tape History
Bed-It Tape was developed after this article was originally written in 2003.The article was originally written using “butyl” Tape. I started to get nasty emails saying the “butyl” did not behave or perform as I had described it to. This was odd to me so I went ahead and began ordering butyl tape and testing it.
I quickly discovered that butyl tapes of today, thanks to EPA standards, were not what they had been in the 70’s. The products I ordered were so horrible I was forced to develop a true marine quality product for this purpose.
Developing Bed-It Tape took over a year of testing and working with our lab to get the first rolls to market. we tested multiple formulations and we made numerous tweaks to the formulation for the best performance in bedding deck hardware. We made tweaks to improve the product for less cold flow / creep for hot climates as well as elongation and adhesion and improvements to chemical resistance. What we ended up with was no longer a typical “butyl tape” but a hybrid elastomer sealant formulated for the job it was intended it for.
Bed-It Tape is sold in 1/16″ thick by 1/2″ wide X 50′ long rolls. It is specifically engineered & formulated for bedding marine deck hardware and best of all it is manufactured right here in the USA supporting US jobs. Even the packaging is made here in the USA!
Bed-It Tape can be purchased from; Sailboat Owners.com
Many builders used to use butyl tape, CS Yachts, Hinckley, Bristol, Sabre and many others did, but they all stopped because butyl in a production environment is significantly more labor intensive despite being a better mouse trap.
The benefits of Bed-It Tape are numerous:
#1 It never hardens and remains at the same thick flexible consistency.
#2 Because it never hardens deck hardware can flex and move slightly, and the Bed-It Tape does too.
#3 It is multiple times more flexible than a cured polyurethane or polysulfide.
#4 It sticks extremely well to clean gelcoat, plastic, aluminum, bronze or stainless.
#5 It’s not a glue, and for through bolted deck hardware you do not need a glue.
#6 You can easily remove hardware previously bedded with Bed-It Tape without destroying your decks or involving countless hours of clean up.
#7 Bed-It Tape is specifically formulated to resist cold flow or creep once properly tightened.
#8 More than 100,000 rolls of Bed-It Tape have been sold and shipped word-wide since 2008!
Pre-EPA Butyl at 29 Years Old
As I mentioned a quality butyl tape is VERY, VERY flexible. This photo represents well over 1000% elongation of the original squished thickness and this pre-EPA butyl is still stretching and much of it has not yet failed.Unfortunately butyl tapes of today DO NOT perform like this but Bed-It does.
You will also notice that it is still perfectly adhered to the deck and the cleat and never let go of either despite its very low 10-20 PSI bond strength, when compared to some polyurethanes gelcoat destroying 700 +/- PSI adhesion.
Bed-It tape also cleans up easily. Remove the fitting and clean the surface with mineral spirits and a rag. That’s it!
Because Bed-It can be softened with mineral spirits the one place I won’t use it is on fuel fills or fuel vents. If you normally clean your decks with potent solvents, doubtful, then just be careful around the Bed-It bedded hardware.
29 Years! Bone Dry Core!

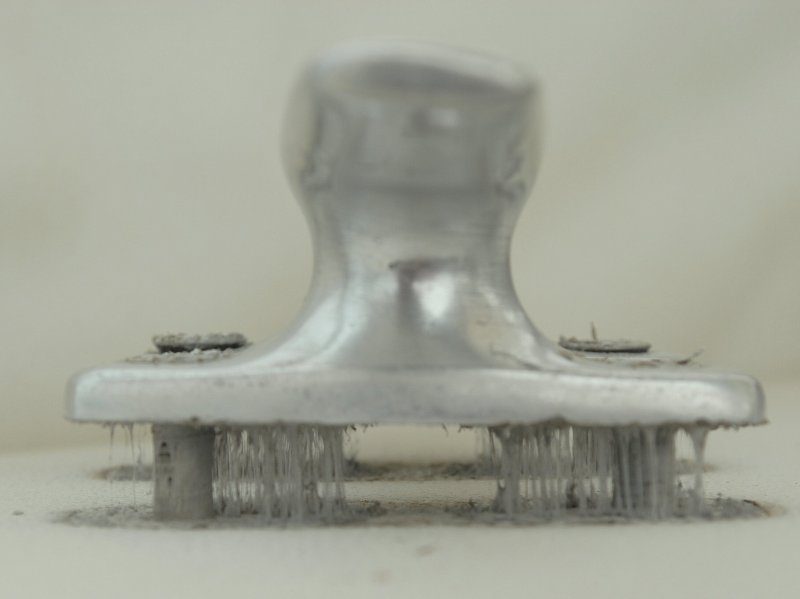
Here is a look at the below deck view of that cleat pictured above.
This cleat had been bedded 29 years prior to this photo with a pre-EPA butyl, and frustratingly, with no beveling of the holes.
Despite the lack of countersinking/beveling it was used for 29 years with this vessel covering over 50k+ nautical miles. Even after 29 years and 50k+ miles, was still 100% bone dry, not delaminated and this was confirmed dry with a moisture meter and soundings.
You can see the pure white core and no signs of moisture damage.
No Signs of Leaking at 29 Years!

Anyone who has been around boats for a long time knows what the back side of a deck looks like when the backing plates come off and the fitting has been leaking.
Pre-EPA Butyl tape, a deck cleat that sees tremendous loads, no countersinking and yet 29 years of service later and BONE DRY! No rust, no brown goo, no signs of any leakage.
I re-bedded much of our 2005 Catalina in 2006 and the vessel already had multiple deck fitting leaks. This was a BRAND NEW BOAT!!! Properly installed Bed-It tape, in my humble opinion, is a superior deck sealant to any of the polysulfides or polyurethanes currently marketed for most applications.
Any of them polysulfide or polyurethane, Bed-It etc. will all work very, very well if properly installed. IF PROPERLY INSTALLED being the key words.
All deck hardware will eventually need re-bedding, no matter how good your sealant is. Why make things more difficult than they have to be in the future by using Satan’s Glue (AKA 5200) that can have as much as a 700 PSI bond strength? Why do this when a product with just 10-20 PSI will achieve the same, and often better, results or outcomes?
It is good to keep in mind that 5200 can actually bond to the gelcoat more strongly than the gelcoat is bonded to the fiberglass substrate. Unnecessary bond strength? Absolutely! The Satan’s Glue marketing mavens have probably driven millions of dollars in repair revenue for boat yards.
They have even spawned & supported an entire business sector dedicated to selling polyurethane/ 3M 5200 removal products! Again, this is absolutely ridiculous. This level of adhesion for THROUGH BOLTED deck hardware is 100% unnecessary.
Genoa Track At 31 Years Old

Just one last bit of evidence as to why I prefer Bed-It Tape for deck hardware over Devil’s Glue or its extended family of misfit relatives.
EDIT – 2/19/2013: These genoa tracks are still bone dry having not yet been re-bedded since this boat left the factory in 1979!
This is the genoa track on our CS-36T as photographed at year 31. The track is still bedded with the original Pre-EPA butyl tape she left the factory with in 1979. The track 31 years later was still BONE DRY, does not leak and has not leaked, ever, in 31 years and 50,000+ nautical miles. We run a 150 genoa most of the year, just as the previous owner did, so this track sees some heavy loads.
I’ve seen some 4 year old boats bedded with Devils Glue or its relatives dripping wet with rust stained bolts and wet core at year four and sometimes earlier.
Oh and this genoa track was installed without countersinking the holes. Just an aluminum genoa track bedded with Pre-EPAbutyl in 1979. Bevel the holes and it will probably go 70 years without a leak.. (wink)
PRO-TIP:Removing the Old Hardware

Just a quick tip on removing hardware. A cordless impact driver can make short one person work at removing the nuts on the inside of the boat.
For stanchions and other hardware I often re-install them with hex head bolts rather than Phillips or slot headed screws. This allows me to tape a wrench to the deck using Gorilla Tape to keep it from moving then hit the inside with the impact driver, wrench or socket wrench. If you use the impact driver to re-install pleas DO NOT over do it. These tools are powerful and fast. I would advise against the use of one for re-installing the hardware until you know you are competent with it.
Impact drivers work via hundreds of rapid fire quick impacts or beats per minute sort of like a machine gun. These small, short, very fast beats or impacts will almost always break a nut free from one side without even using a wrench or screw driver on deck.
The Impact Driver

This is one of our impact drivers, it’s a cheap Ryobi and does the job. While I much prefer the quality & torque of our Milwaukee M12 or M18 tools I won’t lose sleep if I hand this one off to Davey Jones and that kind of power is just not necessary here.
PRO-TIP – Filling Holes With Screws
One last trick. We’ve all removed old hardware from a boat only to be left with a hole in the fiberglass. You can try to patch it with gelcoat, and may succeed, or you may make it worse if you’re not well versed in gelcoat repair. Here’s a quicker way to get back to boating.
Simply countersink the hole then use a truss head machine screw, or your preferred style, and Bed-It Tape to cover & seal the hole. Truss head machine screws are available from most nut and bolt suppliers like Fastenal. Truss head machine screws have a much wider and lower profile head than a pan head machine screw. The truss head machine screws lend themselves well to plugging old holes with Bed-It Tape.
First, make a Bed-It cone around the head.
Different Machine Screw Head Styles
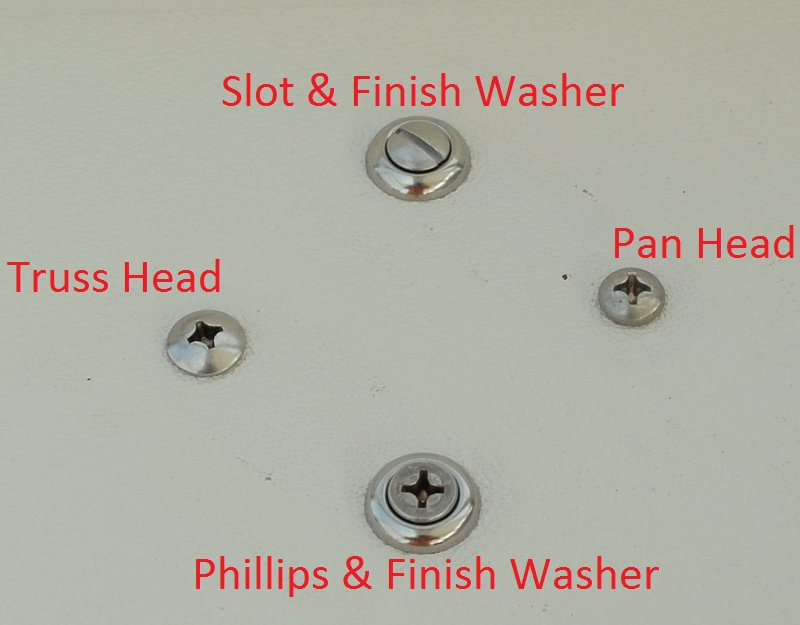
Choose your weapon. I prefer the truss heads as I feel they seal better and will have less potential for leaking. They are also very low profile..
Bed-It Cone Wrap

Clean the surface and insert the Bed-It wrapped machine screw.
Cone Fits Into Countersunk/Beveled Hole

After Tightening

Have one person hold the screw head with a screw driver to keep it from spinning then go below and install the nut and washer and tighten it down.
Best Practices For Bedding Deck Hardware:
SEALANT ON DECK – Do not use sealant on the inside of the deck. If it leaks you WANT to know about it. By sealing the backing plate side or the inside of the boat you will force the water into the core, if not sealed. You can also cause any trapped water to become starved of oxygen. This can lead to pitting or crevice corrosion of the stainless bolts potentially leading to a catastrophic bolt failure. Only seal the deck side!
TIGHTEN ONCE (tube-type caulks) – If you use tube-type sealant please don’t listen to that old wives tale about letting sealant cure and then tightening it a second time. The second step in that process is waiting for the sealant to change consistency. With Bed-It, or a marine sealant, done with countersinking, there is no need to wait for a change in consistency.
While in “theory” this sounds all warm and fuzzy, and can work if done well, the raw reality is this is often a disaster waiting to happen because it’s rarely done well because you’d need to be a psychic to predict the rate of cure.
With a marine Bed-It you tighten in until it stops oozing, then you are done. This may take multiple small tightening events for the excess Bed-It to displace but there is no worry about it becoming hard… Be patient and don’t try this in one step. With tube types there are just too many variables that can change the outcome with the “two-step” method.
I have had my moisture meter & sounding hammer on lots of DIY and “professionally” done “tighten twice” boats and there is huge correlation to “tighten twice” and wet decks, huge. Of course Bed-It eliminates most of these issues.
SILICONE USE – Avoid silicone where you can. There are only two situations where silicone should be used and that is for bedding acrylic dead lights or plastic fittings that are damaged by polysulfides or polyurethanes such as Beckson products. Dow 795 or similar should be used for acrylic ports/dead lights.
Silicone contamination of gelcoat is very, very real. It is nearly impossible to clean and remove silicone from gelcoat. Auto body products intended for metal are not generally safe for gelcoat. To effectively remove silicone from gelcoat requires judicious manual cleaning then wet sanding rinsing the paper frequently to clear it of silicone traces so you don’t grind it deeper into the gelcoat. To test if the silicone is gone spray the area with a misting bottle of water. If the water beads it is not clean.
A customer owned a mid eighties Catalina where the previous owner had used silicone to bed the chain plates. Even after re-bedding they leaked every year for four years straight. He had even resorted to tenacious glues like 3M 5200, still it leaked. He finally called me to discuss it and we simply masked off the surrounding areas with 3M film tape and ground and sanded away the silicone contamination. The chain plates have been dry since, lesson learned the silicone must be COMPLETELY removed before any re-bedding.
If you think you’ve cleaned dry silicone with Acetone, De-Bond or any of the other products folks claim have worked guess again. Over many years I have tried & tested every chemical under the sun to remove silicone contamination and the only thing that works is a thorough manual cleaning and sanding.
We also have many thousands of dollars invested in developing a marine safe (AwlGrip, AwlCraft 2000, Alexseal & gelcoat safe) silicone remover. None have worked well enough for us to sell to you and put our name on! If you want to nearly ensure that the fitting will leak the next time you re-bed then using silicone is a good way to ensure it.
CLEAN, CLEAN, CLEAN – When bedding hardware clean everything. The deck the hardware the bolts the heads of the bolts etc.. Bolts especially still have cutting oils and residue from machining on them so if you want a good seal clean, clean, clean….
Purchase Bed-It Tape
Bed-It Marine Sealant Tape:
Because we were able to test & formulate specifically for a marine bedding application Bed-It Tape has; wider temp ranges, better chemical resistance, less cold-flow/creep, high re-bound memory and better flex-before-failure performance. You will not find a product that performs like Bed-It unless it is genuine Bed-It Tape.
PLEASE HELP!
This site is 100% reader supported. My wife is urging me to shut it down as it just keeps costing us money. My stroke recovery is very costly as is authoring this site and keeping it secure.
Click the DONATE button below if you would like to make a donation via BUY ME A COFFEE.
 .!
.!


Thanks for all this amazing information!! My wife and I just bought a 1976 27′ Catalina. There seem to be some serious leaking issues on the starboard stanchion bases. There seems to be some sort of light grey sealant used. Should I just assume it’s silicone? Also, do you suggest drying things out with a dehumidifier and/fan before re-bedding? Thanks!
I bought a boat, 1982 Cape Dory 36, THEN learned to sail with a few ASA courses. Sailed her from Pensacola to Corpus Christi August/September 2016 with my daughter and an experienced crewman. Your site is my Bible as we slowly move through the boat getting ready to shove off and sail the world. Thanks for all you do.